Hello dear reader , in this tutorial we will be talking about the Arduino Voltage Sensor Module: Measure Battery Level Voltage with. The Arduino Voltage Sensor Module is a voltage sensing module that can be interfaced with an Arduino for measuring DC voltages within 2V – 25V. To read more about the technical details, go to shop.

Components Used for Project Tutorial:
In this practical, we will be using the Following Component.
- Arduino Uno
- Voltage Sensor
- Pb-Acid Battery 12V
- Jumper Wires
- Screwdriver
- DC-DC boast converter (optional)
All these components can be bought on our online store. Alternatively, if you can’t find them, leave us a message on WhatsApp or Telegram group for assistance or in the comment section way down below.
Arduino Voltage Sensor Module: The Principle of Operation

The Voltage sensors are made up of the following input pinouts (VCC and GND) socket – (which can take in Maximum Voltage of 25v). These pinouts are used for measuring the voltage. On the other side, it has 3 pins which contains (VCC, GND and S where S is the Analog pin that can be connected to Arduino).
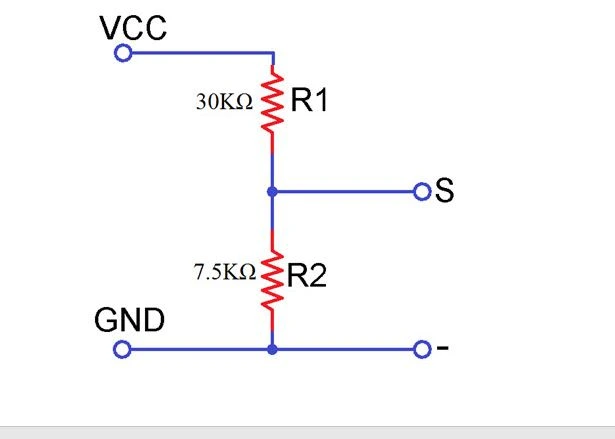
The Arduino Sensor Module contains 2 Resistors 30kΩ and 7.5kΩ that uses the principle voltage divider rule. This is given in the Equation as:

Read up more on this this link. Let us proceed to how to hook this up to an Arduino Uno board and use it to measure DC voltage, rechargeable battery and Solar panel up to 24V DC.
Arduino Voltage Sensor Module Measure battery voltage level
The Circuit Diagram for 3V Battery Measurement
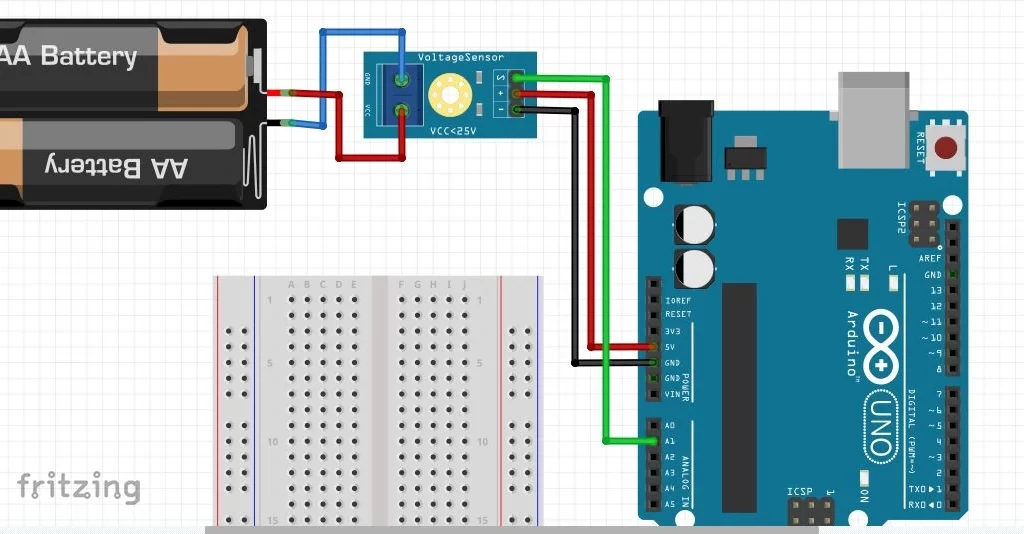
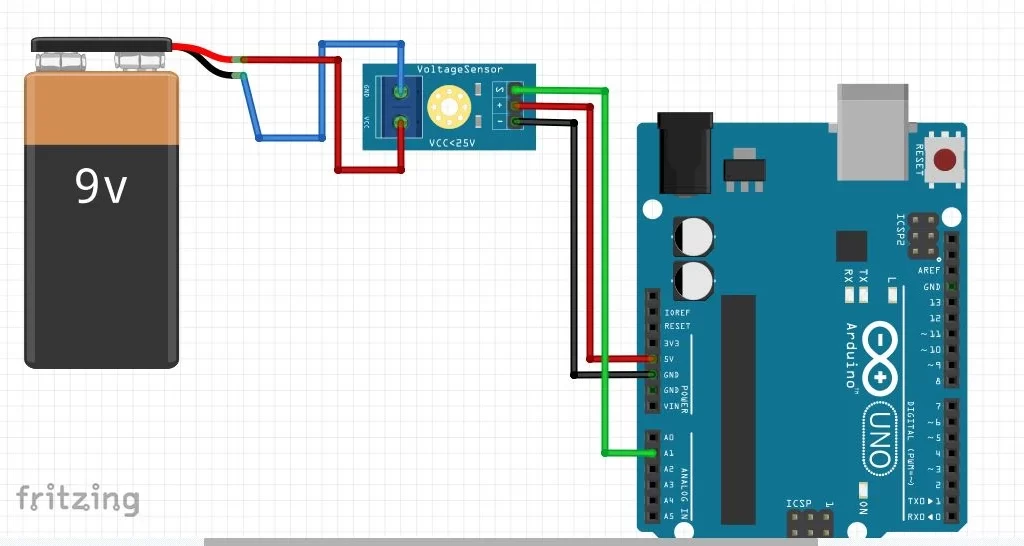
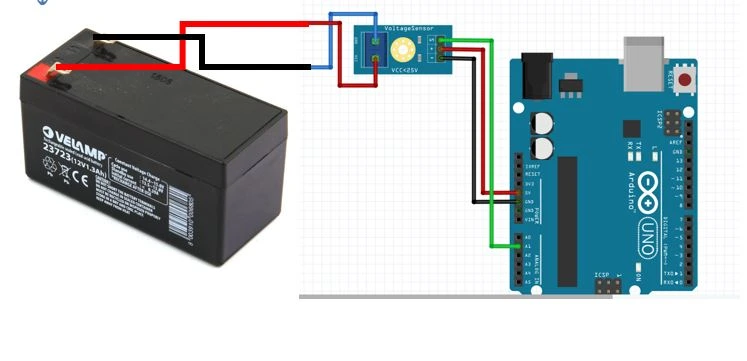
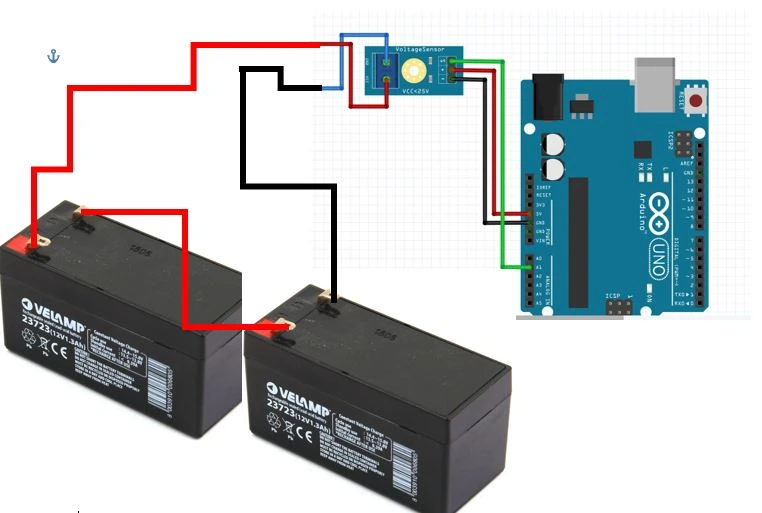
To use the Arduino Voltage Sensor Module with Arduino Uno board, the 3 pins of the Voltage sensors are connected to Arduino Uno as shown above. In which, the VCC is connected to 5V. The GND is also connected to the GND of the Arduino. The “S” which is the Analog pins slot is connected to the Analog part on the Arduino board, which could be connected to (A0, A1, A2, A3 and …). For this project we used the A1 analog pin on the Arduino Uno board. To read the battery level for a 3V battery, the above circuit was used.
The Source Code (Arduino Sketch)
float PVr1 = 30000.0;
float PVr2 = 7500.0;
float batteryVoltSensor, vinBattery;
const int voltagePinBattery = A0;

void setup() {
  Serial.begin(9600);
   dht.begin();
Serial.println("Now in Setup");
Serial.println("Now exiting Setup function");
}

void loop(){
Serial.println("Now in loop function");

  //now doing calculations
  batteryVoltSensor = analogRead(voltagePinBattery);
 batteryVoltSensor = (batteryVoltSensor * 5.0)/1023.0;
 vinBattery = batteryVoltSensor/(PVr2/(PVr1+PVr2));

Serial.println(vinBattery);

Serial.println("Now exiting loop function");
 delay(1000);
}
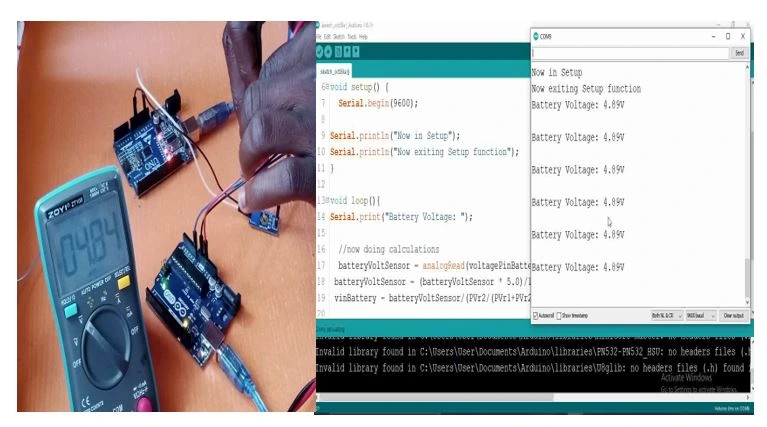
Results

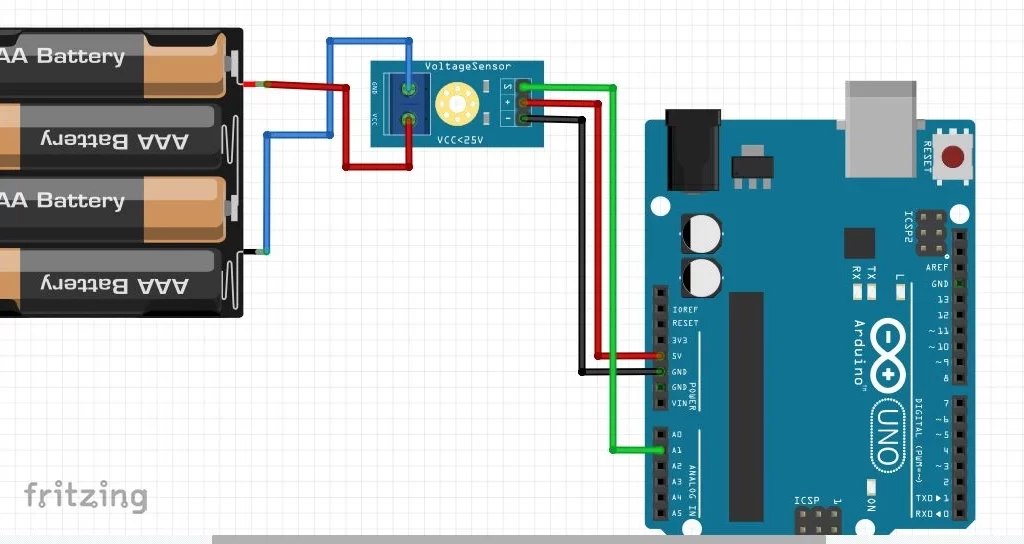
The Circuit Diagram for 5V Battery Measurement
The Source Code (Arduino Sketch)
float PVr1 = 30000.0;
float PVr2 = 7500.0;
float batteryVoltSensor, vinBattery;
const int voltagePinBattery = A0;

void setup() {
  Serial.begin(9600);
   dht.begin();
Serial.println("Now in Setup");
Serial.println("Now exiting Setup function");
}

void loop(){
Serial.println("Now in loop function");

  //now doing calculations
  batteryVoltSensor = analogRead(voltagePinBattery);
 batteryVoltSensor = (batteryVoltSensor * 5.0)/1023.0;
 vinBattery = batteryVoltSensor/(PVr2/(PVr1+PVr2));

Serial.println(vinBattery);

Serial.println("Now exiting loop function");
 delay(1000);
}
Results for 5V Battery Level on Arduino Voltage Sensor Module: Measure Battery Level Voltage
The Circuit Diagram for 9V Battery Measurement
The Source Code (Arduino Sketch)
float PVr1 = 30000.0;
float PVr2 = 7500.0;
float batteryVoltSensor, vinBattery;
const int voltagePinBattery = A0;

void setup() {
  Serial.begin(9600);
   dht.begin();
Serial.println("Now in Setup");
Serial.println("Now exiting Setup function");
}

void loop(){
Serial.println("Now in loop function");

  //now doing calculations
  batteryVoltSensor = analogRead(voltagePinBattery);
 batteryVoltSensor = (batteryVoltSensor * 5.0)/1023.0;
 vinBattery = batteryVoltSensor/(PVr2/(PVr1+PVr2));

Serial.println(vinBattery);

Serial.println("Now exiting loop function");
 delay(1000);
}
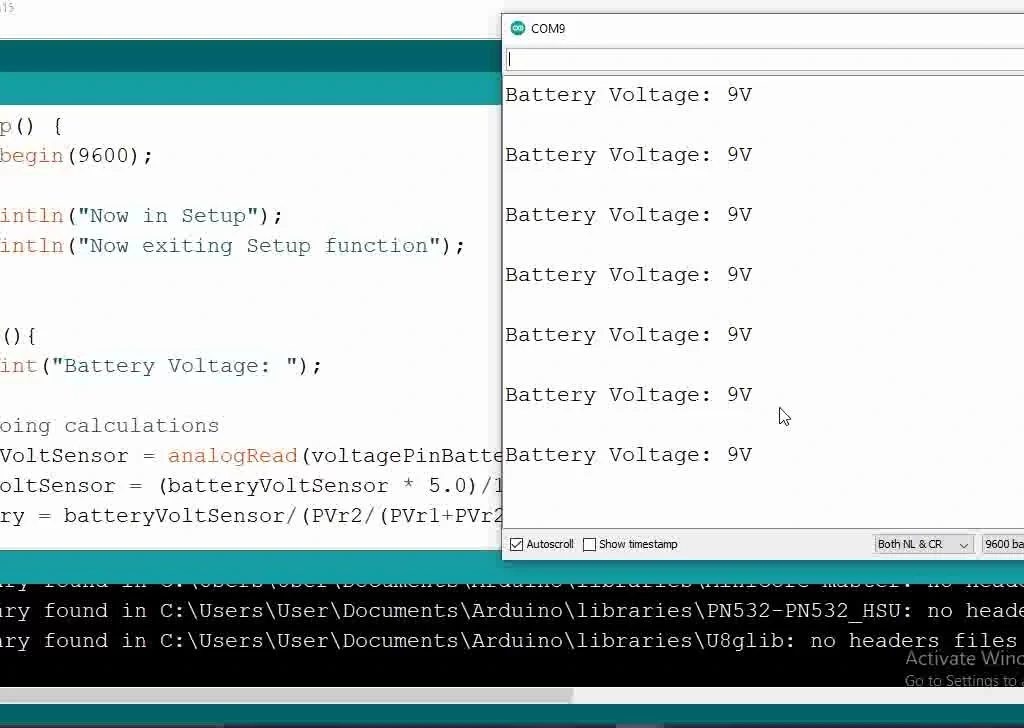
Results for 9V Battery Level on Arduino Voltage Sensor Module: Measure Battery Level Voltage Project
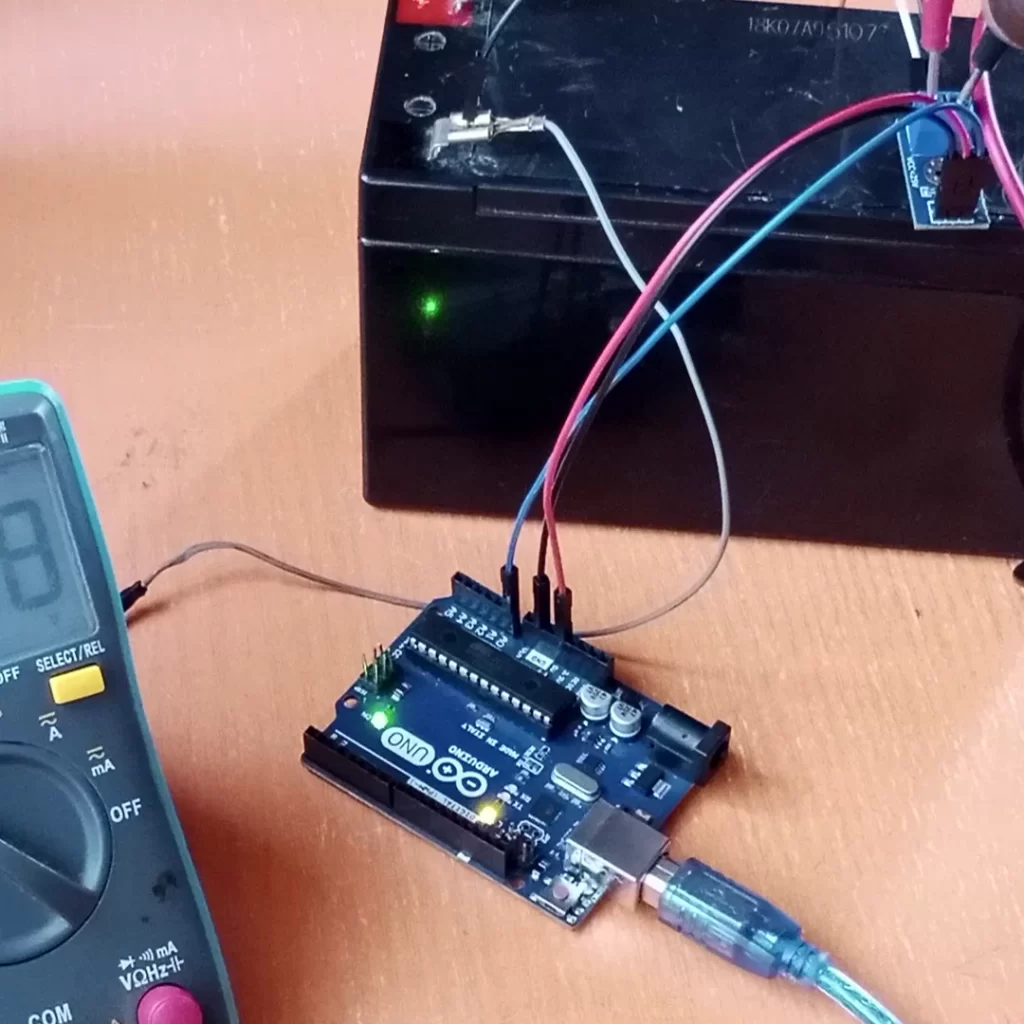
The Circuit Diagram for 12V Battery Measurement
The Source Code (Arduino Sketch)
float PVr1 = 30000.0;
float PVr2 = 7500.0;
float batteryVoltSensor, vinBattery;
const int voltagePinBattery = A0;

void setup() {
  Serial.begin(9600);
   dht.begin();
Serial.println("Now in Setup");
Serial.println("Now exiting Setup function");
}

void loop(){
Serial.println("Now in loop function");

  //now doing calculations
  batteryVoltSensor = analogRead(voltagePinBattery);
 batteryVoltSensor = (batteryVoltSensor * 5.0)/1023.0;
 vinBattery = batteryVoltSensor/(PVr2/(PVr1+PVr2));

Serial.println(vinBattery);

Serial.println("Now exiting loop function");
 delay(1000);
}
Results
The Circuit Diagram for 24V Battery Measurement
The Arduino Sketch
float PVr1 = 30000.0;
float PVr2 = 7500.0;
float batteryVoltSensor, vinBattery;
const int voltagePinBattery = A0;

void setup() {
  Serial.begin(9600);
   dht.begin();
Serial.println("Now in Setup");
Serial.println("Now exiting Setup function");
}

void loop(){
Serial.println("Now in loop function");

  //now doing calculations
  batteryVoltSensor = analogRead(voltagePinBattery);
 batteryVoltSensor = (batteryVoltSensor * 5.0)/1023.0;
 vinBattery = batteryVoltSensor/(PVr2/(PVr1+PVr2));

Serial.println(vinBattery);

Serial.println("Now exiting loop function");
 delay(1000);
}
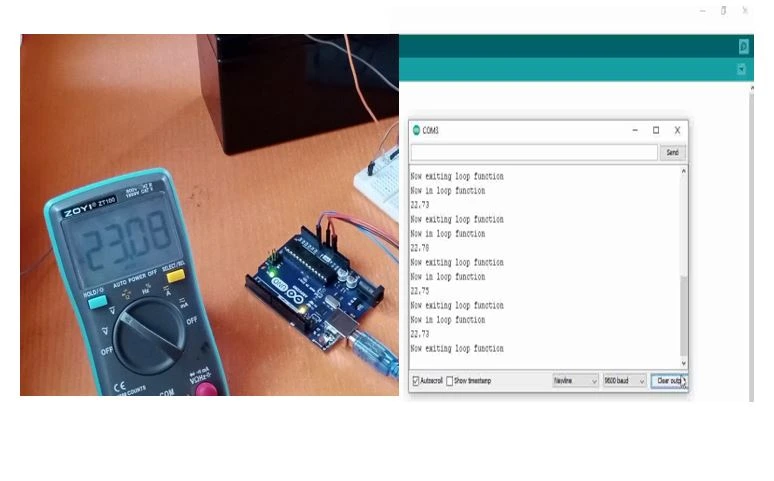
Result for 24V Battery Level on Arduino Voltage Sensor Module: Measure Battery Level Voltage Project
Explanation of Circuit Diagram
The circuit diagram for 3.3V, 5V, 9V, 12V and 24V uses the same source code (Arduino Sketch) given below. The battery level can be increased from 3.3V to 24V. and connected as shown above. Once this was done, connect the Arduino Uno board to the Personal Computer (PC), power up the Arduino IDE and copy the sketch given below.
Conclusion
The serial monitor printing show that we can measure or take the reading of various DC voltage levels of batteries ranging from 3V to 24V via the Analog pins on the Arduino, using the Serial Monitor on the Arduino IDE.
So what do you think about this tutorial? Can you reproduce this? or make further modifications to it? Let us know if you tired it and built you in the comment section below.
Thank you.

