In this project tutorial, we will be using a SIM800L with Arduino to send, receive SMS and also make calls. The design would use the following materials, modules and components as listed below. They all can be ordered from the Smartech online store.
Materials and Components
- SIM800L GSM Module
- SIM Card
- Lipo- Battery – 3.7v. (Charged to about 3.8v to 4.2v)
- Arduino Uno
WHAT IS SIM800L GSM MODULE?
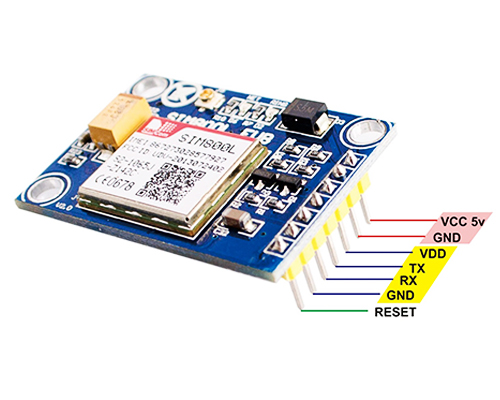
SIM800L is a small cellular module that can transmit GPRS, send and receive SMS, and make and receive voice calls. This is used in a large IoT project. The operating voltage output (output maximum voltage) of SIM800L GSM Modules is approximately 3.7 to 4.2 volts. The SIM800L has about 12 pins, which includes – GND, VCC, RXD , TRD, RST, NET and more.
The SIM800L has a LED on it, the indications of the light are as follows :
- Every 1sec, blink – Although the module is operating, it has not yet established a connection with the cellular network.
- Every 2secs, blink – Your required GPRS data connection has been established.
- Every 3secs, blink – The module is in communication with the cellular network and is capable of sending and receiving voice and SMS.
HOW TO CONNECT SIM800L GSM MODULE WITH ARDUINO UNO
We can connect SIM800L with Arduino Uno in the following ways :
- Software Serial Connection
- Hardware Serial Connection
SOFTWARE SERIAL CONNECTION
Software Serial Connection makes use of digital pins on the Arduino that are connected to the SIM800L’s TXD and RXD. In this project, we will use digital pins 11 and 12, which are connected to the SIM800’s TXD and RXD. The Lipo-battery has a Vcc of 3.7 volts (which should be charged to about 4 to 4.2 volts to power the SIM800L) and all GND, including the Arduino, SIM800L, and Lipo-Battery, should have a common ground (GND).
N.B : Insert the SIM to the SIM800L
CONNECTION MODE :
| ARDUINO | SIM800L GSM MODULE | LIPO BATTERY (3.7v) |
| GND | GND | GND |
| – | VCC | VCC |
| D12 | TXD | – |
| D13 | RXD | – |
HARDWARE SERIAL CONNECTION
Hardware serial connection involves the use of TXD and RXD on the Arduino, which are connected to the TXD and RXD of the SIM800L. In this project, we will use the Arduino’s TXD and RXD pins, which will be connected to the SIM800’s RXD and TXD. The Lipo-battery has a Vcc of 3.7 volts (which should be charged to about 4 to 4.2 volts to power the SIM800L) and all GND, including the Arduino, SIM800L, and Lipo-Battery, should have a common ground (GND).
CONNECTION MODE :
| ARDUINO | SIM800L GSM MODULE | LIPO BATTERY (3.7v) |
| GND | GND | GND |
| – | VCC | VCC |
| RXD | TXD | – |
| TXD | RXD | – |
USING SIM800L GSM MODULE AND ARDUINO TO SEND SMS
The circuit diagram to achieve this feat should be the software serial connection schematic diagram shown above. We recommend this, so that both the program code can be upload simultaneously as the connections are still intact.
Arduino Sketch (Source Code)
#include <SoftwareSerial.h>

//Create software serial object to communicate with SIM800L
SoftwareSerial mySerial(12, 13);

void setup() {
  //Begin serial communication with Arduino and Arduino IDE (Serial Monitor)
  Serial.begin(9600);

  //Begin serial communication with Arduino and SIM800L
  mySerial.begin(9600);

  Serial.println("Initializing...");
  delay(1000);
sendSMS();
delay(22000);
}

void sendSMS(){
  mySerial.println("AT"); //Once the handshake test is successful, it will back to OK
  updateSerial();

  mySerial.println("AT+CMGF=1"); // Configuring TEXT mode
  updateSerial();
  mySerial.println("AT+CMGS=\"+ZZ8xxxxx\"");//change ZZ with country code and xxxxxxxxxxx with phone number to sms
  updateSerial();
  mySerial.print("Hello, can you read me?");// + String(tg)); //text content
  updateSerial();
  mySerial.write(26);
}


void loop() {
  }

void updateSerial(){
  delay(500);
  while (Serial.available())
  {
    mySerial.write(Serial.read());//Forward what Serial received to Software Serial Port
  }
  while(mySerial.available())
  {
    Serial.write(mySerial.read());//Forward what Software Serial received to Serial Port
  }
}
Results
USING SIM800L GSM MODULE AND ARDUINO TO RECEIVE SMS
#include <SoftwareSerial.h>
// Configure software serial port
SoftwareSerial MySerial(12, 13); //tx and rx

// Relay connected to pin 12
const int lampPin1 = 7;
const int lampPin2 = 8;
const int lampPin3 = 9;

String textMessage;

void setup() {
   // Set LED as OUTPUT
  pinMode(lampPin1, OUTPUT);
  pinMode(lampPin2, OUTPUT);
  pinMode(lampPin3, OUTPUT);

  // By default the LED is off
  digitalWrite(lampPin1, LOW);
  digitalWrite(lampPin2, LOW);
  digitalWrite(lampPin3, LOW);

  // Initializing serial commmunication
  Serial.begin(9600);
  MySerial.begin(9600);

  Serial.print("SIM800 ready...");
  delay(1000);
   // AT command to set SIM900 to SMS mode
  MySerial.print("AT+CMGF=1\r");
  delay(100);
  // Set module to send SMS data to serial out upon receipt
  MySerial.print("AT+CNMI=2,2,0,0,0\r");
  delay(100);
}


String controlCommandFxn(){
  //create a Command for SMS

  if(MySerial.available()>0){
    textMessage = MySerial.readString();
    Serial.print(textMessage);
    delay(10);
}
return checkStatus;
}

void loop(){
controlCommandFxn();
}


// Clearing the Buffer in the SMS section
void updateSerial(){
  delay(500);
  while (Serial.available())
  {
    MySerial.write(Serial.read());//Forward what Serial received to Software Serial Port
  }
  while(MySerial.available())
  {
    Serial.write(MySerial.read());//Forward what Software Serial received to Serial Port
  }
}
Results
USING SIM800L GSM MODULE AND ARDUINO TO MAKE CALLS
#include <SoftwareSerial.h>

//Create software serial object to communicate with SIM800L
SoftwareSerial mySerial(12, 13);

void setup() {
  //Begin serial communication with Arduino and Arduino IDE (Serial Monitor)
  Serial.begin(9600);

  //Begin serial communication with Arduino and SIM800L
  mySerial.begin(9600);

  Serial.println("Initializing...");
  delay(1000);
 makeCall();
 delay(5000);
}

void makeCall(){
  mySerial.println("AT"); //Once the handshake test is successful, i t will back to OK
  updateSerial();

  mySerial.println("ATD+ +ZZZxxxxxxx;"); //  change ZZ with country code and xxxxxxxxxxx with phone number to dial
  updateSerial();
  delay(20000); // wait for 20 seconds...
  mySerial.println("ATH"); //hang up
  updateSerial();
}


void loop() {
  }

void updateSerial(){
  delay(500);
  while (Serial.available())
  {
    mySerial.write(Serial.read());//Forward what Serial received to Software Serial Port
  }
  while(mySerial.available())
  {
    Serial.write(mySerial.read());//Forward what Software Serial received to Serial Port
  }
}
Results
Conclusion
So far, we have discussed about using a SIM800L with Arduino to send, receive SMS and also make calls. What do you think about this project tutorial? Can you reproduce it? If you did, we would love to see your work. leave us a comment down below or you can send us pictures or videos of your work on the Telegram group, WhatsApp handle. You can chat us any time. See you on the next tutorial.
Thank you.

