This is an IoT based automatic and user controlled fish pond feeder project design that was the result of Mr. Nwachukwu, former student of Covenant University Ottah. He is the brain behind this work.
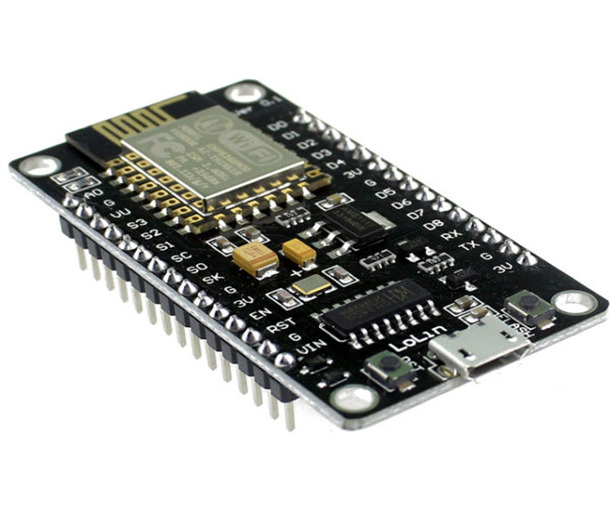
The project design was made using NodeMCU (ESP8266-12E) development board. Its function is to automate the feeding of catfishes in a model pond by allowing the user control such feeding through phone over IoT through the Cayenne mydevices platform. It also check for the when the water is very dirty, drains the water and then pumps in a fresh clean water. It achieves this by knowing the water turbidity.
Please note the following:
Since Cayenne mydevices platform has had an end of life which means it is no longer available. You can also use the following platforms to achieve the same results. Platforms like Blynk.io, Zafron, Remotexy, etc. can still perform the same functions as Cayenne.
Materials/Components for the IoT Based Automated Fish Pond Feeder
| Components | Quantity |
|---|---|
| Servo Motor (SG90) | 2 |
| NodeMCU (ESP8266-12E) | 1 |
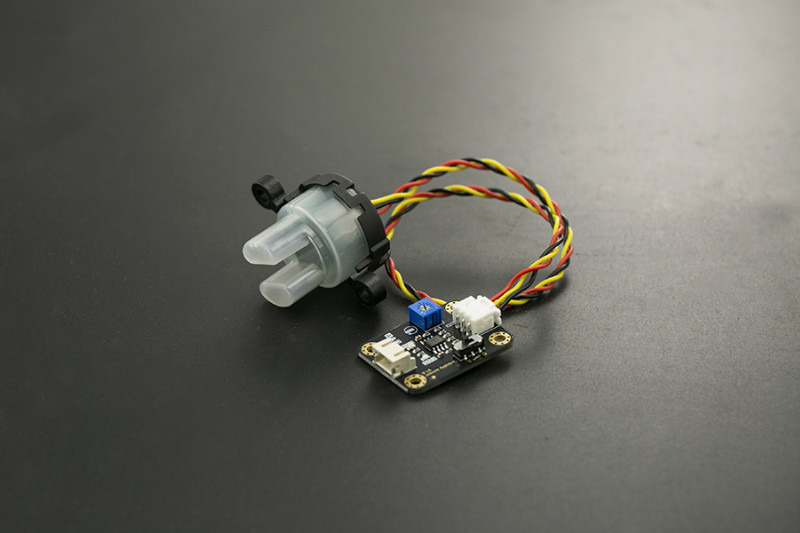
| Turbidity sensor Module | 1 |
| Solenoid Valve | 2 |
| Polyethylene Transparent Storage box (>20Ltrs) | 1 |
| Ultrasonic sensor (HC-SR04) | 1 |
| 2 channel 5V relay | 1 |
| NPN Transistor TIP41C (Optional) | 2 |
| 1k resistors | 2 |
| DC-DC buck converter | 1 |
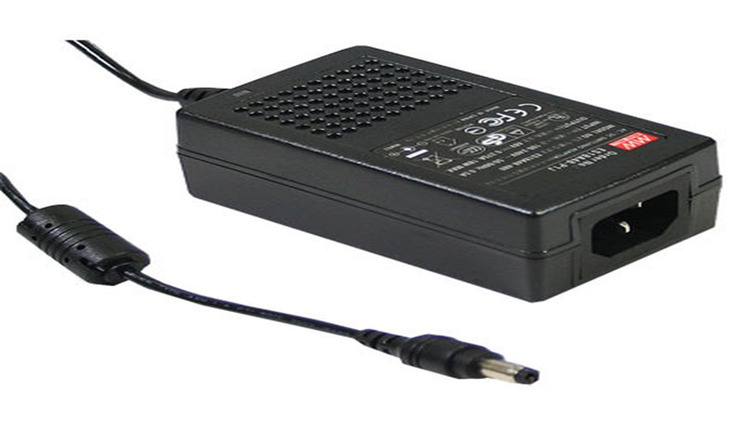
| 5V power supply module | 1 |
The power supply (PS) module is an AC to DC converter rated 5V 3A. This AC to DC Switching Power Supply can supply stable 5V at both 120V AC and 220V Ac. It has a flyback converter and an inductor that can store energy making it intelligent in the case of change in AC input from the load point.
The NodeMCU operates on 3.3V but with input voltage of 7V minimum and this wasn’t a challenge. Since most common flyback converter come on the logic voltage levels. However, it doesn’t have a DC jack so a male to female header was used to connect power to it.
Technical Specifications:
- Microcontroller: Tensilica 32-bit RISC CPU Xtensa LX106
- Operating Voltage: 3.3V
- Input Voltage: 7-12V
- Digital I/O Pins (DIO): 16
- Analog Input Pins (ADC): 1
- UARTs: 1
- SPIs: 1
- I2Cs: 1
- Flash Memory: 4 MB
- SRAM: 64 KB
- Clock Speed: 80 MHz
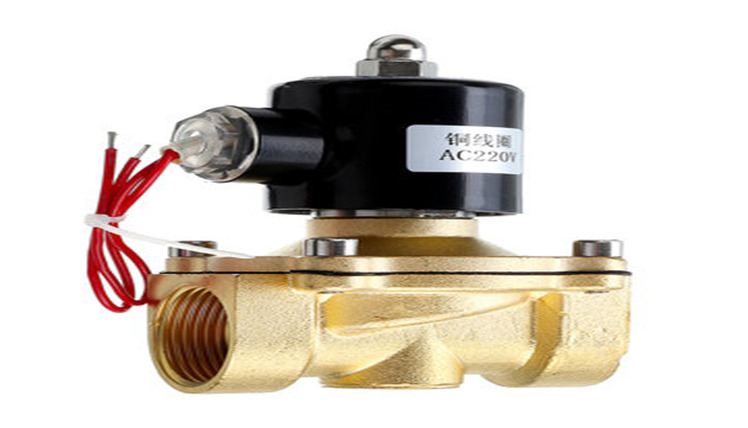
A solenoid valve is an electrically controlled valve. The valve features a solenoid, which is an electric coil with a movable ferromagnetic core (plunger) in its center. In the rest position, the plunger closes off a small orifice. An electric current through the coil creates a magnetic field. The magnetic field exerts an upwards force on the plunger opening the orifice. This is the basic principle that is used to open and close solenoid valves.
IoT Based Automated Fish Pond Feeder: The Circuit Diagram
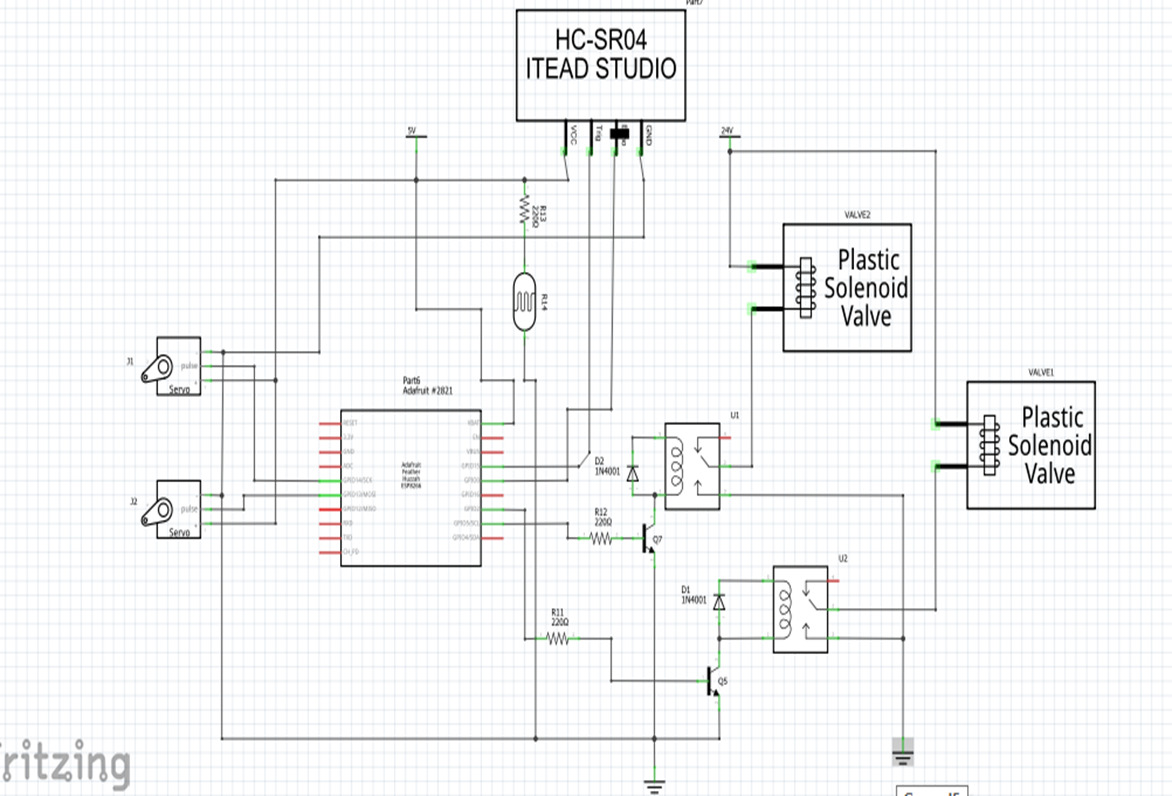
Explanation for Circuit diagram for IoT based Fish pond feeder
The circuit above described the connection of the control and sensing parts of the project design. We used the ESP-12E to control the actuators like the 2 channel relay modules. In the schematic diagram above, this is represented with a common emitter transistor diagram with flyback diodes that is used to trigger the relays. We connected the two servo motors signal pins to GPIO pin 3 (D3) and GPIO 4 (D4) on the NodeMCU respectively. The ultrasonic sensor power pinout were connected to 5V power rails of the Vcc and Gnd pin. Whereas the Echo and Trig pins were connected to the D7 and D8 on the NodeMCU.
The schematic diagram shown above replaced the turbidity sensor module with a light dependent resistor (LDR) and a low wattage laser light. When the laser light is shown from one side of the plastic storage box containing water, the captured light on the LDR can be used to determine if the water is clear (still clean) or dirty.
The reason for the replacement is when working with the DFrobots Turbidity sensor, we found out that it doesn’t work. The turbidity sensor failed to work as expected. All readings observed with it was incoherent and hence we decommissioned it and made out sensor using the LDR and 10k resistor connected according to the circuit diagram.
Coupling and Casing The Project Design
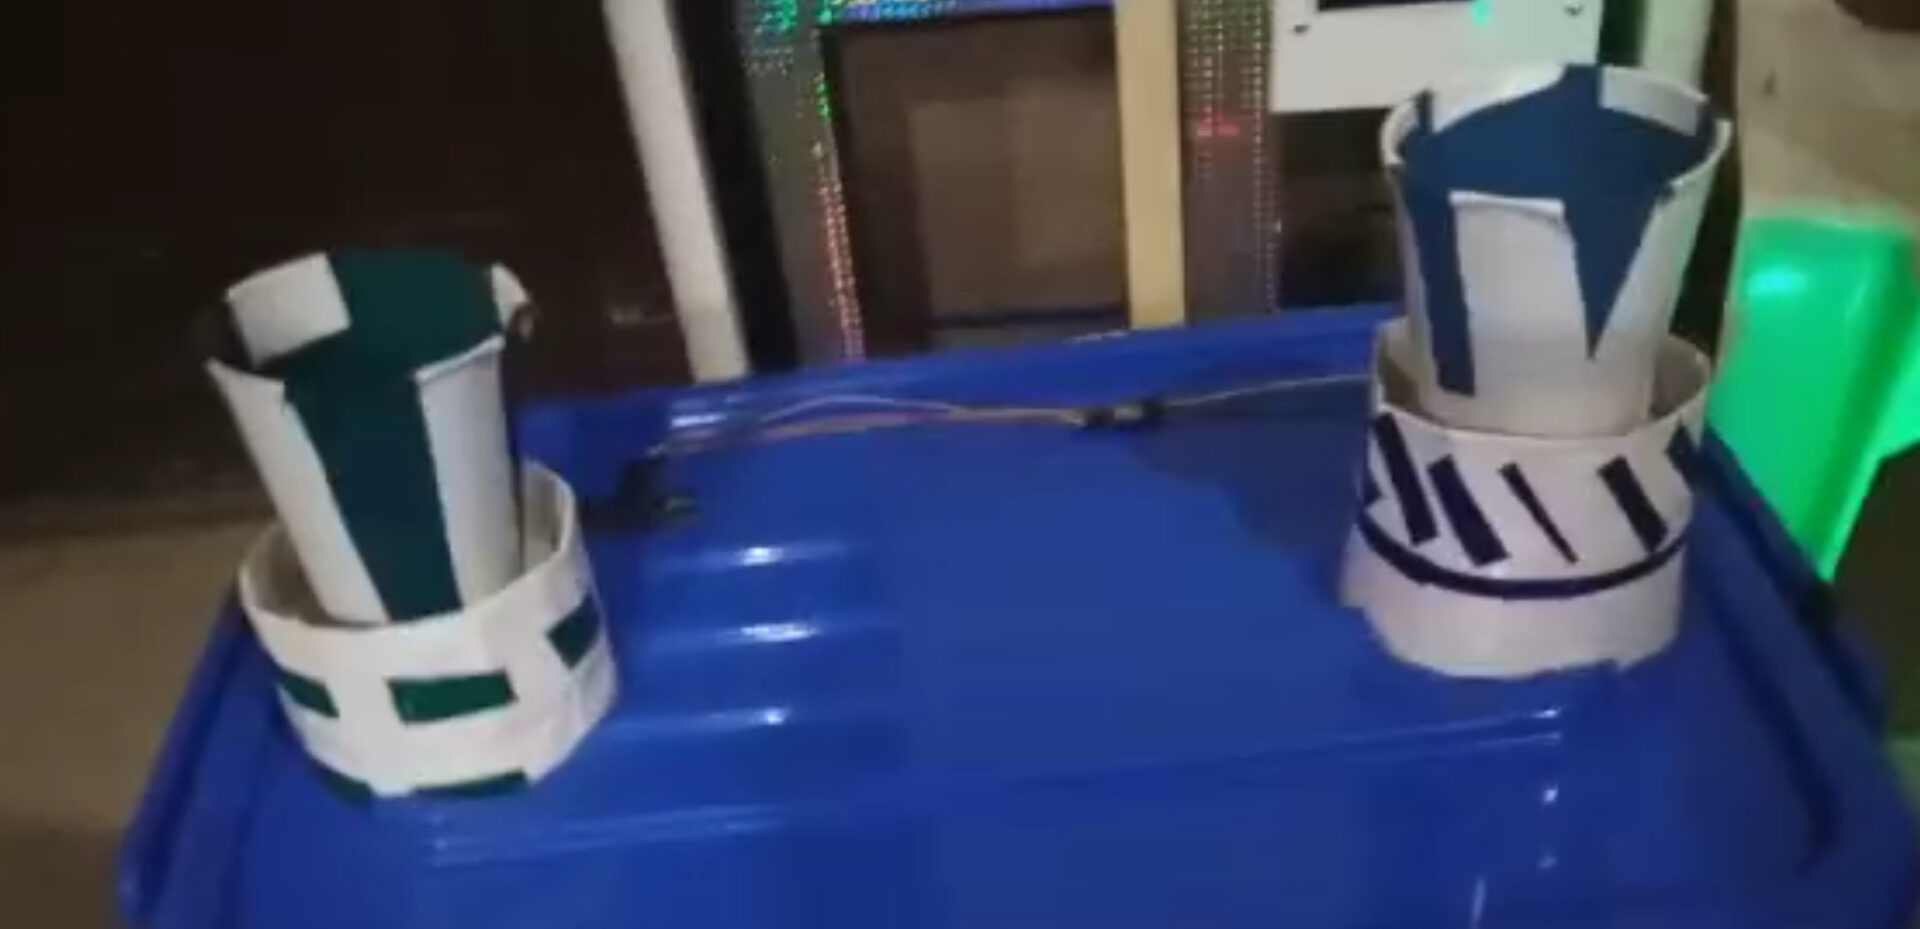
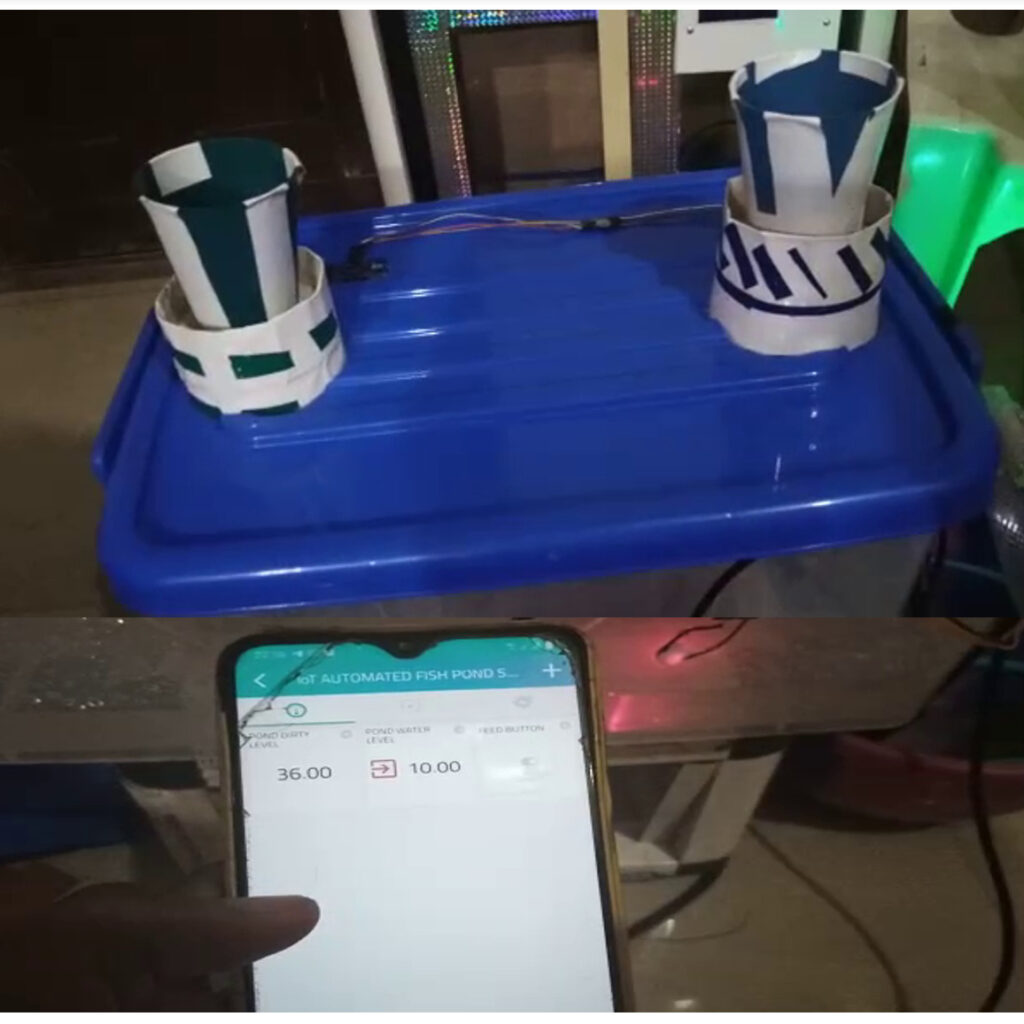
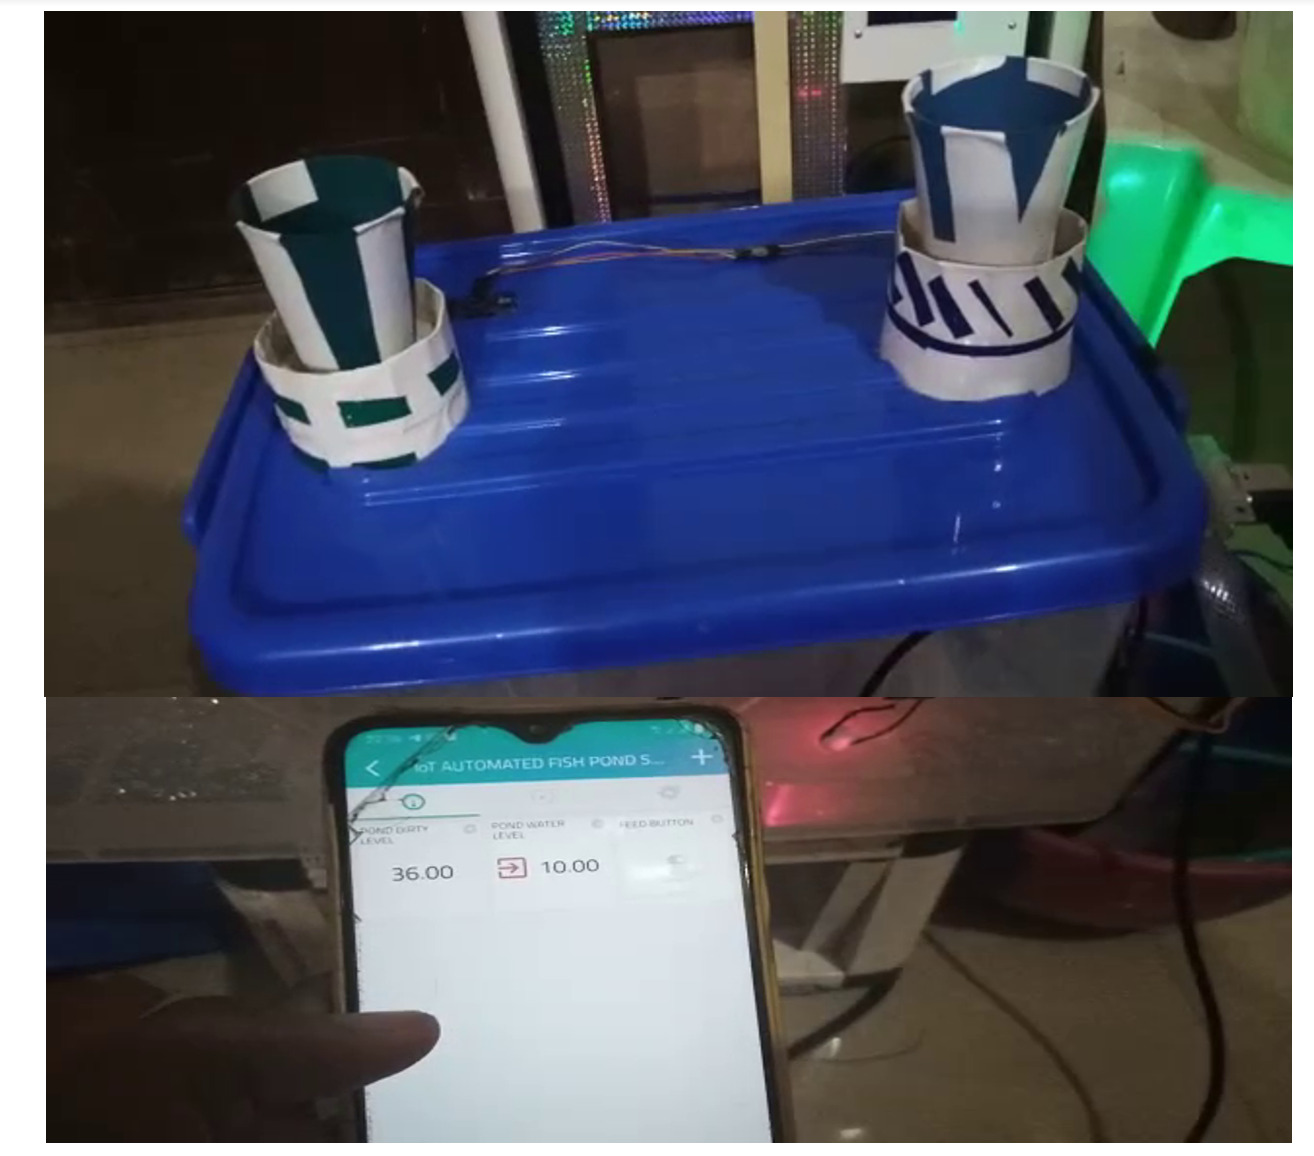
To work on the feeding mechanism for this IOT based fish pond feeder, we had to design the a feeding storage and chamber that made use of two cups that were placed bottom-to-bottom as shown above. Their bottoms were cut to have an overlapping hole. Such that the servo motors can control the rotation of the top cups. This way, when the cups are rotated to a certain angle, there is an exposed hole that would allow fish feeds to fall pass through them and drop into the water that is modelled to be the pond in the plastic container.
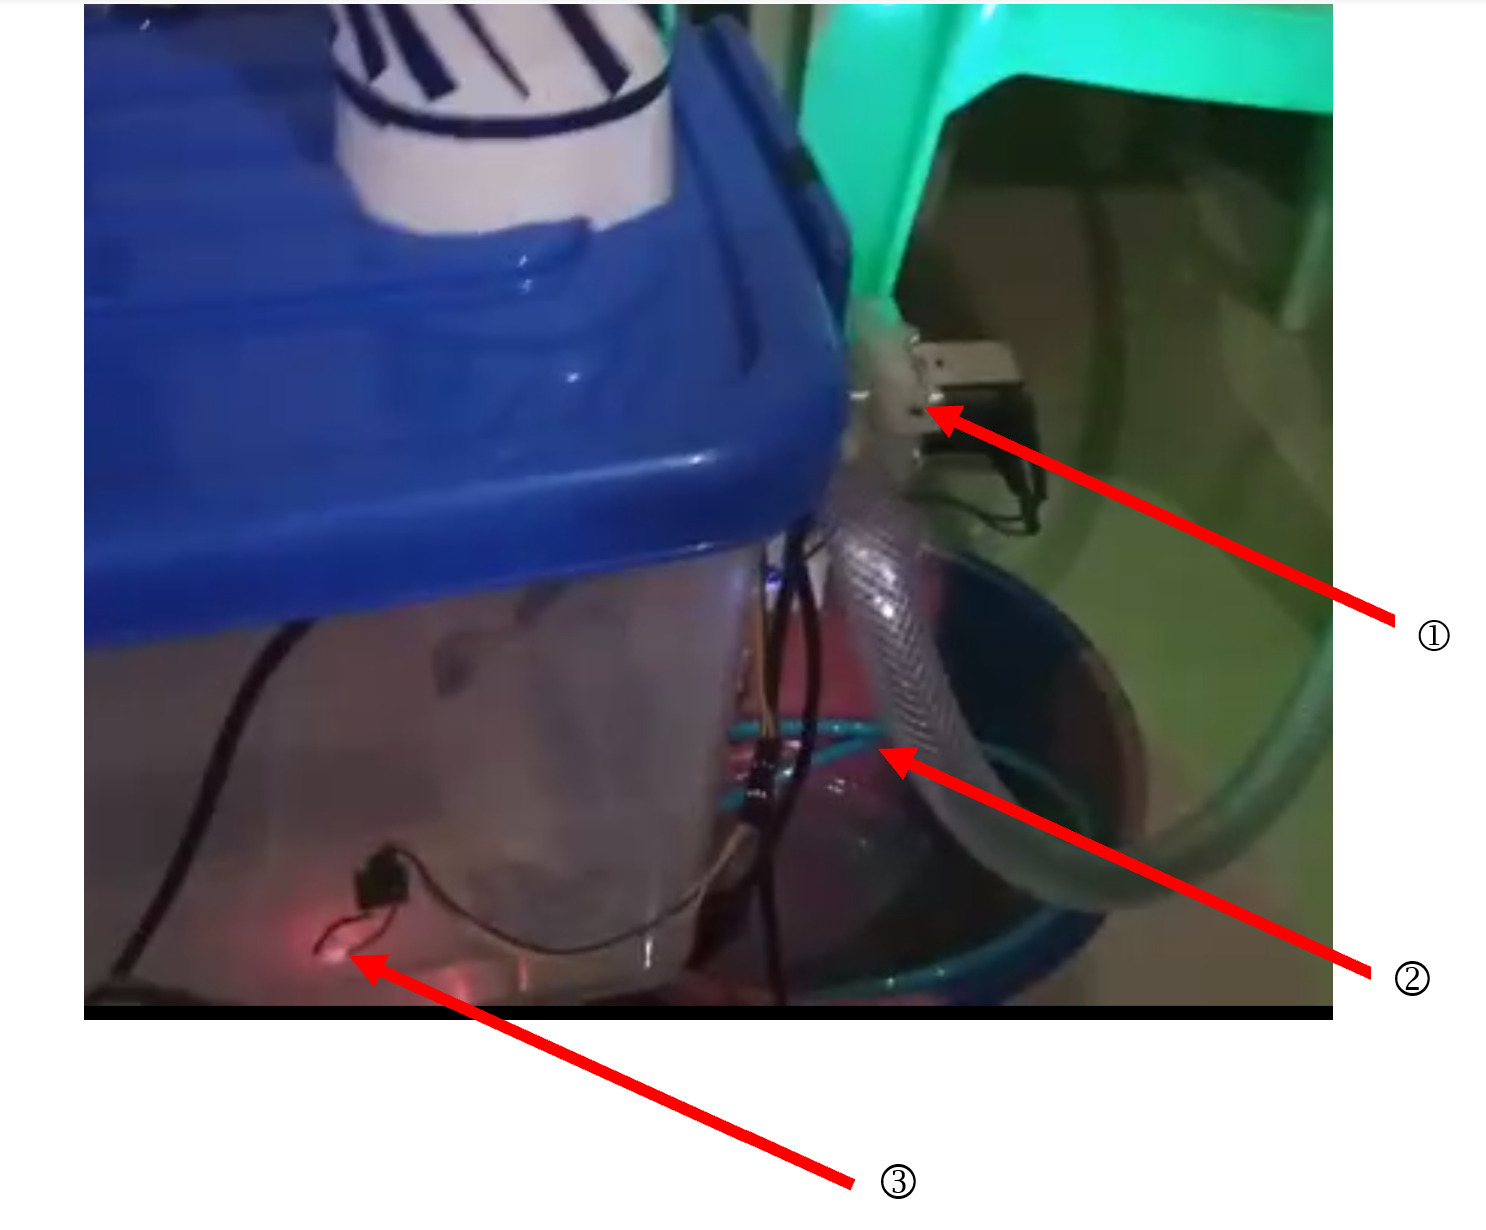
The picture above shows how the solenoid valves *at point 1 and point 2) where they are connected on the model of the fish pond. There are two solenoid valves were connected to the plastic storage container in such a way the top solenoid valve was responsible for introducing clean water into the model pond. The Ultrasonic sensor helps us to know when the water level is at the maximum expected full height and which will signal the microcontroller to stop supplying clean water into the model pond. Whereas the bottom was connected another solenoid valve that was responsible for draining the dirty water.
The point marked as three (3) is the turbidity sensor that was made from the LDR and 10k resistor that captures the laser diode light that is shot from the other side of the transparent polyethylene storage container. This is how we captured all the given parameters needed for the IoT based fish pond feeder.
The IoT Dashboard
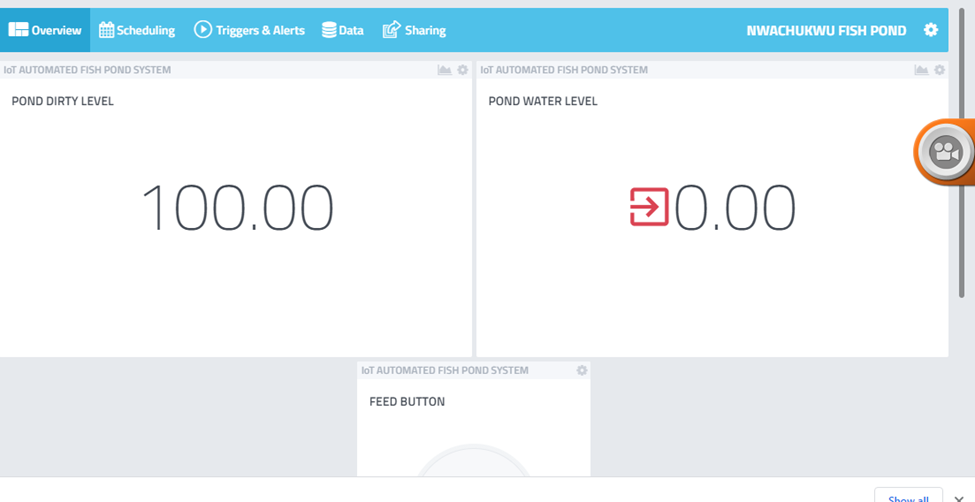
The IoT dashboard was designed on Cayenne Mydevices. It has two display widget that displayed the pond water level and the pond turbidity level. And it has a control pushbutton switch that you can use to feed the fish in the model pond when you click on it. The Turbidity Level widget was labelled “Pond dirty water level” and it is calibrated in percentage with 100% meaning that the water is very dirty and needs to be drained.
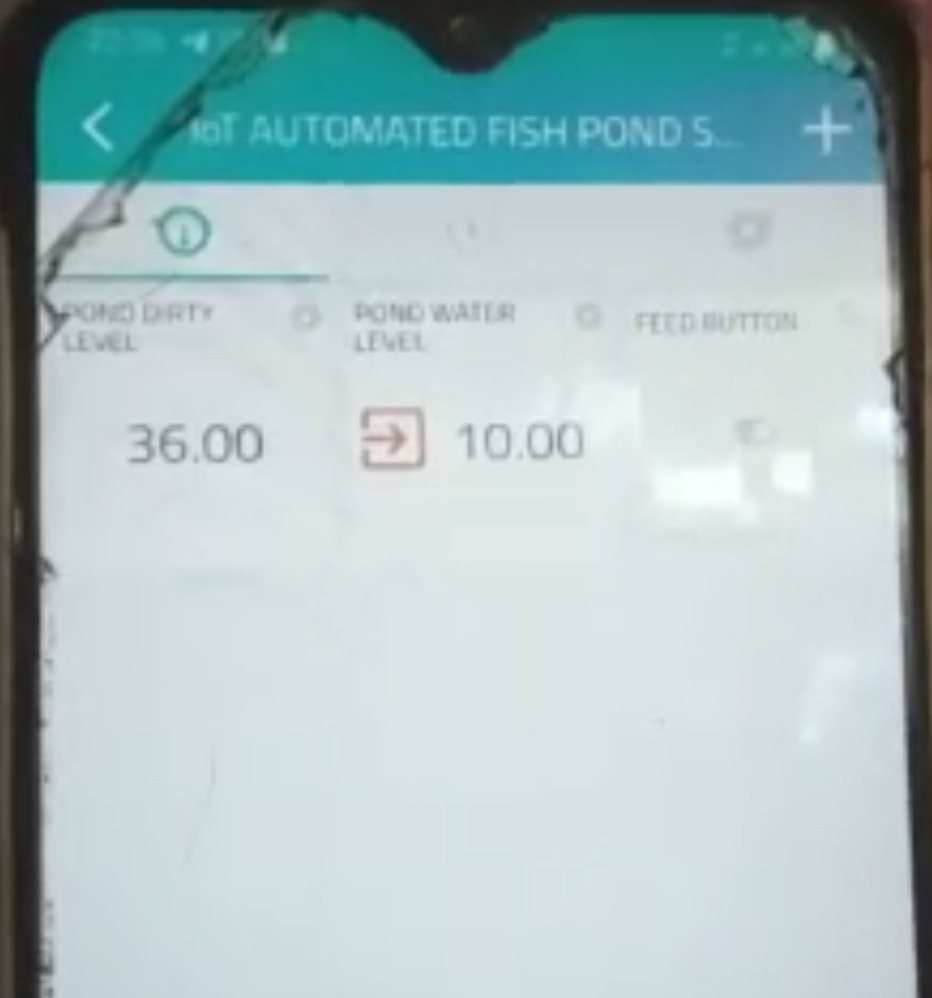
The mobile view of this dashboard is shown above, The level of water in the pond model is also calibrated in percentage. The switch button is turned off for feeding at the moment and only the water draining process is being carried out.
The Arduino Source Code for the IoT Based Automatic Fish Bond Feeder
//#define CAYENNE_DEBUG
#define CAYENNE_PRINT Serial
#include <CayenneMQTTESP8266.h>
#include <Servo.h>

// WiFi network info.
char ssid[] = "Anc";
char wifiPassword[] = "ANCSUcre";

// Cayenne authentication info. This should be obtained from the Cayenne Dashboard.
char username[] = "00d420d0-cfbe-11eb-8779-7d56e82df461";
char password[] = "b72281be1c7d94c9d604963032cabbd20cedbcbd";
char clientID[] = "3fccfdf0-d524-11eb-8779-7d56e82df461";

#define Turb_CHANNEL 1
#define waterVolume_CHANNEL 2

#define VIRTUAL_CHANNEL 3
#define ACTUATOR_PIN D4

#define PIN_DRAINPUMP D6
#define PIN_FILLPUMP D5
int tg, level;

 int pos = 0;
Servo myservo, myservo1;
const int trigPin = D7; // Trigger Pin of Ultrasonic Sensor
const int echoPin = D8; // Echo Pin of Ultrasonic Sensor
long duration;
float distance;

//define the turbidity sensor pin
#define SENSOR A0

//buzzer variables
const int ledPinRed =  D2;
int ledStateRed = 0;

const int ledPinBlue =  D1;
int ledStateBlue = 0;

const int ledPinGreen =  D0;
int ledStateGreen = 0;

unsigned long previousMillis = 0;
const long interval = 1000;

void setup() {
  Serial.begin(9600);
  Cayenne.begin(username, password, clientID, ssid, wifiPassword);

//define the inputs and outputs
pinMode(ledPinRed, OUTPUT);
pinMode(ledPinBlue, OUTPUT);
pinMode(ledPinGreen, OUTPUT);
pinMode(SENSOR,INPUT);
pinMode(trigPin, OUTPUT);
pinMode(echoPin, INPUT);
pinMode (PIN_FILLPUMP, OUTPUT);
pinMode (PIN_DRAINPUMP, OUTPUT);
pinMode(ACTUATOR_PIN, OUTPUT);

myservo1.attach(D4);
myservo.attach(D3);

digitalWrite(PIN_FILLPUMP, LOW);
digitalWrite(PIN_DRAINPUMP, LOW);

myservo.write(50);
myservo1.write(50);

}


void ledGreen(){
  unsigned long currentMillis = millis();
if (currentMillis - previousMillis >= interval) {
     previousMillis = currentMillis;
    if (ledStateGreen == LOW) {
      ledStateGreen = HIGH;
    } else {
      ledStateGreen = LOW;
    }

    // set the LED with the ledState of the variable:
    digitalWrite(ledPinGreen, ledStateGreen);
  }
}

void ledBlue(){
  unsigned long currentMillis = millis();
if (currentMillis - previousMillis >= interval) {
     previousMillis = currentMillis;
    if (ledStateBlue == LOW) {
      ledStateBlue = HIGH;
      ledStateBlue = LOW;
    } else {
    }

    // set the LED with the ledState of the variable:
    digitalWrite(ledPinBlue, ledStateBlue);
  }
}

void ledRed(){
  unsigned long currentMillis = millis();
if (currentMillis - previousMillis >= interval) {
     previousMillis = currentMillis;
    if (ledStateRed == LOW) {
      ledStateRed = HIGH;
    } else {
      ledStateRed = LOW;
    }

    // set the LED with the ledState of the variable:
    digitalWrite(ledPinRed, ledStateRed);
  }
}


void loop() {
  Cayenne.loop();

 digitalWrite(trigPin, LOW);
delayMicroseconds(2);
digitalWrite(trigPin, HIGH);
delayMicroseconds(10);
digitalWrite(trigPin, LOW);
duration = pulseIn(echoPin, HIGH);
distance = duration*0.034/2.0;
level = (int)(distance);
level = map(level, 2, 22, 100, 0);
level = constrain(level, 0, 100);

tg = analogRead(SENSOR);
tg = map(tg, 0, 1023, 0, 100);
tg = constrain(tg, 0, 100);

//Serial.println("water level: " + String(level)+ " turb: " + String(tg));


if((tg >= 70.00) && (level >= 50)){
   digitalWrite(PIN_DRAINPUMP, HIGH);
   //Serial.println("DRAIN PUMP ON");
   ledRed();
   digitalWrite(ledPinBlue, HIGH);
  digitalWrite(ledPinGreen, HIGH);
  }

  if(level == 0){
digitalWrite(PIN_DRAINPUMP, LOW);
digitalWrite(PIN_FILLPUMP, HIGH);
//Serial.println("FILL PUMP ON");
ledBlue();

}

if(level >= 53){
 digitalWrite(PIN_DRAINPUMP, LOW);
digitalWrite(PIN_FILLPUMP, LOW);
//Serial.println("ALL PUMPS OFF");
}

 else{
  ledGreen();
  digitalWrite(ledPinRed, HIGH);
  digitalWrite(ledPinBlue, HIGH);
}

}

// Default function for sending sensor data at intervals to Cayenne.
// You can also use functions for specific channels, e.g CAYENNE_OUT(1) for sending channel 1 data.
CAYENNE_OUT_DEFAULT()
{
  Cayenne.virtualWrite(Turb_CHANNEL, tg);
  Cayenne.virtualWrite(waterVolume_CHANNEL, level);
//  Cayenne.virtualWrite(0, millis());
  // Some examples of other functions you can use to send data.
  //Cayenne.celsiusWrite(1, 22.0);
  //Cayenne.luxWrite(2, 700);
  //Cayenne.virtualWrite(3, 50, TYPE_PROXIMITY, UNIT_CENTIMETER);
}


CAYENNE_IN(VIRTUAL_CHANNEL){
  CAYENNE_LOG("Channel %u, value %s", request.channel, getValue.asString());
  int value = getValue.asInt();
  Serial.println(value);
  digitalWrite(ACTUATOR_PIN, value);

  if( value == 1){
   for(pos = 30; pos <= 180; pos += 1) {
    myservo.write(pos);
    myservo1.write(pos);
    delay(15);
    }
}
if(value != 1){
 for(pos = 180; pos >= 30; pos -= 1) {
    myservo.write(pos);
    myservo1.write(pos);
    delay(15);
  }
  }

  }
Explanation of the Source Code
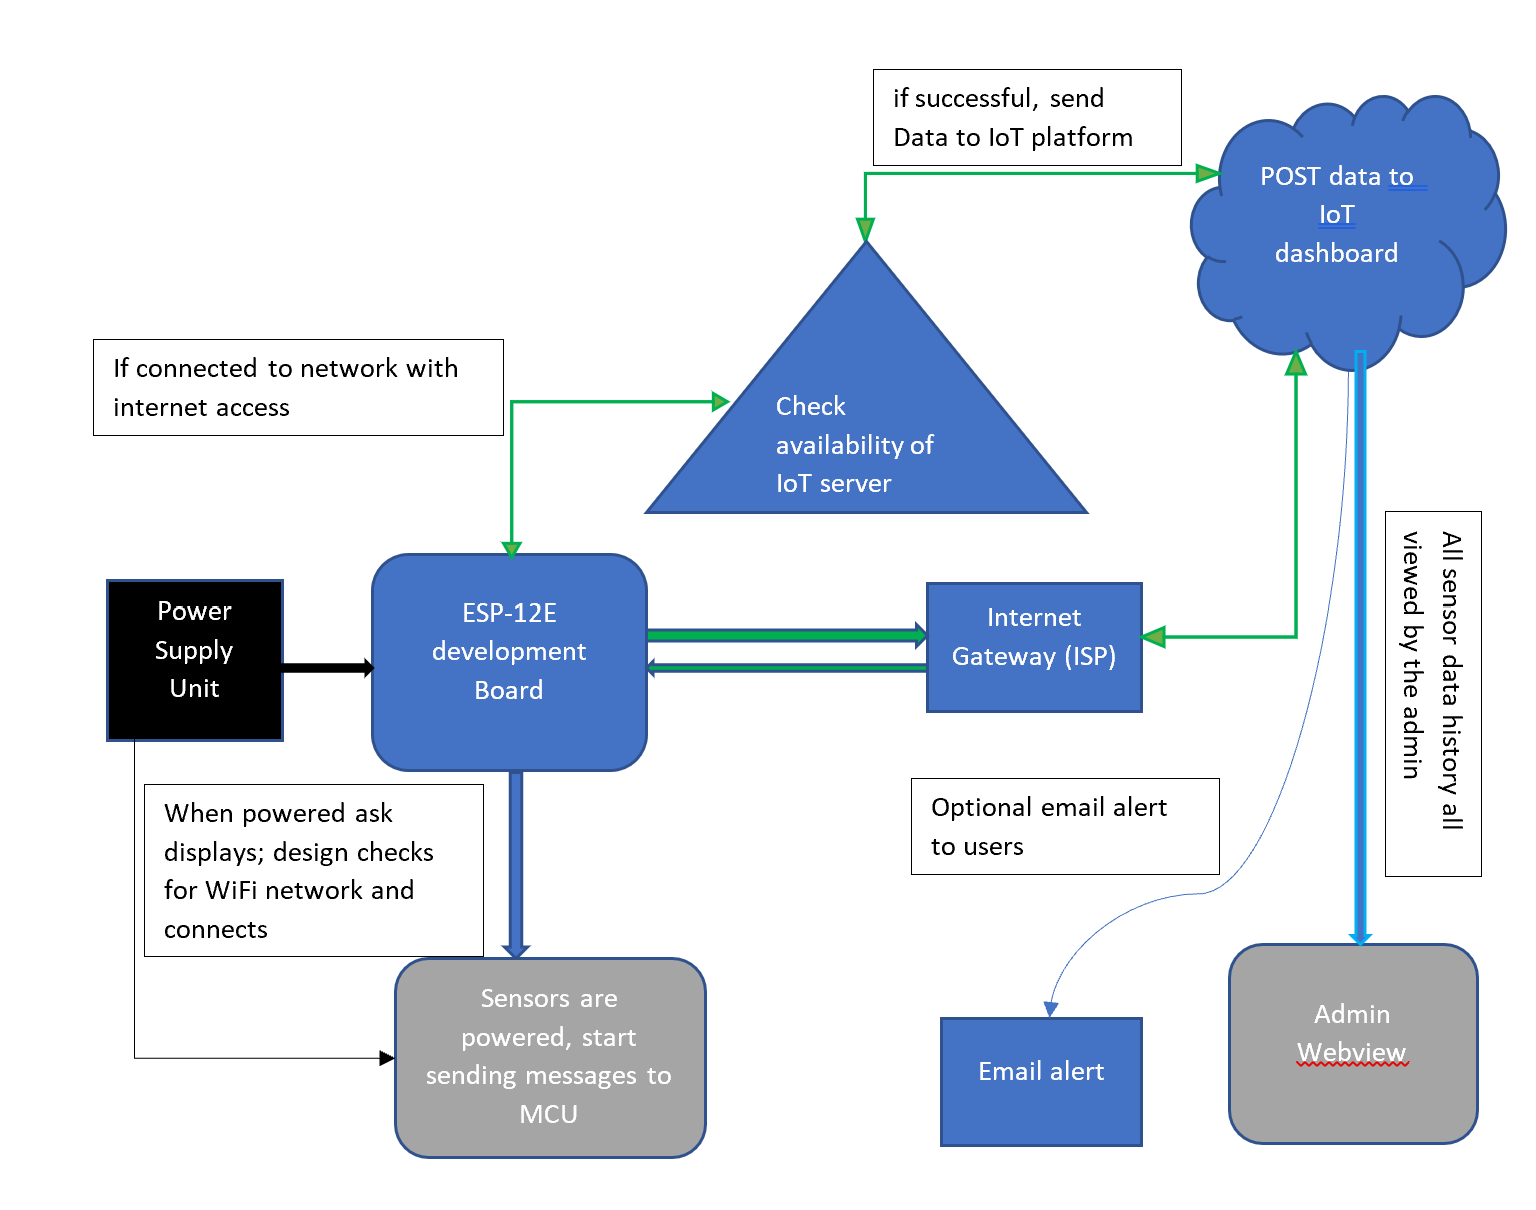
The block diagram shows the flow process of the design. This basically how the program code works once it is compiled and burnt onto the ESP-12E dev board. We included an email alert from the Cayenne dashboard to notify us about when some the things we wanted to noticed by the sensors was noticed.
Read More Posts Like This
- USING SIM800L GSM MODULE AND ARDUINO TO SEND SMS AND MAKE CALLS.
- How to Design Arduino Social Distancing Bar Project
- How to Design Arduino Face And Face Mask Recognition Project
- IoT Based Manhole Lid Detection With Surveillance Camera
Results and Testing
The IoT based automatic fish pond feeder has the capacity to check when there isn’t enough water in the pond and opens up the first solenoid valve that allows water through the storage tank to start pumping cleaning water into the pond model. Once this reaches its full point, it will close the valve. This and more is demonstrated in the video above.
Conclusion
We have design and constructed an IoT based automatic fish pond feeder that can automatically drain dirty fish pond water and supply fresh water to the pond. It can noticed when the pond is filled with clean water and stop pumping in water and it can autodetect when the water inside the pond is dirty and notify the owner or user via email alerts. The whole parameters are monitored and feeding can be controlled via the IoT dashboard seamlessly. Let us know if you were to recreate this project design in the comment section below.
FAQ
1. How big should my fish pond be?
The size of your fish pond will depend on several factors, including the number and type of fish you want to keep, the amount of space you have available, and your budget. A general rule of thumb is to allow at least 10 gallons of water per fish, plus additional space for plants and decorations.
2. What type of fish should I choose?
There are many different types of fish suitable for ponds, each with its own unique requirements. Some popular choices include goldfish, koi, guppies, and mollies. It’s important to research the specific needs of the fish you’re interested in before adding them to your pond.
3. Do I need a filter for my pond?
Yes, a filter is essential for keeping your pond clean and healthy. The filter will remove waste products from the water and help to prevent algae growth. There are several different types of filters available, so you can choose one that best fits your needs and budget.
4. How often should I clean my pond?
The frequency of cleaning your pond will depend on its size, the number of fish you have, and the amount of debris that accumulates. Typically, you’ll need to clean your pond at least once a month. This may involve removing debris from the surface of the water, cleaning the filter, and performing a partial water change.
5. How do I keep my fish pond healthy?
There are several things you can do to keep your fish pond healthy, including:
- Maintaining proper water quality: This includes testing the pH and ammonia levels of your water regularly and adjusting them as needed.
- Providing adequate oxygen: Plants and a waterfall or fountain can help to oxygenate your pond.
- Controlling algae growth: Algae can be unsightly and harmful to your fish. You can control algae growth by adding plants to your pond and keeping the water clean.
- Feeding your fish properly: Feed your fish a high-quality diet and only feed them what they can eat in a few minutes.
- Keeping the pond free of predators: Predators such as birds, raccoons, and snakes can eat your fish. You can help to protect your fish by installing a fence around your pond.
6. What are some common problems with fish ponds?
Some common problems with fish ponds include:
- Algae growth: This can be a problem if your pond is not adequately filtered and maintained.
- Fish diseases: There are a number of diseases that can affect fish in ponds. It’s important to quarantine new fish before adding them to your pond to help prevent the spread of disease.
- Predators: Predators such as birds, raccoons, and snakes can eat your fish.
- Water quality problems: This can be caused by a variety of factors, such as inadequate filtration, overstocking, or improper feeding.
7. Where can I get more information about fish ponds?
There are many resources available where you can learn more about fish ponds, including books, websites, and online forums. You can also talk to your local fish store or pond expert for advice.
Here are some additional tips for keeping your fish pond healthy:
- Start small: If you’re new to fish ponds, it’s best to start small and add more fish and plants gradually.
- Do your research: Before adding any fish or plants to your pond, be sure to research their specific needs.
- Be patient: It takes time and effort to maintain a healthy fish pond. Be patient and don’t get discouraged if you encounter problems along the way.

