This blog post details the design and construction of a uniaxial solar tracker that would follow the direction of the sun, ensuring maximum harvest of the solar panel. Most homes face the problem of peak harvest of sunlight. This project design would help reduce this challenge.
Components Needed For Solar Tracker Project Design
| ITEM DESCRIPTION | QUANTITY |
| VOLTAGE REGULATOR | 1 |
| LDR | 2 |
| TRANSFORMER | 1 |
| LEDs | 1 |
| RESISTORS, 10K and 1K | 6 |
| ATMEGA328P | 1 |
| CONNECTING WIRES | 3YARD |
| CASING | 1 |
| VERO BOARD | 2 |
| Bridge Rectifier | 1 |
| 16MHz Crystal Oscillator | 1 |
| 1000uF electrolytic Capacitor | 3 |
| SOLDERING IRON | 1 |
| BREAD BOARD | 3 |
| CAPACITOR | 4 |
| 1A FUSE | 1 |
| VARISTOR | 1 |
| 0.01uF Capacitor | 1 |
| Pushbutton | 1 |
| Servo Motor MG990 | 1 |
| 22pF Capacitor | 2 |
| MISCELLANEOUS | 5 |
Solar Tracker Robot: The Circuit Diagram
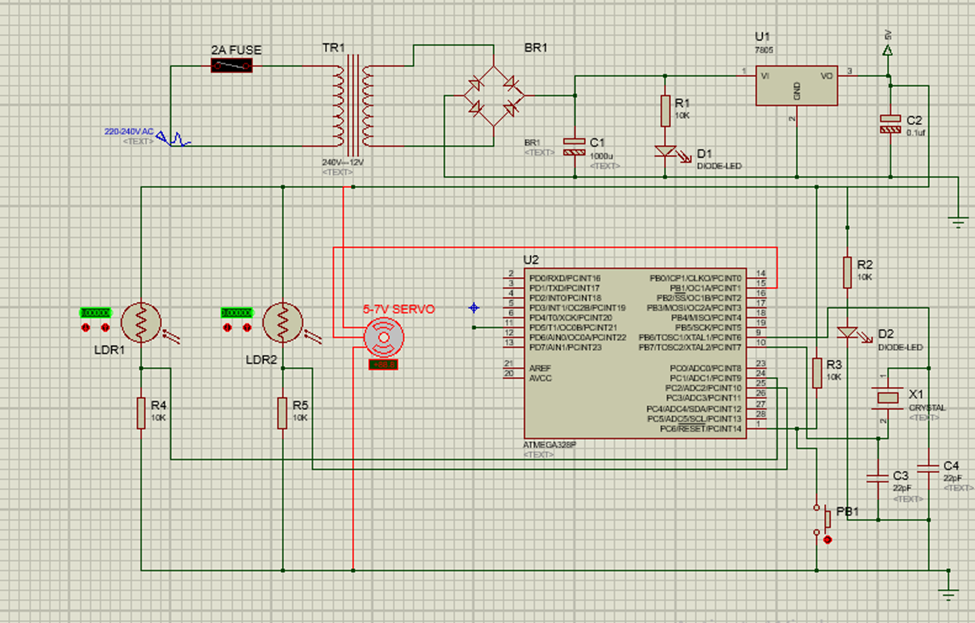
Explanation for Circuit Diagram of Solar Tracker Robot
The schematic diagram shown above was done with Proteus IDE, It used two Light Dependent Resistors (LDRs) to sense and measure the average amount of sun intensity, hence move the solar panel to the direction of the sun. The LDR is connected in series with a 10K resistor. This forms a voltage divider and we can use the program code to do a bit of calculations to determine where best to position the solar panel.
The project design doesn’t use an Arduino board but a standalone version. The brain of the project is the Atmega328P IC. It is powered by the 5V power supply circuit that is shown above. This is a linear power supply circuit diagram; one can also opt for an already made power supply unit.
The Arduino Source Code
#include <Servo.h>

Servo tracker;  // create servo object to control a servo
int eastLDRPin = 0;  //Assign analogue pins
int westLDRPin = 1;
int eastLDR = 0;   //Create variables for the east and west sensor values
int westLDR = 0;
int error = 0;
int calibration = 10;  //Calibration offset to set error to zero when both sensors receive an equal amount of light
int trackerPos = 90;    //Create a variable to store the servo position

void setup()
{
  tracker.attach(9);  // attaches the servo on pin 11 to the servo object
  Serial.begin(9600);
   tracker.write(90);
   delay(5000);
}


void loop()
{
  eastLDR = calibration + analogRead(eastLDRPin);    //Read the value of each of the east and west sensors
  westLDR = analogRead(westLDRPin);
  error = eastLDR - westLDR;          //Determine the difference between the two sensors.
  if(error>15)        //If the error is positive and greater than 15 then move the tracker in the east direction
  {

    tracker.write(180);              // tell servo to go to position in variable 'pos'
    delay(500);                       // waits 15ms for the servo to reach the position

  }
 else if(error<-15)  //If the error is negative and less than -15 then move the tracker in the west direction
  {

    tracker.write(0);              // tell servo to go to position in variable 'pos'
    delay(500);                       // waits 15ms for the servo to reach the position
   }

  Serial.print(eastLDR);
  Serial.print("   ");
  Serial.print(westLDR);
  Serial.print("   ");
  Serial.println(error);
  delay(500);
}
Conclusion
Solar trackers are important because they can significantly increase the energy output of solar panels. By tracking the sun’s movement across the sky, solar trackers ensure that the panels are always perpendicular to the sun’s rays, which allows them to capture the most sunlight possible. This can increase energy production by up to 40%, depending on the location and climate

