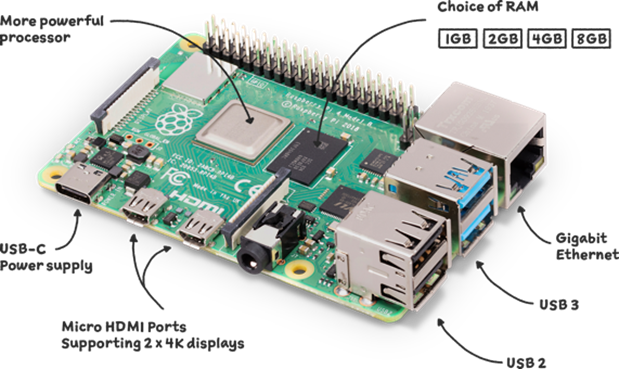
This project design would make use of both the face recognition and fingerprint recognition biometrics to verify a user before they can access the entry or exit a door. The Bimodal Biometric-based Surveillance System was made using a Raspberry pi 4B microcomputer, as well as an Arduino Nano board that was connected in serial connection to it. While the Raspberry Pi controls both the face and fingerprint recognition biometrics; the Arduino board was responsible for actuating and displaying feedback responses through an LCD screen to the user. Ensure you read through to the end to get the full grasp of the project design.
Face and Fingerprint Recognition: The Components/Materials Used
| S/N | Apparatus | Quantity | Cost per Quantity (₦) | Cost (₦) |
| 1 | Raspberry Pi 4 | 1 | ||
| 2 | Resistors | 1 | ||
| 3 | Rechargeable Battery | 3 | ||
| 4 | CSI Camera | 1 | ||
| 5 | Switch | 1 | ||
| 6 | LCD Module | 1 | ||
| 7 | 5v Power Supply | 1 | ||
| 8 | Solenoid Lock | 1 | ||
| 9 | Vero Board | 1 | ||
| 10 | Potentiometer | 1 | ||
| 11 | White Box | 1 | ||
| 12 | Push Buttons | 4 | ||
| 13 | A pack of jumper Wires | 1 | ||
| Total | ||||
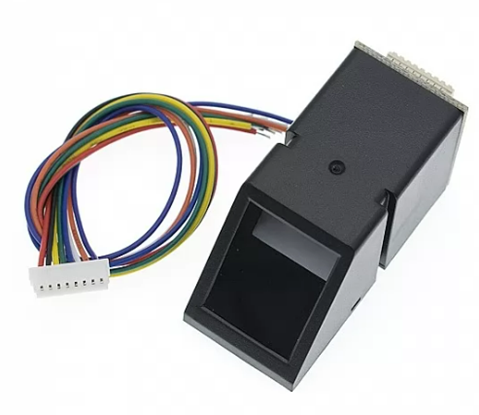
For this Bimodal Biometric-based Surveillance System; to verify and allow access to people, a fingerprint sensor is a biometric device that records and analyzes distinctive fingerprint patterns. This ensures secure identification and authorization. In this project, a simple fingerprint module was used to capture the fingerprint data of the users. The figure below shows an image of the fingerprint module that would be used.
In a lithium battery, the lithium ions are used to promote the movement of electrical current. It has a long lifespan, a lightweight design, and a high energy density. Mobile phones, laptop computers, electric cars, and portable electronics all frequently use lithium batteries. Because they provide effective and dependable power storage, they are a common option in contemporary technology. Lithium batteries must be handled and charged safely to avoid overheating or other potential risks.
In this project, the lithium batteries serve as backup for the design in case of situations where there is no direct power.

A CSI (Camera Serial Interface) camera is a type of camera module that is designed to be used specifically with Raspberry Pi and other devices that support CSI interfaces. It connects to the CSI port on the device, providing a direct and high-speed data link for transferring image and video data. CSI cameras are typically compact and offer high-resolution capabilities, making them suitable for various applications such as surveillance systems, robotics, computer vision projects, and more.
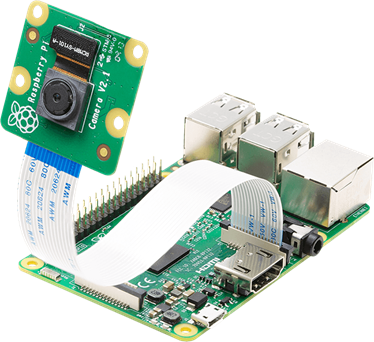
They often come with adjustable focus, and different lens options, and can be controlled programmatically to capture and process images or video streams.
In this project, Bimodal Biometric-based Surveillance System, the CSI camera is used to detect and record the faces of the individuals who want to gain access to the facility. Figure 3.5 shows an image of the CSI camera.
Programming the Raspberry Pi for Face Detection And Recognition
To program the face recognition part of this Bimodal Biometric-based Surveillance System project, python codes if mot most of it was replicated from Caroline Dunn from Tomshardware. The project design was supposed to log the entry of each successfully verified personnel or users but the cloud email email account required payment. And we haven’t got that yet.
To begin the preparation, we made sure that the CSI camera was connected to the raspberry pi firmly. And after this we are ready to install the dependencies for the face recognition. Using OpenCV, face_recognition, imutils, and a temporary swapfile modification, we will set up our Raspberry Pi for machine learning and facial recognition in this stage.
An open-source software package called OpenCV is used to process images and videos in real-time using machine learning. The Python face_recognition library will be utilized to calculate the bounding box surrounding every face, calculate facial embedding, and perform face comparisons inside the encoding dataset. Imutils is a set of useful routines to speed up Raspberry Pi OpenCV computation.
To finish this portion of the facial recognition tutorial, allow at least two hours. The duration of each command on a Raspberry Pi 4 8GB running at largely depends on your internet speed. Also, you may not not be successful doing this on Raspberry pi 3B+. I have tried it out 3 times and it didn’t work. I think the OpenCV library was too heavy for the processor speed. However, you are welcome to disprove me. Just leave a comment in the comments section if you pulled this off on Raspberry pi 3B+.

We assume that you have already loaded your Raspbian on your raspi and also the apps and libraries inside are up to date. You can also use the command line sudo apt-get update && sudo apt-get upgrade to update them. Personally, if i just downloaded my Raspbian OS unto a new SD, I don’t do this again. But feel free to open the command line by pressing command+T in your raspi desktop environment to get started.
Use your terminal to type the following instructions to install OpenCV. Before moving on to the next command, copy and paste each one into the terminal on your Pi, hit Enter, and wait for it to complete. When asked, “Would you like to proceed? (y/n)” hit the Enter key after selecting y.
| Header Cell – Column 0 | Terminal Command | Length of time to run |
|---|---|---|
| 1 | sudo apt install cmake build-essential pkg-config git | a few seconds |
| 2 | sudo apt install libjpeg-dev libtiff-dev libjasper-dev libpng-dev libwebp-dev libopenexr-dev | a few seconds |
| 3 | sudo apt install libavcodec-dev libavformat-dev libswscale-dev libv4l-dev libxvidcore-dev libx264-dev libdc1394-22-dev libgstreamer-plugins-base1.0-dev libgstreamer1.0-dev | 4 minutes |
| 4 | sudo apt install libgtk-3-dev libqtgui4 libqtwebkit4 libqt4-test python3-pyqt5 | 4.5 minutes |
| 5 | sudo apt install libatlas-base-dev liblapacke-dev gfortran | 1 minute |
| 6 | sudo apt install libhdf5-dev libhdf5-103 | 1 minute |
| 7 | sudo apt install python3-dev python3-pip python3-numpy | a few seconds |
Before executing the following set of operations, we must first extend the swapfile. We will begin by opening dphys-swapfile for editing in order to extend the swapfile:
sudo nano /etc/dphys-swapfile
After the file is opened, add CONF_SWAPSIZE=2048 and comment out the line CONF_SWAPSIZE=100.
In order to save your modifications to dphys-swapfile, press Ctrl-X, Y, and then Enter. This is merely a temporary modification that we will reverse once OpenCV is fully installed.

Please not that this file was edited using the Nano editor or IDE. We now need to restart our swapfile by running the following command in order for our changes to take effect:
sudo systemctl restart dphys-swapfile
Now let’s go back to installing packages by giving each of the following commands a separate entry in our terminal. I’ve listed the approximate times for each Raspberry Pi 4 8GB command.
| Length of time to run | Terminal Commands |
|---|---|
| 7 minutes | git clone https://github.com/opencv/opencv.git |
| 2 minutes | git clone https://github.com/opencv/opencv_contrib.git |
| less than a second | mkdir ~/opencv/build |
| less than a second | cd ~/opencv/build |
| 5 minutes | cmake -D CMAKE_BUILD_TYPE=RELEASE |
| -D CMAKE_INSTALL_PREFIX=/usr/local | |
| -D OPENCV_EXTRA_MODULES_PATH=~/opencv_contrib/modules | |
| -D ENABLE_NEON=ON | |
| -D ENABLE_VFPV3=ON | |
| -D BUILD_TESTS=OFF | |
| -D INSTALL_PYTHON_EXAMPLES=OFF | |
| -D OPENCV_ENABLE_NONFREE=ON | |
| -D CMAKE_SHARED_LINKER_FLAGS=-latomic | |
| -D BUILD_EXAMPLES=OFF .. | |
| One hour and 9 minutes | make -j$(nproc) |
| a few seconds | sudo make install |
| a few seconds | sudo ldconfig |
Once OpenCV has been installed successfully, we will restore our swapfile to its initial condition. Enter the following in your terminal:
sudo nano /etc/dphys-swapfile
Once the file is open, uncomment CONF_SWAPSIZE=100 and delete or comment out CONF_SWAPSIZE=2048. Press Ctrl-X, Y and then Enter to save your changes to sudo phys-swapfile. Once again, we will restart our swapfile with the command:
sudo systemctl restart dphys-swapfile
Next, we need to use the pip command to install face-recognition module/lib.
pip install face-recognition
Also, install the imutils module
Install imutils
Install these modules again using pip2 instead of pip if you receive problems like “No module named imutils” or “No module named face-recognition” during model training. Some OS has pip2 installed instead of pip.
Once this is done, you can proceed to git clone my folder on GitHub. open your command terminal and type the following:
git clone https://github.com/Anc2/face_recognition
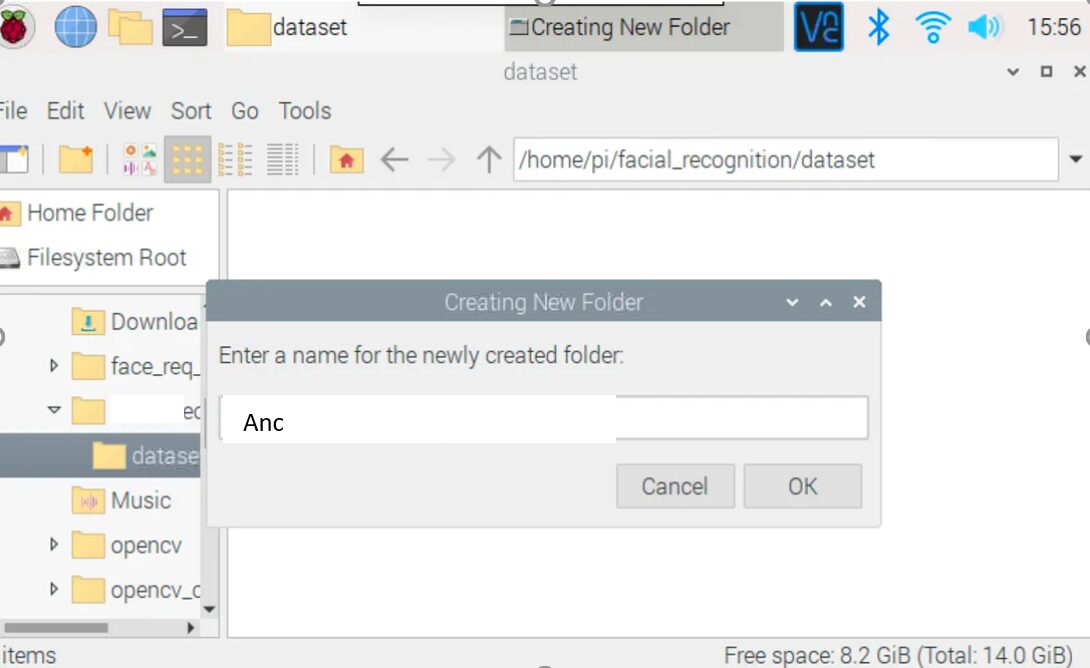
Let’s now assemble the dataset that will be used to teach our Pi. Click the folder icon to open your file manager from your Raspberry Pi desktop. Go to the dataset folder after navigating to the face_recognition folder. Within the dataset folder, use the right-click menu to choose New Folder.
Open headshots_picam.py in Geany while you’re still in the File Manager and navigate to the face_recognition folder. In line 3 of headshots_picam.py, enter the name of the folder you just made in step above in lieu of Anc (between quote marks). Continue to enclose your name in quote marks. Your name on line 3 and your name in the dataset folder should exactly match.
In Geany, click the Paper Airplane icon to run headshots_picam.py. Your CSI will be visible in a new window that opens. (On a Raspberry Pi 4, the camera viewer window opened in about ten seconds.) To take a picture of yourself, point the CSI in your direction and hit the spacebar. Pressing the spacebar initiates a new photo capture each time. We advise you to take roughly ten pictures of your face from various perspectives, being sure to slightly turn your head in each one. You can take a couple pictures both with and without your glasses if you wear them. It is not advised to wear hats in training shots. Our model will be trained using these images. When you’re done taking pictures, hit Esc.
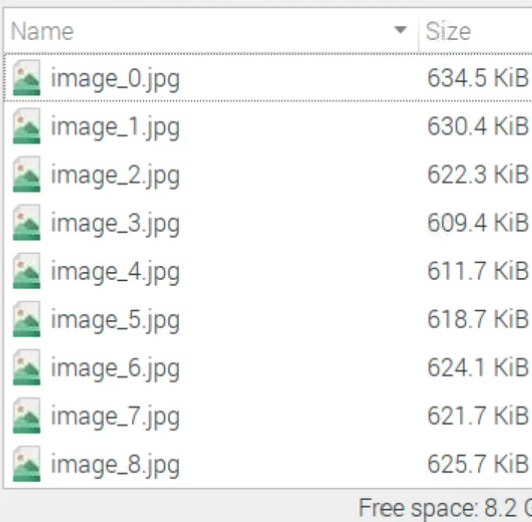
To view your images, use your file manager and return to the folders containing your name and dataset. To view a single photo, double-click on it. Click the arrow key in the bottom left corner of each photo to navigate through all of the ones you took in the previous phase. I would recommend taking these snapshots instead of uploading a folder with pictures. Because when tested, the accuracy was more for the headshots taken with the CSI camera.
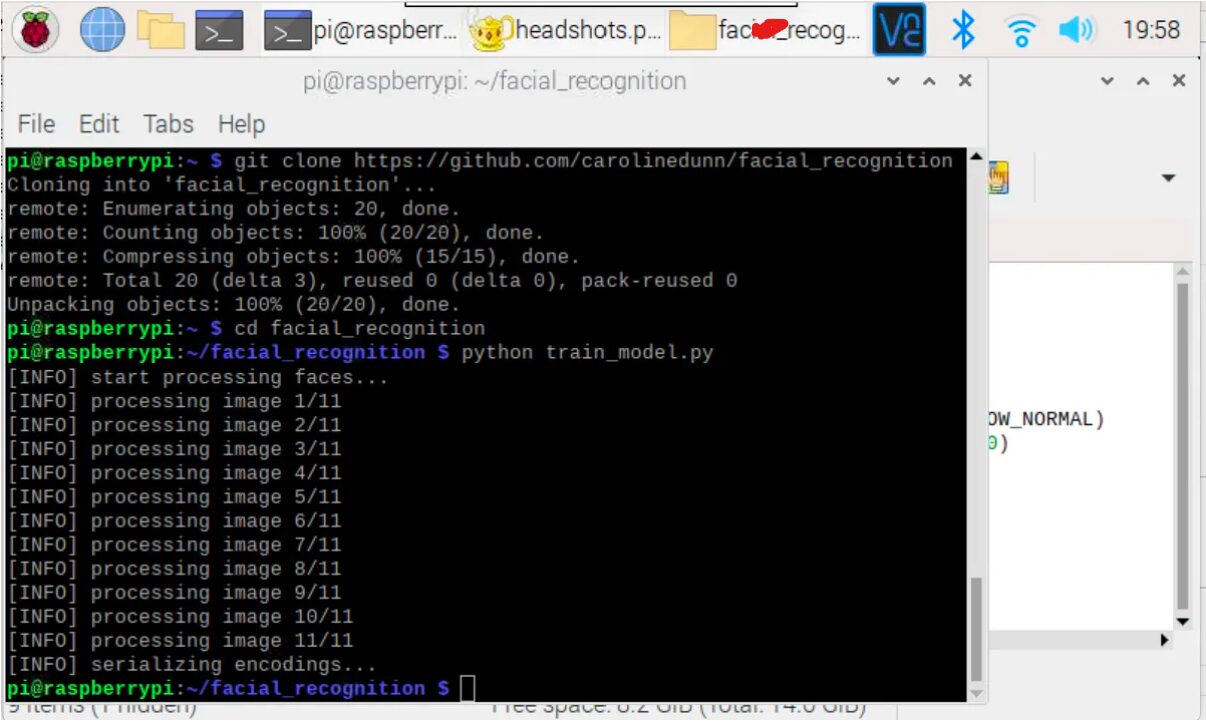
We are prepared to train our model now that our dataset has been assembled. Type the following to open a new terminal and go to face_recognition.
cd face_recognition
The command checks the directory and opens it up for further command entry from you. The Pi needs three to four seconds to process through every image in your dataset. The Pi will need roughly one and a half minutes to process a dataset containing twenty images and create the encodings.pickle folder. Enter the following to launch the model training command:
python train_model.py
The train_model.py code notes:
Photos in the dataset folder will be analyzed using train_model.py. Sort your pictures by the names of the people in them. For instance, inside the dataset folder, make a new folder called Paul and store all of the images of Paul’s face inside of it.
Encodings: train_model.py will produce an encodings.pickle file with the standards needed to recognize faces in the following stage. The HOG (Histogram of Oriented Gradients) detection approach is what we’re employing.
Let’s test the newly trained model now.
Type the following command to test the model:
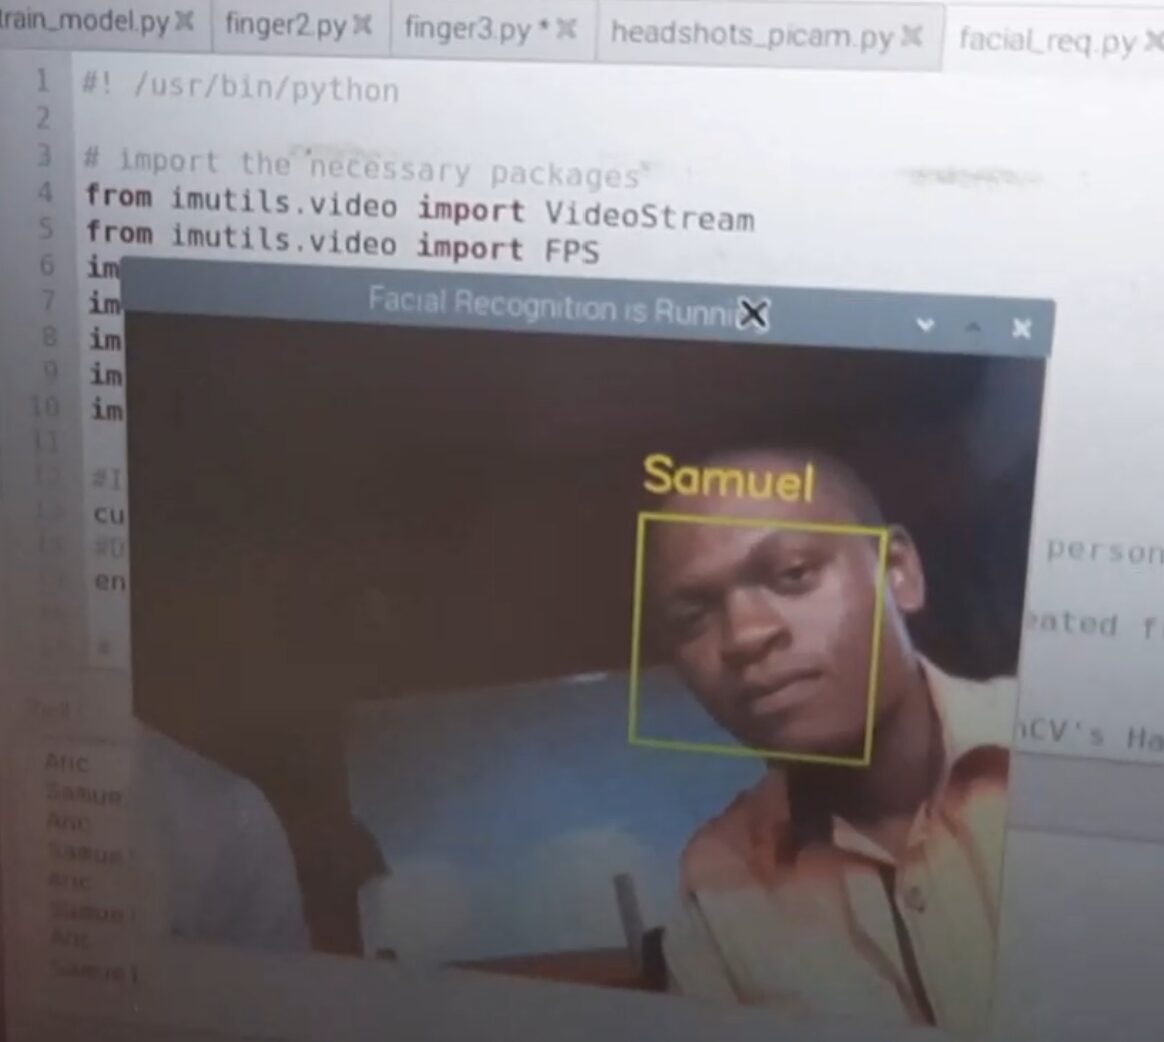
python facial_req.py
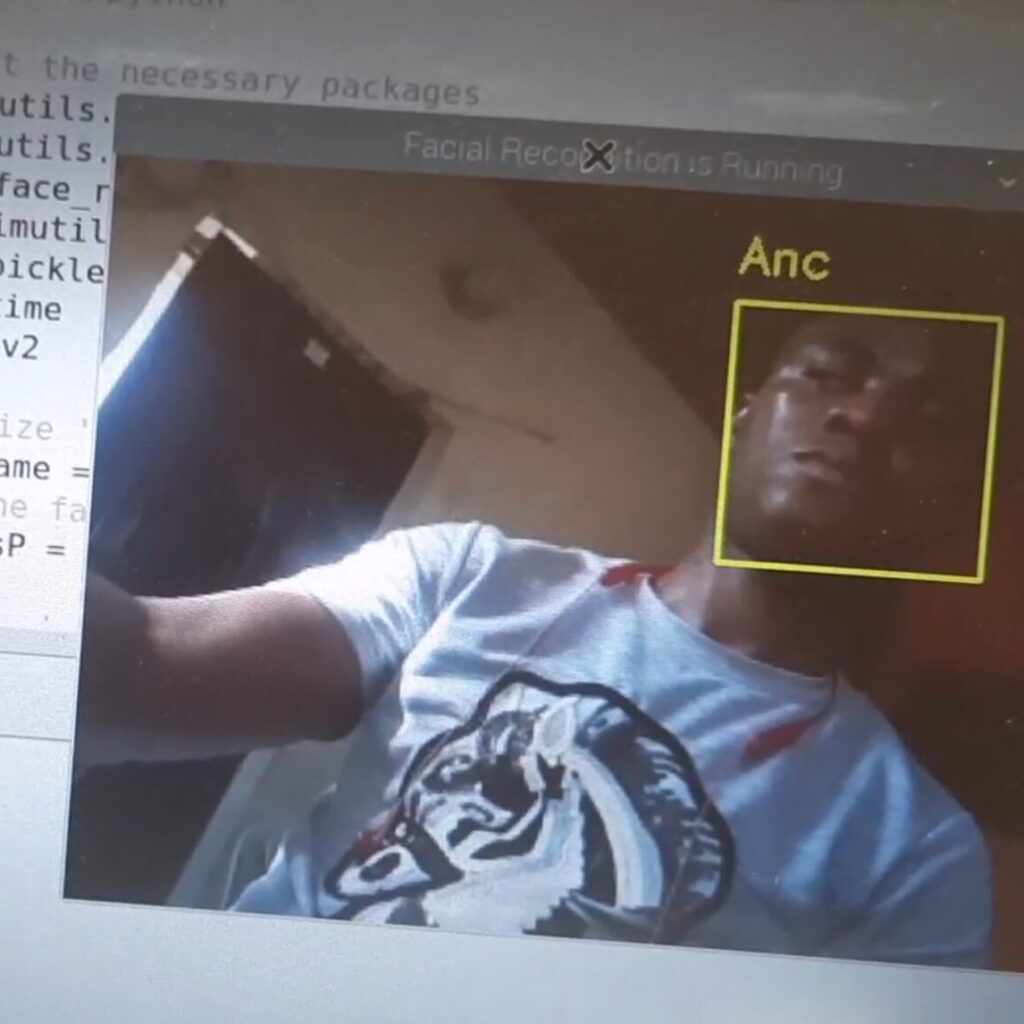
The testing of the face recognition system now will tell us how accurate the trained model is.
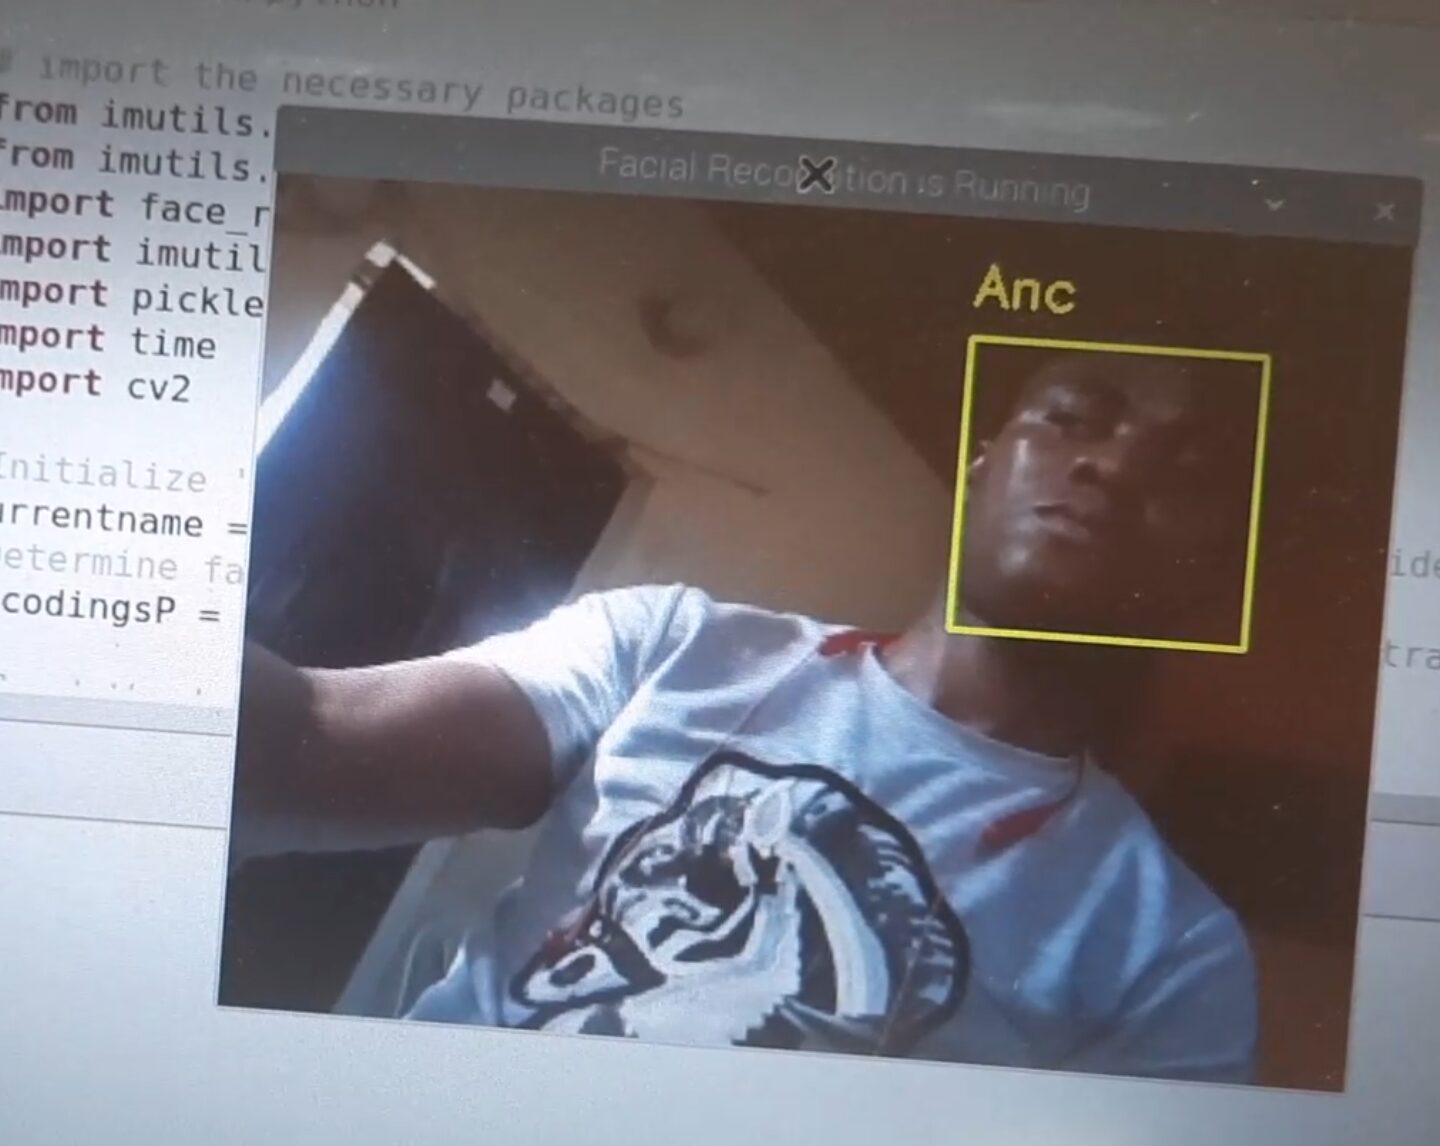
Your CSI camera view should open in a few seconds. Direct the CSI camera towards your visage. Your face has been appropriately trained to be recognized by the model if it has a yellow box around it with your name on it.
Fingerprint Biometric Recognition
The installation of the Adafruit libraries for this is well detailed on this Raspberry Pi website here. The blog post contains step-by-step process on how to do this.
You May Want to Read Also…
- Raspberry Pi Face Mask Detection & Temperature COVID-19 Project
- How to Design Arduino Face And Face Mask Recognition Project
- IoT Based Manhole Lid Detection With Surveillance Camera
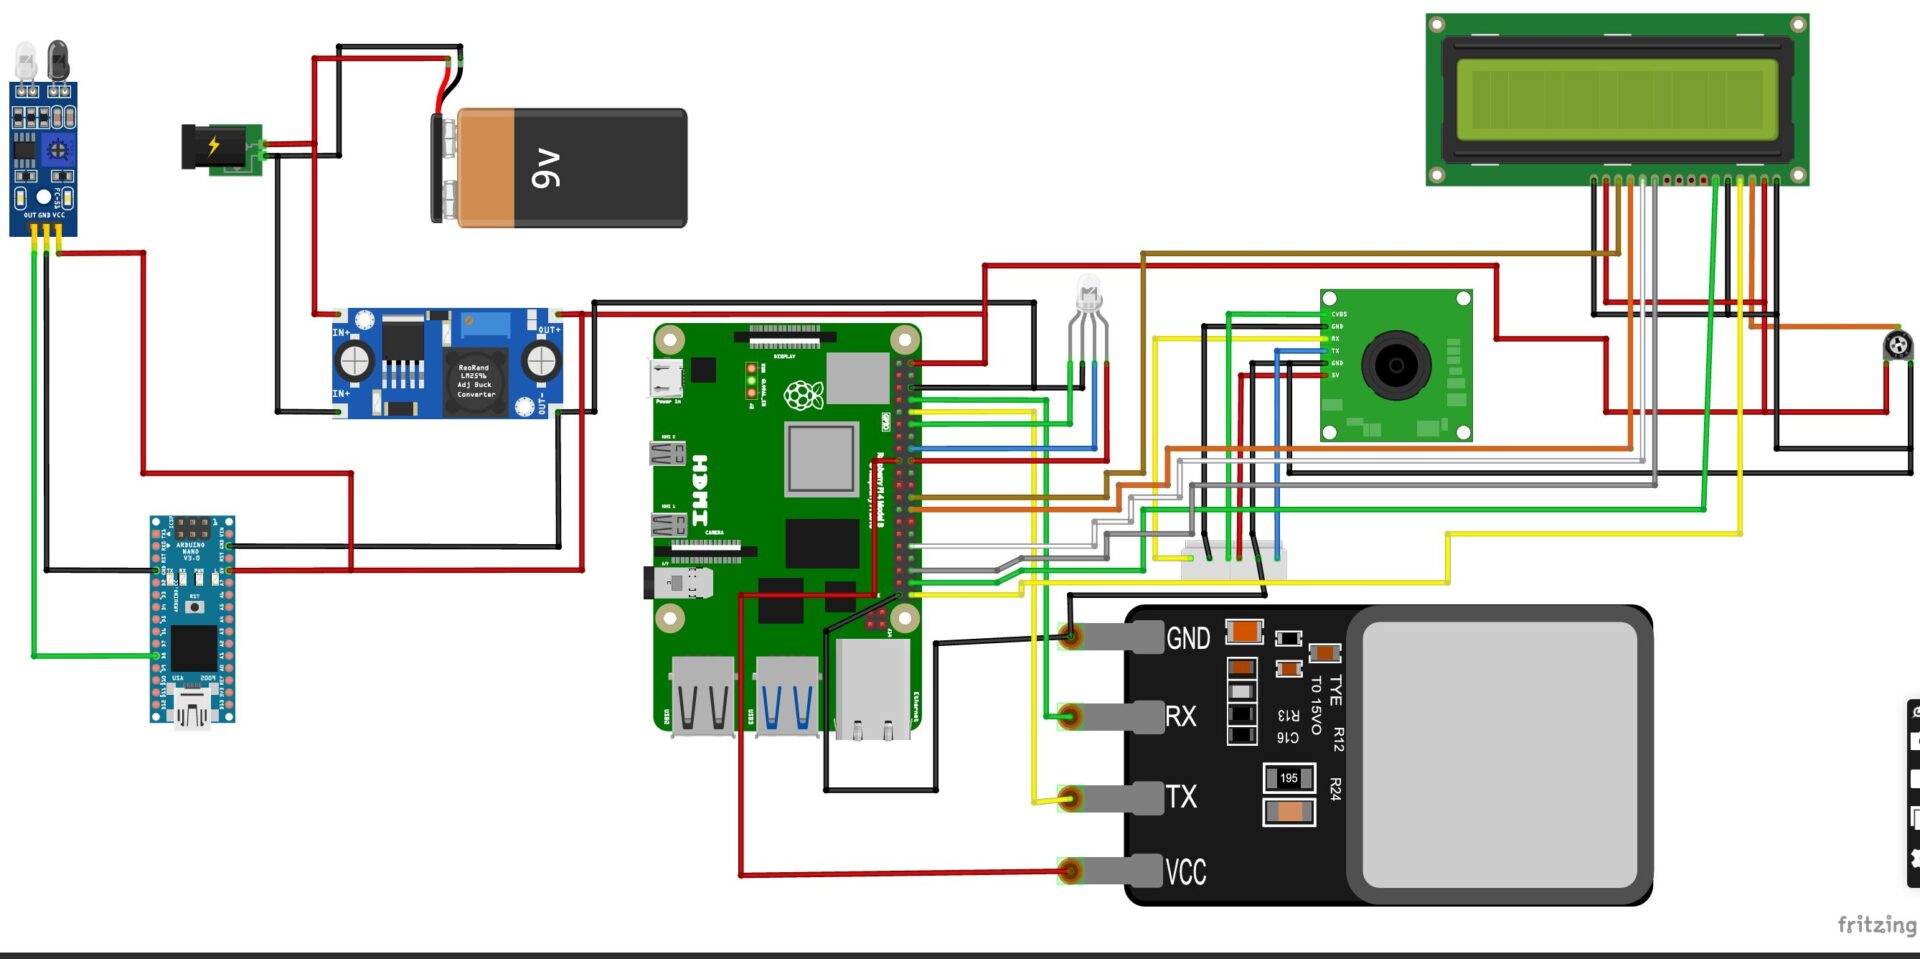
The Schematic Diagram
You can also download a free copy of al versions of the schematic diagram from my GitHub page here.
Explanation of the Schematic Diagram
Although not shown above in the schematic diagram but both the Raspi and the Arduino were connected together for serial communication using the Arduino Nano programming cable (Watch YouTube video below). We used an RBG LED to show different stages of the system design. When it is locked, it will show red light, if it is half-way verified, that is only the fingerprint verification has been successful, it will show blue color, and when both face and fingerprint biometric verifications are successful, it will turn to green color.
Now, we were supposed to use micro-switches, but after much considerations we reverted to infrared proximity sensor so that the design can sense when a user is closer to the door. The actual designed was powered by a 3.7V LiPo batteries connected in series connection to form a 12V.
Combining the Whole Codes For Face and Fingerprint Recognition
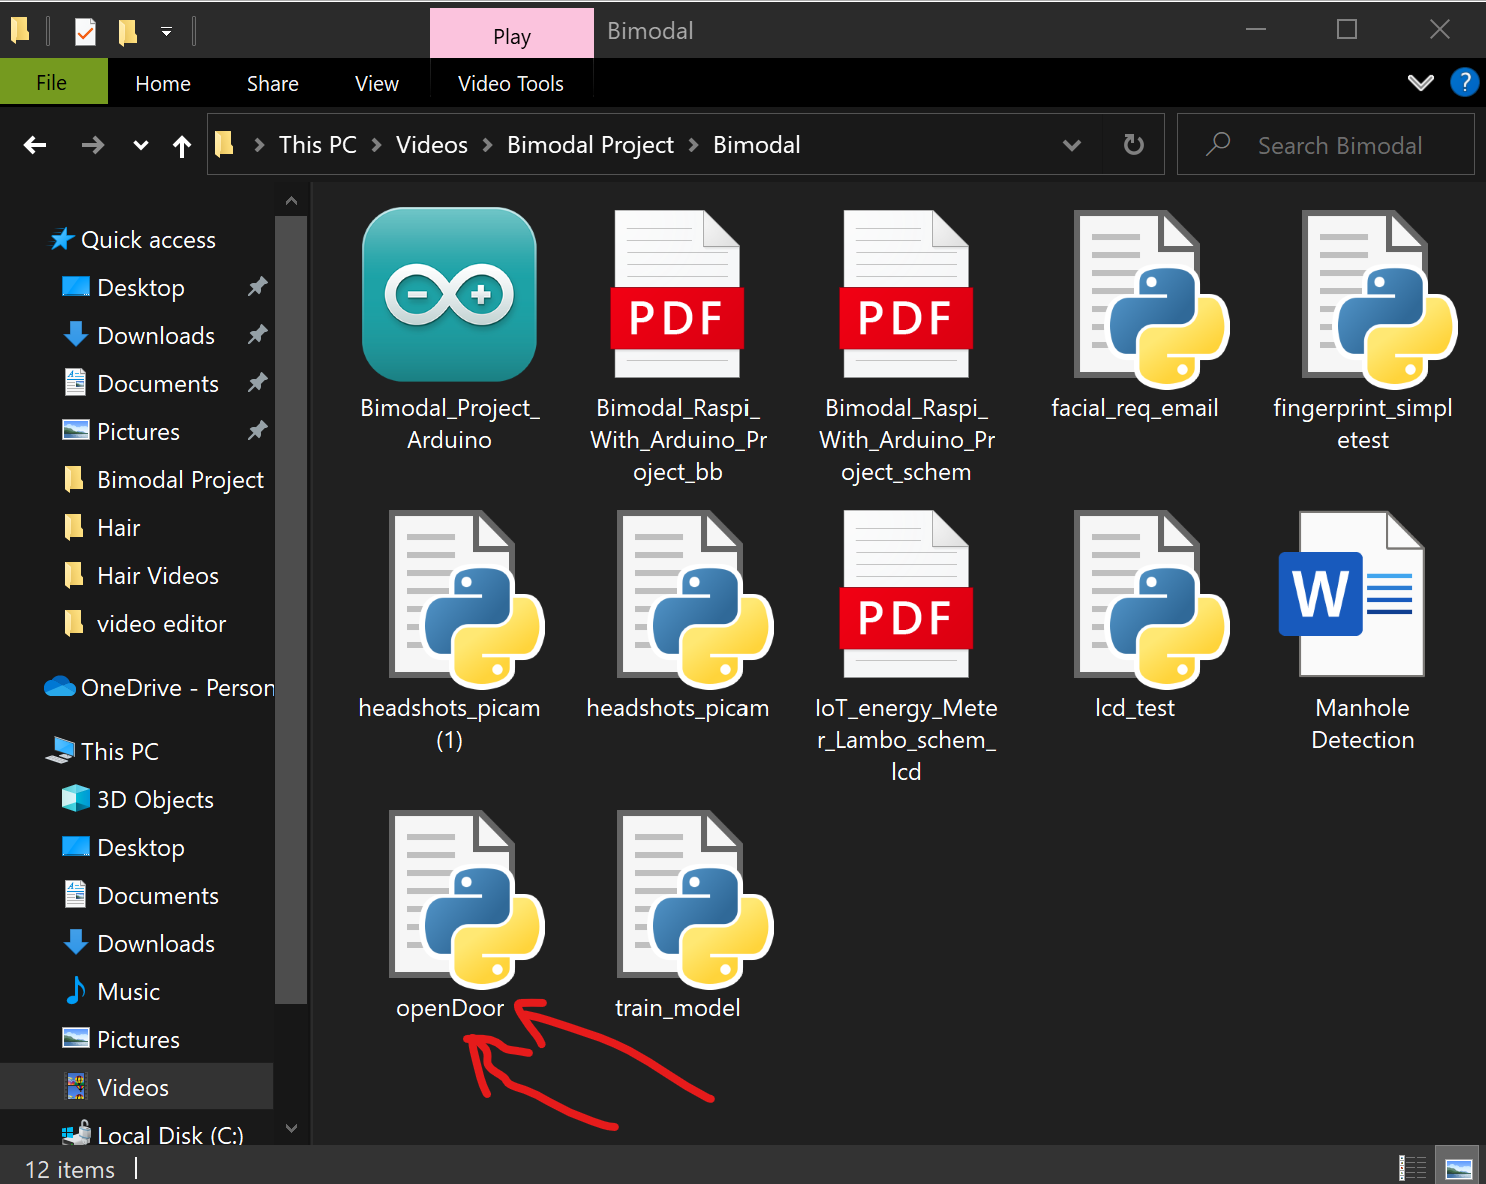
Open the following file in your Raspi Desktop environment using any editor best for you. We have already done the buck of the work for you. Run this code and ensure that you connected everything as shown in the schematic diagram above.
The Arduino Source Code
// include the library code:
#include <LiquidCrystal.h>

#define sensorPin 4
#define redLED A4
#define blueLED A3
#define greenLED A2
#define doorPin A1
#define buzzer A5

int readSensor;

// initialize the library by associating any needed LCD interface pin
// with the arduino pin number it is connected to
const int rs = 5, en = 6, d4 = 7, d5 = 8, d6 = 9, d7 = 10;
LiquidCrystal lcd(rs, en, d4, d5, d6, d7);

void setup() {
  Serial.begin(9600);
  pinMode(sensorPin, INPUT_PULLUP);
  pinMode(redLED, OUTPUT);
  pinMode(blueLED, OUTPUT);
  pinMode(greenLED, OUTPUT);
  pinMode(doorPin, OUTPUT);

  digitalWrite(blueLED, HIGH);
  // set up the LCD's number of columns and rows:
  lcd.begin(20, 4);
  lcd.setCursor(4, 0);
  // Print a message to the LCD.
  lcd.print("HELLO KARIS");
}

int readButtonPressed(){
  readSensor = digitalRead(sensorPin);

  return readSensor;
}

void buzzerTone(){
  digitalWrite(buzzer, HIGH);
  delay(2000);
  digitalWrite(buzzer, LOW);
}

void blinkGreenLED(){
  digitalWrite(redLED, LOW);
  digitalWrite(blueLED, LOW);
  digitalWrite(greenLED, HIGH);
  delay(300);
  digitalWrite(greenLED, LOW);
  delay(300);
  digitalWrite(greenLED, HIGH);
  delay(300);
  digitalWrite(greenLED, LOW);
  delay(300);
}

void blinkBlueLED(){
  digitalWrite(redLED, LOW);
  digitalWrite(greenLED, LOW);
  digitalWrite(blueLED, HIGH);
  delay(300);
  digitalWrite(blueLED, LOW);
  delay(300);
  digitalWrite(blueLED, HIGH);
  delay(300);
  digitalWrite(blueLED, LOW);
  delay(300);
}

void doorOpen(){
  digitalWrite(doorPin, HIGH);
  delay(7000);
  digitalWrite(doorPin, LOW);
  Serial.println("2");
}

void loop() {
  readButtonPressed();

     if (Serial.available() > 0) {
    String data = Serial.readStringUntil('n');
    //Serial.println(data);

    if (data == "start"){

        if(readSensor == LOW){
        Serial.println("0");
  }

  else if(readSensor == HIGH){
    Serial.println("");

      lcd.clear();
      lcd.setCursor(0, 0);
  // Print a message to the LCD.
  lcd.print("   BIMODAL");
  lcd.setCursor(0, 1);
  lcd.print("    VERIFICATION ");
  lcd.setCursor(0, 2);
  lcd.print("  SMART PROJECT");
  }
    }

  if (data == "Waiting for finger"){
      blinkGreenLED();
      lcd.clear();
      lcd.setCursor(0, 0);
  // Print a message to the LCD.
  lcd.print("PLEASE PLACE");
  lcd.setCursor(0, 1);
  lcd.print("   FINGER ");
  lcd.setCursor(0, 2);
  lcd.print(" FOR VERIFICATION");
  }

  if(data == "Error fingerprint sensor failed"){
    digitalWrite(redLED, HIGH);
    digitalWrite(blueLED, LOW);
    digitalWrite(greenLED, LOW);
    lcd.clear();
      lcd.setCursor(0, 0);
  // Print a message to the LCD.
  lcd.print("FINGERPRINT SENSOR ");
  lcd.setCursor(0, 1);
  lcd.print("  FAILED ");
  lcd.setCursor(0, 2);
  lcd.print("PLEASE CLEAN THE");
  lcd.setCursor(0, 3);
  lcd.print("FINGERPRINT SENSOR");
  buzzerTone();
  }

  if(data == "No match found"){
    digitalWrite(redLED, HIGH);
    digitalWrite(blueLED, LOW);
    digitalWrite(greenLED, LOW);
    lcd.clear();
      lcd.setCursor(0, 0);
  // Print a message to the LCD.
  lcd.print("FINGERPRINT CHECKED ");
  lcd.setCursor(0, 1);
  lcd.print("  FAILED ");
  lcd.setCursor(0, 2);
  lcd.print("NO MATCH FOUND");
  lcd.setCursor(0, 3);
  lcd.print("ON THE DATABASE");
  buzzerTone();
  }

  if(data == "fingerprint sensor not initialised"){
    digitalWrite(redLED, HIGH);
    digitalWrite(blueLED, LOW);
    digitalWrite(greenLED, LOW);
    lcd.clear();
      lcd.setCursor(0, 0);
  // Print a message to the LCD.
  lcd.print("FINGERPRINT SENSOR ");
  lcd.setCursor(0, 1);
  lcd.print(" NOT CONNECTED ");
  lcd.setCursor(0, 2);
  lcd.print("PLEASE CHECK");
  lcd.setCursor(0, 3);
  lcd.print("CONNECTION");
  buzzerTone();
  }

if(data == "Fingerprint found"){
  blinkGreenLED();
    lcd.clear();
      lcd.setCursor(0, 0);
  // Print a message to the LCD.
  lcd.print("FINGERPRINT DATA");
  lcd.setCursor(0, 1);
  lcd.print("FOUND IN DATABASE");
  lcd.setCursor(0, 2);
  lcd.print("PLEASE WAIT FOR");
  lcd.setCursor(0, 3);
  lcd.print("FACE RECOGNITION");
  digitalWrite(redLED, LOW);
    digitalWrite(blueLED, HIGH);
    digitalWrite(greenLED, LOW);
}

if(data == "Anc"){
  blinkBlueLED();
  lcd.clear();
      lcd.setCursor(0, 0);
  // Print a message to the LCD.
  lcd.print("WELCOME MR. ANC");
  lcd.setCursor(0, 1);
  lcd.print("FACE IDENTITY ");
  lcd.setCursor(0, 2);
  lcd.print("VERIFIED ");
  lcd.setCursor(0, 3);
  lcd.print("PLEASE PROCEED");
  digitalWrite(redLED, LOW);
  digitalWrite(blueLED, LOW);
  digitalWrite(greenLED, HIGH);
  doorOpen();
}

if(data == "Samuel"){
  blinkBlueLED();
    lcd.clear();
      lcd.setCursor(0, 0);
  // Print a message to the LCD.
  lcd.print("WELCOME MR. SAMUEL");
  lcd.setCursor(0, 1);
  lcd.print("FACE IDENTITY ");
  lcd.setCursor(0, 2);
  lcd.print("VERIFIED ");
  lcd.setCursor(0, 3);
  lcd.print("PLEASE PROCEED");
  digitalWrite(redLED, LOW);
  digitalWrite(blueLED, LOW);
  digitalWrite(greenLED, HIGH);
  doorOpen();
}

if(data == "Constantine"){
  blinkBlueLED();
  digitalWrite(redLED, LOW);
  digitalWrite(blueLED, LOW);
  digitalWrite(greenLED, HIGH);
  lcd.clear();
      lcd.setCursor(0, 0);
  // Print a message to the LCD.
  lcd.print("WELCOME MR. CONSTANTINE");
  lcd.setCursor(0, 1);
  lcd.print("FACE IDENTITY ");
  lcd.setCursor(0, 2);
  lcd.print("VERIFIED ");
  lcd.setCursor(0, 3);
  lcd.print("PLEASE PROCEED");
  doorOpen();
}

if(data == "Karis"){
  blinkBlueLED();
  digitalWrite(redLED, LOW);
  digitalWrite(blueLED, LOW);
  digitalWrite(greenLED, HIGH);
  lcd.clear();
      lcd.setCursor(0, 0);
  // Print a message to the LCD.
  lcd.print("WELCOME MR. KARIS");
  lcd.setCursor(0, 1);
  lcd.print("FACE IDENTITY ");
  lcd.setCursor(0, 2);
  lcd.print("VERIFIED ");
  lcd.setCursor(0, 3);
  lcd.print("PLEASE PROCEED");
  doorOpen();
}

if(data == "Maero"){
  blinkBlueLED();
  digitalWrite(redLED, LOW);
  digitalWrite(blueLED, LOW);
  digitalWrite(greenLED, HIGH);
  lcd.clear();
      lcd.setCursor(0, 0);
  // Print a message to the LCD.
  lcd.print("WELCOME MR. MAERO");
  lcd.setCursor(0, 1);
  lcd.print("FACE IDENTITY ");
  lcd.setCursor(0, 2);
  lcd.print("VERIFIED ");
  lcd.setCursor(0, 3);
  lcd.print("PLEASE PROCEED");
  doorOpen();
}

if(data == "Ose"){
  blinkBlueLED();
  digitalWrite(redLED, LOW);
  digitalWrite(blueLED, LOW);
  digitalWrite(greenLED, HIGH);
  lcd.clear();
      lcd.setCursor(0, 0);
  // Print a message to the LCD.
  lcd.print("WELCOME MR. OSE");
  lcd.setCursor(0, 1);
  lcd.print("FACE IDENTITY ");
  lcd.setCursor(0, 2);
  lcd.print("VERIFIED ");
  lcd.setCursor(0, 3);
  lcd.print("PLEASE PROCEED");
  doorOpen();
}

if(data == "Otiger"){
  blinkBlueLED();
  digitalWrite(redLED, LOW);
  digitalWrite(blueLED, LOW);
  digitalWrite(greenLED, HIGH);
  lcd.clear();
      lcd.setCursor(0, 0);
  // Print a message to the LCD.
  lcd.print("WELCOME MR. OTIGER");
  lcd.setCursor(0, 1);
  lcd.print("FACE IDENTITY ");
  lcd.setCursor(0, 2);
  lcd.print("VERIFIED ");
  lcd.setCursor(0, 3);
  lcd.print("PLEASE PROCEED");
  doorOpen();
}

//else{
//  lcd.clear();
//      lcd.setCursor(3, 0);
//  // Print a message to the LCD.
//  lcd.print(data);
//
//}


 }
}
Results And Testing
The project design was successful and worked as programmed. We proceeded to test it out on different users and they were able to gain access to the other side of the model door only if they were registered or already in the database.
Conclusion
The face and fingerprint recognition surveillance system design has been successfully implemented in this blog post. We would like to know if you found this post helpful and you were able to follow through to replicate it. Lt us know by leaving a comment below.
Read More
- Arduino Smart Light Control Benefits
- Arduino Smart Light Control Project Ideas
- Design Weather-Based and Temperature Controlled Automatic Window
Frequently Asked Questions
- What is the difference between face recognition and fingerprint recognition?
Face recognition uses facial features to identify individuals, while fingerprint recognition relies on the unique patterns of fingerprints. Both technologies offer contactless and relatively accurate identification methods. Although in Bimodal Biometric-based Surveillance System, we used both of them.
- Which technology is more accurate?
The accuracy of both technologies depends on various factors, including the quality of the sensors, lighting conditions, and the size of the database being compared against. Generally, fingerprint recognition tends to be slightly more accurate than face recognition, especially in controlled environments. However, advancements in facial recognition algorithms are rapidly closing the gap.
- What are the advantages of using face or fingerprint recognition?
As seen in this Bimodal Biometric-based Surveillance System, both technologies offer several advantages over traditional identification methods like passwords or key cards:
* **Convenience:** They are contactless and quick, providing seamless user experience.
* **Security:** They are more difficult to fake or forge compared to traditional methods.
* **Scalability:** They can be easily implemented for large groups of people.
- What are the disadvantages of using face or fingerprint recognition?
Some potential drawbacks to consider include:
* **Privacy concerns:** Collecting and storing biometric data raises privacy concerns, and regulations like GDPR need to be considered.
* **Cost:** Implementing and maintaining these systems can be expensive, especially for complex projects.
* **Accuracy limitations:** Both technologies can be susceptible to errors under certain conditions, like poor lighting or facial coverings.
Face Recognition Specific FAQs:
- What kind of camera is needed for face recognition?
For the Bimodal Biometric-based Surveillance System, we used the CSI camera. However, the type of camera needed depends on the application and desired accuracy. High-resolution cameras with good lighting are generally recommended.
- How is face recognition data stored?
Face recognition data is typically stored in secure databases using encryption and other security measures.
- Can face recognition be used for tracking people?
Yes, face recognition can be used for tracking people’s movements, which raises ethical concerns and requires careful consideration of privacy regulations.
Fingerprint Recognition Specific FAQs:
- What kind of sensor is needed for fingerprint recognition?
There are different types of fingerprint sensors available, each with its own advantages and disadvantages. Optical sensors are common, but capacitive and ultrasonic sensors offer better accuracy for dry or damaged fingerprints.
- Can fingerprints be easily copied?
While copying fingerprints is more difficult than forging signatures, it is not impossible. Implementing strong security measures is crucial to protect fingerprint data.
- Can fingerprint recognition be used for medical purposes?
Fingerprint recognition is increasingly being explored for medical applications, such as identifying patients or monitoring their health.

