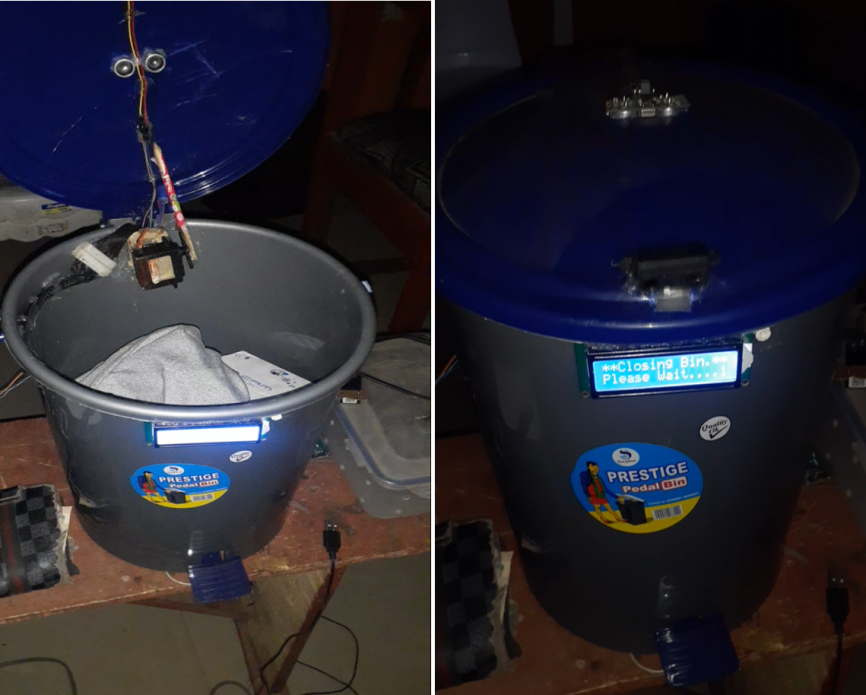
We have developed a Smart Automatic Trash Basket that can detect the presence of people and open automatically, allowing for contact-free trash disposal. The bin is also smart enough to check the depth of the trash inside it. Once the bin is full, it will not open automatically again. Instead, it will emit a beeping sound and direct people to use the next available smart bin or check back later. The bin will also notify waste managers to come and dispose of its contents via SMS and calls. The project design uses electronic components that are inexpensive and easily available in the market.
Components used for this project.
- 1602 LCD
- Real Time clock (RTC) module DS3233 type
- Servo motor MG997R
- Sharp Infrared sensor Module GX1080 model
- Sim800L GSM module
- Piezo speaker
- LCD wires
- Some stranded wires
- Arduino Uno, or Nano or Standalone Atmega328P board.
- 5V power supply.
- Ultrasonic Sensor
Read More
Human Evolution: Stone Tools Used by Early Humans and Monkeys
- EVOLUTION OF iPhone; THE HUMBLE BEGINING
- Space Tourism: The Countdown to Interplanetary Adventure
Schematic Diagram for the Smart Automatic Trash Basket

The above diagram shows the connection of the microcontroller (MCU) to the sensors. The MCU is using its ADC pins to take the readings. The project has uses an Atmega328P IC chip which is the brain of the project. The rest of the project is connected as peripherals to the project design. This is the standalone dev board, you can order for the copy of the PCB dev board on our website here.
You can equally achieve this using your Arduino Nano or Arduino Uno board. The same thing applies to the whole circuitry.
For clocking speed synchronization, the 16MHz crystal oscillator connected at pin 9 and 10 of the Atmega329P IC was used. This, however, doesn’t mean the IC performs program executions this fast. A pair of 22-pF mica capacitors were used to suppress the noise generated by the switch of the internal transistors of the Atmega328P IC.
But the Atmega328P IC has a hardware rest pin (pin 1); for this, a pull-up resistor was used to connect to pin 1 of the IC. This is an active LOW pin, and the 10k pull-up resistor supplies a steady 5V HIGH logic to this pin. This pin would reset the program in the programmable Atmeag328P IC when pulled LOW (to the 0V potential). To achieve this reset mode, we connected a momentary pushbutton to pin 1 of the IC chip. This would pull the 5V supply to the ground when depress. But since it is a monostable switch, it would return to its stable state when released. This, in turn, allows the IC to continue its program functions.
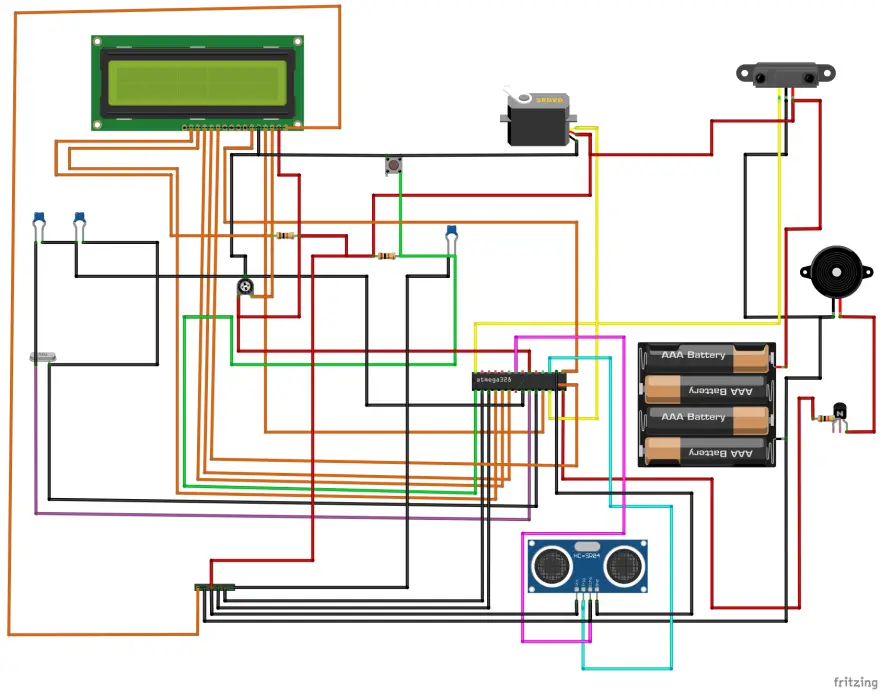
The circuit diagram uses the 1602 LCD as display. The LCD module is connected using the 4-bit method as opposed to the 8-bit method. The RS pin is connected to digital pin 10, and the E pin is connected to pin 9.
Programming the Sensors
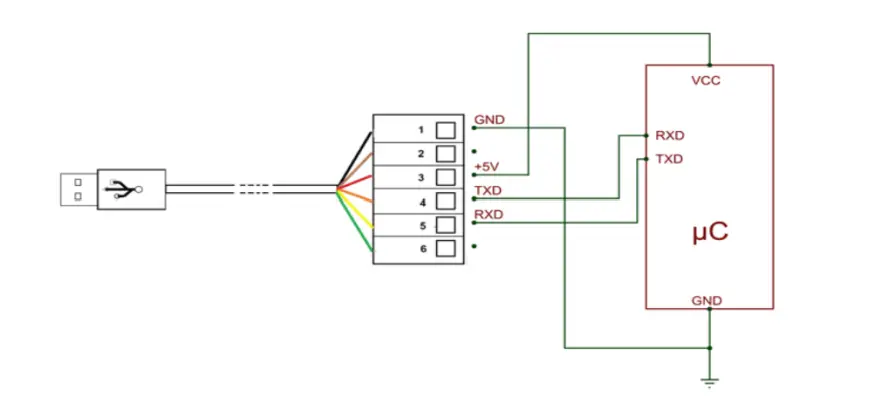
The program for the hardware part of the project design was written in C and C++ language; using the Arduino Integrated Environment (IDE). To burn (convert to machine language) these programs into the Atmega328P standalone development board, we used the FTDI ISP programmer as shown in the picture above. You can order a copy of the FTDI programmer from our online shop.
Source Code (Arduino Sketch)
#include <SharpIR.h>
#include <SerialGSM.h>
#include <LiquidCrystal.h>
#include <SoftwareSerial.h>
#include <Servo.h>
#include "RTClib.h"

RTC_DS3231 rtc;
char daysOfTheWeek[7][12] = {"Sunday", "Monday", "Tuesday", "Wednesday", "Thursday", "Friday", "Saturday"};

SerialGSM cell(2,3);

char* recepient = "XXXXXXXXXXX";
char aux_string[30];
char phone_number[15];
char received[15];
int length = 11;


// initialize the library with the numbers of the interface pins
LiquidCrystal lcd(10, 9, 16, 17, 11, 15);
//Create a new instance of the library
//Call the sensor "sensor"
//The model of the sensor is "GP2YA41SK0F"
//The sensor output pin is attached to the pin A0
SharpIR sensor( SharpIR::GP2Y0A41SK0F, A0 );


const int trigPin = 6; // Trigger Pin of Ultrasonic Sensor
const int echoPin = 7; // Echo Pin of Ultrasonic Sensor
long duration;
float distance;
String SMS;
boolean sendonce = true;
bool waitTime, firstReminder = false;
bool State = LOW;
bool flag = true;
float cm;
int y;
unsigned int HighByte =0;
unsigned int LowByte = 0;
unsigned int Len =0;
#define piezo 12
Servo myservo;

bool close_bin(int steps = 10, int wait = 10){
  lcd.setCursor(0,0);
  lcd.print("**Closing Bin.***   ");
  lcd.setCursor(0,1);
  lcd.print(" Please Wait....");
  //delay(500);
  for (int pos = 50; pos <= 180; pos += steps) { // goes from 0 degrees to 180 degrees in steps of 1 degree
    myservo.write(pos);              // tell servo to go to position in variable 'pos'
    delay(wait);                       // waits for the servo to reach the position
  }
  delay(1000);
  return false;
}


bool open_bin(int steps = 10, int wait = 10, int count = 5){
  lcd.setCursor(0,0);
  lcd.print("**Opening Bin.***   ");
  lcd.setCursor(0,1);
  lcd.print(" Please Wait....");
  for (int pos = 180; pos >= 50; pos -= steps) { // goes from 180 degrees to 0 degrees
    myservo.write(pos);              // tell servo to go to position in variable 'pos'
    delay(wait);                       // waits for the servo to reach the position
  }
  delay(500);
  lcd.setCursor(0,0);
  lcd.print("                     ");
  while(count > 0){
    lcd.setCursor(8,0);
    lcd.print(count);
    count -= 1;
    delay(1000);
  }
  return false;
}


void sendSMSALert(){
cell.Rcpt(recepient);
    delay(500);
     Serial.print("Sending mesage to: ");
    Serial.println(recepient);
    cell.Message("***SMART BIN ALERT***\n__BIN FULL!__\n Trash Basket at Location Wiston and 5th is full. PLS kindly quickly dispose\nEnd of Report!\nHave a Nice Day.");
          delay(1000);
          cell.SendSMS();
  }

bool motion(int average = 10){
  int distance = 0;
  for(int x = 0; x<= average; x++){
  distance += sensor.getDistance();
  }
  distance /= average;
  Serial.println(distance);
  if (distance <= 5){
    return true;
  }
  else{return false;}
}


int waste_volume(){
  DateTime now = rtc.now();
  digitalWrite(trigPin, LOW);
delayMicroseconds(2);
digitalWrite(trigPin, HIGH);
delayMicroseconds(10);
digitalWrite(trigPin, LOW);
duration = pulseIn(echoPin, HIGH);
distance = duration*0.034/2.0;


}

void Date_TIME(){
    DateTime now = rtc.now();
    lcd.setCursor(0, 1);
    lcd.print("DATE: ");
    lcd.print(now.day(), DEC);
    lcd.print('/');
    lcd.print(now.month(), DEC);
    lcd.print('/');
    lcd.print(now.year(), DEC);
    lcd.print("           ");
    lcd.setCursor(0, 0);
    lcd.print("TIME: ");
    lcd.print(now.hour(), DEC);
    lcd.print(':');
    lcd.print(now.minute(), DEC);
    lcd.print(':');
    lcd.print(now.second(), DEC);
     lcd.print("   ");
    }


void setup() {
 Serial.begin(9600);
pinMode(trigPin, OUTPUT);
pinMode(echoPin, INPUT);
 cell.begin(9600);
 cell.Verbose(true);
cell.FwdSMS2Serial();
  delay(2000);
 pinMode(13, OUTPUT);
 pinMode(piezo, OUTPUT);
 myservo.attach(8);

  if (! rtc.begin()) {
  lcd.setCursor(0, 0);
    lcd.print("Can't find RTC");
    delay(3000);
    while (1);
  }


  if (rtc.lostPower()) {
    lcd.setCursor(0, 0);
    lcd.print("RTC lost power!");
    // following line sets the RTC to the date & time this sketch was compiled
    rtc.adjust(DateTime(F(__DATE__), F(__TIME__)));
    delay(3000);
  }

 myservo.write(180);

 lcd.begin(16, 2);
  lcd.setCursor(3, 0);
  lcd.print("  WELCOME");
  delay(1000);
   lcd.setCursor(2, 0);
  lcd.print("  SMART BIN");
  lcd.setCursor(3, 1);
  lcd.print("  PROJECT");
  delay(2000);
  lcd.clear();
  }


void loop() {
waste_volume();
 DateTime now = rtc.now();

Serial.print("dist: ");
Serial.print(distance);
Serial.println(" cm");
y = map(distance, 4.15, 26.20, 100, 0);
y = constrain(y, 0, 100);
Serial.print("y = ");
Serial.println(y);
delay(200);

 int a = (constrain(now.second(), 0, 5));
int b= (constrain(now.second(), 11, 15));
int c= (constrain(now.second(), 21, 25));
int d=(constrain(now.second(), 31, 35));
int e=(constrain(now.second(), 41, 45));
int f= (constrain(now.second(), 51, 55));

 if(distance >= 4.39){
  if(motion() == true){
    open_bin();
    close_bin(1, 20);
    }
  digitalWrite(piezo, LOW);
}


if((flag == true) && (motion != true)){
  digitalWrite(piezo, LOW);
    if((now.second()==a)||(now.second()==b)|| (now.second()==c)|| (now.second()==d)||(now.second()==e)|| (now.second()==f)){
    Date_TIME();
  }
    else{
   lcd.setCursor(0, 0);
  lcd.print("   SMART BIN    ");
    lcd.setCursor(0, 1);
   lcd.print("WASTE LEVEL:");
        if(y<100){
        lcd.print(" ");
          }
        lcd.print(y);
         lcd.print("%");
  }
 }
if((distance < 4.99) && (motion() == true)){
  lcd.setCursor(0, 0);
  lcd.print("SORRY SMART BIN");
    lcd.setCursor(0, 1);
   lcd.print("......FULL......");
   digitalWrite(piezo, HIGH);

  if((now.minute() == 30) || (now.minute() == 59)){
    waitTime = true;
    Serial.println(now.minute());
    sendSMSALert();
    waitTime = false;
    }
}
while ((distance < 4.99) && (firstReminder == false)){
  sendSMSALert();
  firstReminder = true;
}
 }
Code Explanation of Smart Automatic Trash Basket
In the beginning of the code we imported different libraries that was necessary for this particular design. On line 1, we imported the sharpIR library (lib) which is responsible for taking accurate measurement by the infrared distance sensor. At line three, we imported the serial GSM library known as SerialGSM.h. the .h format shows that it is a header file.
Next, with the software serial lib to detect or to call where we connected the GSM module pin. So since we used a servo motor for this particular design, we included a Servo library also and also the Real time Clock (RTC) library.
Here, we are using an RTC type ds3231. Next, we defined the days of the week in a dictionary or string array type. Our serial GSM shows which of the microcontroller pins we connected the transmit and receive pins of the GSM module.
We connected the transmit pain to the Digital pin of a microcontroller and receiver pin to do digital three on a microcontroller. A string character was declared to take the recipient’s phone number. The use of the LCD 16 by 2 module was very important and for its use, we are going to be using the four bits communication protocol. This means that it is going to be using for digital pins on the microcontroller for data transmission; another digital pin for registered select and one digital pin for enable. Our infrared distance sensor is connected to the analog pin of the microcontroller and this is the analog pin zero (A0). To detect the distance or the height of the waste in the bin basket, ultrasonic sensor pins the trigger pin and echo were connected to digital pin 6 and 7 respectively on the microcontroller.
A string type of character known as SMS was defined and we used a boolean algebra to set true for only sending once the SMS to waste management. W created the function called closebin; in this we used a for Loop to move the servo through an angle of 0 to 80 degrees. Another function known as open_bin() was created to do the reverse of this Close_bin(). This time, in a delay increment of 10 MS. Since the smart bin was supposed to open and hold for 5 seconds a countdown of 5 Seconds was to be displayed on the screen.
This was taken care of by the while loop count to print from 1 to 5 in a countdown order. Once the number hits zero on the LCD screen, the lid is automatically closed by the microcontroller. Another function known as sendSMS alert was used to send SMS about the status of the trash. This SMS will contain the level of the trash; that is, if it is full and a location of where the smart bin was located. A function known as motion() was used to detect the presence of human being in front of the smart bin design. In it we used the for Loop to get distance between the person and the infrared distance sensor. On taking average measurements of various distance of object or human beings that emitted infrared radiation. If the distance was less than or equal to 5 cm, the motion sensor will return true boolean logic to the microcontroller and this will then check if the big basket has enough empty space to collect waste. If it did, it will open and user will dispose off his waste. The waste volume function uses the trigger and echo pins to take measurements of the volume of waste in the smart bin.
Construction & Assembly of the Smart Automatic Trash Basket
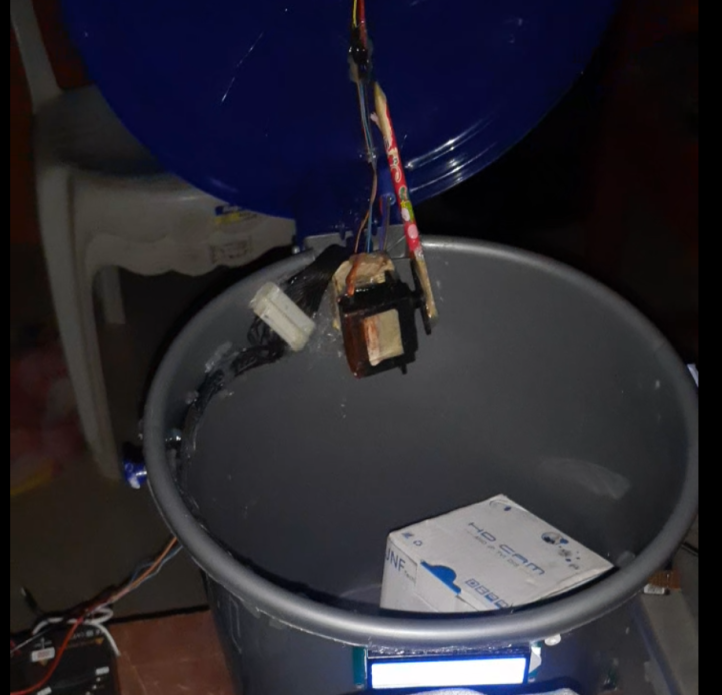
The construction of the Smart Bin design was done using soldering and coupling of active circuits. The soldering was done on the VERO Board using a 40-watt soldering iron, and the components were properly arranged by following the designed circuit diagram of the project.
Thinning
Thinning involves the smooth scrapping of terminal components, either by knife or sand paper, before and after soldering.
Soldering
Soldering involves the joining of the conductors or component terminals to the circuit board by means of soldering iron and soldering lead. This process was carried out after the terminals of the component had been thinned and positive results had been obtained from the testing of the component.
Assembly of Components
The number of components determined the size of the VERO board used, and in dimensioning the size of the board, allowance is given for the arrangement if the need arises.
Testing of Smart Automatic Trash Basket
The project design worked as expected. It was performed as we programmed and optimized it to be. The wastes that was usually littered around trash baskets when they were filled up has been curbed since the trash basket doesn’t open for users but instead notifies them that it is currently full and is waiting for the waste management team to come and dispose of its content and they users can check back later.
Conclusion
Having achieved a smart bin that has the capacity of detecting the presence of human beings, opening the lead with no contact whatsoever and allowing people to dispose of trash effectively. The Smart Automatic Trash Basket project will be smart enough to check the depth of the trash that is inside it; then once full, the bin won’t automatically open again for people to dispose of trash. But rather would send a beeping sound and direct them via their smart LCD screen to use the next available smart bin or check back later. Finally, it will notify the waste managers to come and dispose off its content.

