Imagine a website without images. A sea of text, devoid of visual interest, where user engagement plummets faster than a dropped ice cream cone. Yikes! Thankfully, the HTML image element swoops in like a superhero, allowing you to embed captivating visuals that enhance user experience and bring your web pages to life. Whether you’re a seasoned web developer or a curious newcomer, this guide delves into the world of the HTML image element, empowering you to craft visually stunning and informative web pages.
The <img> Tag
The beating heart of image integration in HTML is the <img> tag. This simple yet powerful tag acts as a placeholder, instructing the browser to fetch and display an image at a specific location. Think of it as a magic portal that transports an image from its digital storage location onto your webpage, ready to capture the user’s attention.
How to Use the HTML Image Element In Your HTML Code

To include an image from a webpage, you can open up your editor and just type the <img> tag, this should autocomplete. For us, to include the legendary M.J picture from the internet, we used the HTML code:
<img src="https://m.media-amazon.com/images/M/MV5BMTM1NjExNjg1OV5BMl5BanBnXkFtZTcwMTQ0NzIwMw@@._V1_FMjpg_UX1000_.jpg" alt="image of Michael Jackson" width="100" height="100">
As shown, the image source is from the Amazon.com media page. The downside of using an image source like this is that, when the webserver from which the image is being hosted is down, the image won’t be displayed. However, since we included the alternate text, this would be the only thing showing.
We could also use the image attribute to size the image being displayed. This is shown in the code in terms of specifying the width and height of the image.
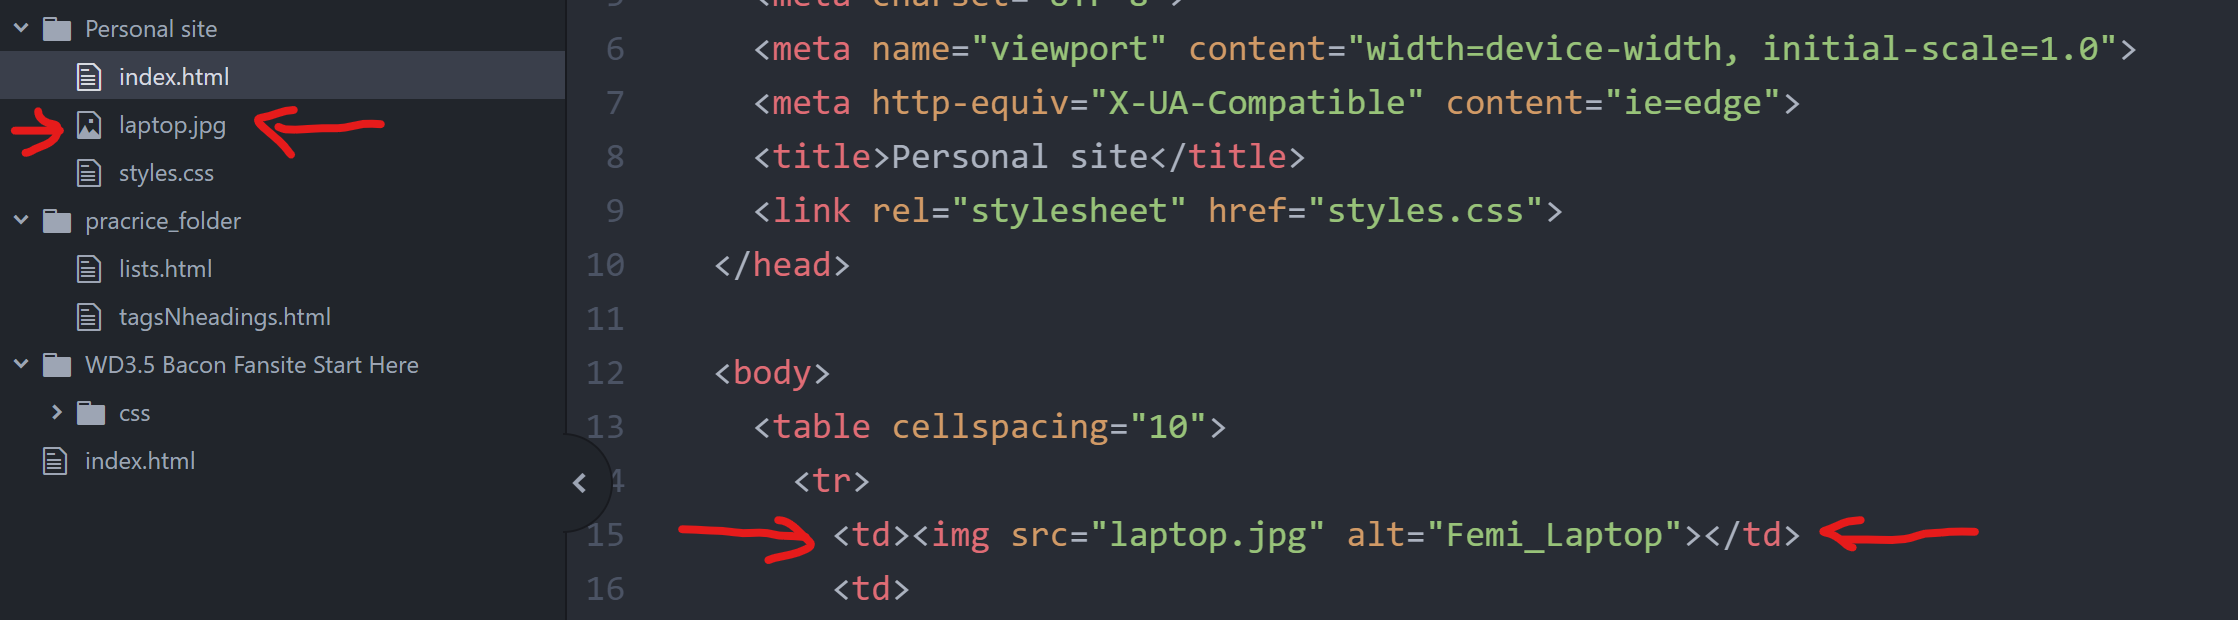
Another way to add your image is from your local folder. However, you have to specify the address of the image. Ensure that you get this right. As shown above, the image is in the same folder as the HTML file. and we can outline the source. This is ensure the image is being displayed.
The Power Within the <img> Tag
While the <img> tag itself is sufficient to embed an image, certain attributes unlock its full potential:
- src: This is the mandatory hero – the attribute that specifies the path (URL) to the image file. Without a valid
srcattribute, your magic portal remains empty, leaving a broken image icon – not a good look! - alt: Imagine a world without images – but with helpful descriptions for those who can’t see them. The
altattribute provides alternative text that describes the image content. This is crucial for accessibility, ensuring visually impaired users understand the image’s purpose, and for SEO (Search Engine Optimization), helping search engines understand your content better.
Remember: A good alt attribute should be concise, descriptive, and relevant to the image content. Don’t stuff it with keywords in an attempt to game the SEO system – search engines are smarter than that these days!
- width & height: Ever seen a website where images stretch and distort, resembling a funhouse mirror gone wrong? These attributes allow you to specify the image’s width and height in pixels (px). While not mandatory, using these attributes ensures your images display at their intended size, preventing unwanted distortion and maintaining a clean and professional website aesthetic.
Pro Tip: If you omit the width and height attributes, the browser will typically display the image at its original size. However, this can lead to layout issues on different screen sizes. It’s generally recommended to specify these attributes whenever possible.
Where to Place Your Images
The placement of your images significantly impacts user experience and website flow. Here are some common strategies:
- Left-aligned, Right-aligned, or Centered: These alignments position the image relative to the surrounding text content. Imagine a news article with an image placed to the left, illustrating the story without interrupting the text flow.
- Floated Images: These images “float” alongside the text content, allowing text to wrap around them. Think of a product image on an e-commerce website, with the product description flowing seamlessly beside it.
Remember: Experiment with different image placements to find what works best for your specific content and layout goals.
Taking Images to the Next Level with CSS
While HTML provides the foundation for embedding images, CSS (Cascading Style Sheets) injects the magic touch. With CSS, you can transform your basic images into visually stunning elements that further enhance user experience.
Here are a few ways to style your images with CSS:
- Borders & Rounded Corners: Want to add a subtle border or create a sleek, modern look with rounded corners? CSS empowers you to do just that.
- Image Effects: Feeling creative? CSS lets you apply various effects like grayscale, opacity adjustments, or even hover effects that change the image appearance when a user hovers over it with their mouse.
- Responsive Design: In today’s mobile-first world, ensuring your website and images adapt seamlessly to different screen sizes is crucial. CSS media queries allow you to define different image sizes and styles for various screen resolutions, guaranteeing a flawless user experience across all devices.
Making Images Inclusive for All
Inclusivity is paramount when building websites. Images play a vital role, but users with visual impairments might not be able to perceive them directly. Here’s how to ensure your images are accessible to everyone:
- Descriptive
altText: As mentioned earlier, a well-craftedaltattribute is key. Imagine a visually impaired user relying on a screen reader to navigate your website. Thealttext becomes their window into the image’s content.
- Long Descriptions: For complex images with intricate details, consider providing a longer description beyond the
alttext. This can be achieved by incorporating an additional<figure>and<figcaption>element pair within your HTML code. The<figcaption>element provides a space for a more detailed explanation of the image content, accessible through screen readers or other assistive technologies.
Advanced Techniques for the HTML Image Element
The HTML image element offers more than meets the eye (or screen, in this case). Here are some advanced techniques to explore:
- Image Maps: Imagine an image with clickable hotspots that link to different web pages. Image maps allow you to create clickable regions within an image, transforming a static image into an interactive element. This can be a great way to showcase product details on an e-commerce website or create interactive infographics.
- Lazy Loading: With websites often boasting high-resolution images, page load times can become sluggish. Lazy loading is an optimization technique that delays the loading of images outside the current viewport (the visible portion of the web page) until they are scrolled into view. This improves initial page load speed and enhances user experience, especially on slower internet connections.
- SVG Images: Scalable Vector Graphics (SVG) offer a unique alternative to traditional image formats (JPEG, PNG). SVG images are vector-based, meaning they can be scaled to any size without losing quality. This makes them ideal for logos, icons, and other graphics that need to adapt to different screen sizes while maintaining crisp visuals.
SEO Optimization: Images as Ranking Powerhouses
Search Engine Optimization (SEO) is the art of making your website more discoverable by search engines. Believe it or not, optimizing your images can actually improve your website’s ranking in search results. Here’s how:
- Descriptive File Names: Don’t settle for generic file names like “image01.jpg.” Instead, use descriptive file names that accurately reflect the image content. Search engines consider file names when indexing your website, so including relevant keywords can give your ranking a boost.
- Image Alt Text: As mentioned earlier, a well-written
alttext attribute not only benefits accessibility but also SEO. Search engines can extract information from youralttext, helping them understand the image’s content and its relevance to your overall webpage content. - Image Compression: While high-quality images are important, excessively large file sizes can slow down your website. Use image compression tools to optimize your images for the web without sacrificing too much quality. Smaller file sizes lead to faster loading times, which is a positive ranking factor for search engines.
Conclusion
From enhancing user experience to boosting your SEO ranking, the HTML image element is a powerful tool in your web development arsenal. By mastering the fundamentals, exploring advanced techniques, and leveraging the styling capabilities of CSS, you can transform your images from mere decorations into engaging and informative elements that elevate your web pages to the next level. So, unleash your creativity, embrace the power of visuals, and let your images speak a thousand words (or at least a compelling visual story) on your website!
Frequently Asked Questions (FAQs)
1. What are some common mistakes to avoid when using the HTML image element?
- Missing
srcattribute (broken image icon alert!) - Neglecting
alttext (inaccessibility and missed SEO opportunity) - Using excessively large image files (slow loading times)
2. How can I ensure my images are responsive and adapt to different screen sizes?
- Utilize CSS media queries to define image sizes and styles for various screen resolutions.
3. What are some alternative image formats besides JPEG and PNG?
- SVG (Scalable Vector Graphics) offer superior scalability and are ideal for logos and icons.
4. How can I optimize my images for SEO?
- Use descriptive file names and
alttext attributes with relevant keywords. - Compress image files to reduce file size without sacrificing significant quality.
5. Where can I find more resources to learn about the HTML image element and image optimization techniques?
With a solid understanding of the HTML image element and the power of visuals, you’re well on your way to crafting visually stunning and user-friendly websites that capture attention and leave a lasting impression. So, happy image embedding!