Solar energy is one of the most accessible and environmentally friendly sources of power. However, capturing this energy efficiently requires a system that can follow the sun’s path, ensuring optimal exposure throughout the day. This is where a solar tracker comes in. In this article, we’ll walk you through building a solar tracker system integrated with weather station monitoring. The system will use an Arduino Mega to read weather sensors and control the orientation of a 10W solar panel to optimize sun exposure.
Not only does this project track the sun, but it also monitors weather conditions like temperature, humidity, and rainfall using a DHT22 sensor and a rain sensor. An upgrade is done to this later to include an ESP8266-01 module that sends the weather data to an IoT platform for real-time monitoring.
Introduction to Solar Trackers
A solar tracker is a device that orients solar panels toward the sun to maximize energy capture. Unlike static panels, solar trackers follow the sun’s movement, increasing the efficiency of solar energy collection by up to 30-50%.
In this project, we enhance our solar tracker with weather station features. The system not only tracks the sun but also collects environmental data, providing real-time information on temperature, humidity, and rainfall.
Why Build a Solar Tracker with Weather Station?
Building your own solar tracker with weather station monitoring offers multiple benefits:
- Increased Solar Efficiency: Solar panels follow the sun’s path for optimal exposure.
- Real-time Weather Monitoring: Get live updates on the environmental conditions affecting your solar system.
- Educational Experience: This project offers an opportunity to learn about solar energy, electronics, and IoT integration.
Materials and Components Needed

For this project, here’s a list of all the components and modules we used:
Arduino Mega 2560 Compact Board Type: Acts as the brain of the system, reading sensors and controlling servos. You can also use any other Arduino board of your choice. We found that this was cheaper and provided us with the needed IO pins we needed in the project design.
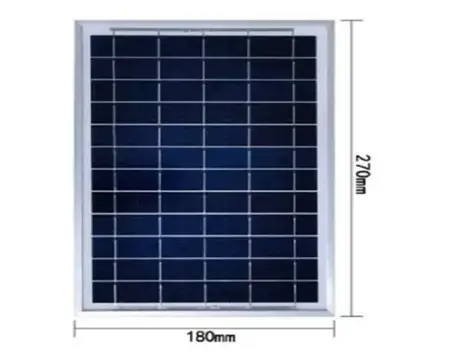
10W Solar Panel: This is the panel that will follow the sun’s movement. It is also used to charge the backup battery using a DC-DC buck converter or a LiPo charging module.
DHT22 Sensor: Measures temperature and humidity. We needed to measure the atmospheric temperature and the humidity. Hence we implored this module for that job.
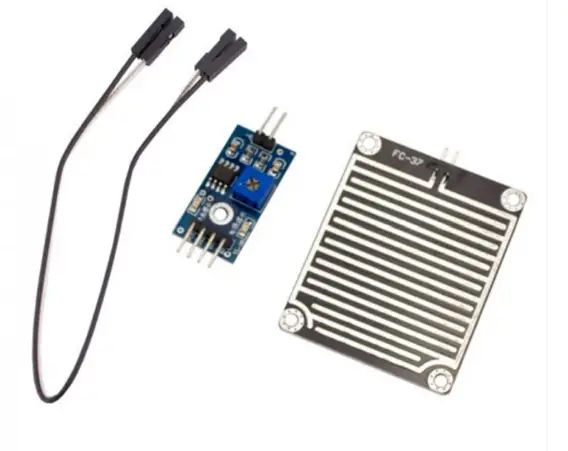
Rain Sensor Module: Detects rainfall and alerts the system. We used this to know when there is rain drops or simulate the advent of rain fall for the solar tracker with weather station design.
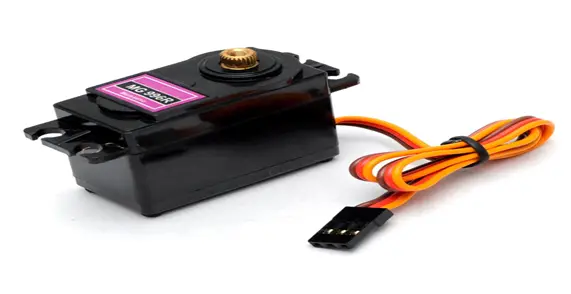
2 Servo Motors: Used to adjust the position of the solar panel. The directional movement of the solar panel in the horizontal and vertical directions are actually done by these pair. One of these is responsible for the vertical movement while the other the horizontal rotation.
ESP8266-01 Module (Optional): For sending data to an IoT platform. Since We included an upgrade of IoT to the project, We used the ESP-01 module to send the readings to the Zafron IoT dashboard. However, you can add a display screen and save yourself this hassle.
DC-DC Buck Converter: Used to regulate the voltage for the Arduino and other components.
3.7V LiPo Batteries (2x): Backup power source to ensure the system runs even during cloudy conditions.
Connecting Wires, female header pin, connectors and Other Connecting Materials: Essential for wiring and connecting components.
Read Also IoT Health Monitoring with LoRa, ESP32 Arduino for Real-Time Tracking
What is a Dual-Axis Solar Tracker?
In this project, we are building a dual-axis solar tracker, which allows movement in two directions: horizontal and vertical. This ensures that the solar panel can follow the sun as it moves from east to west, and also adjusts its tilt as the sun’s angle changes throughout the day.
Solar Tracker With Weather Station: The Schematic Diagram
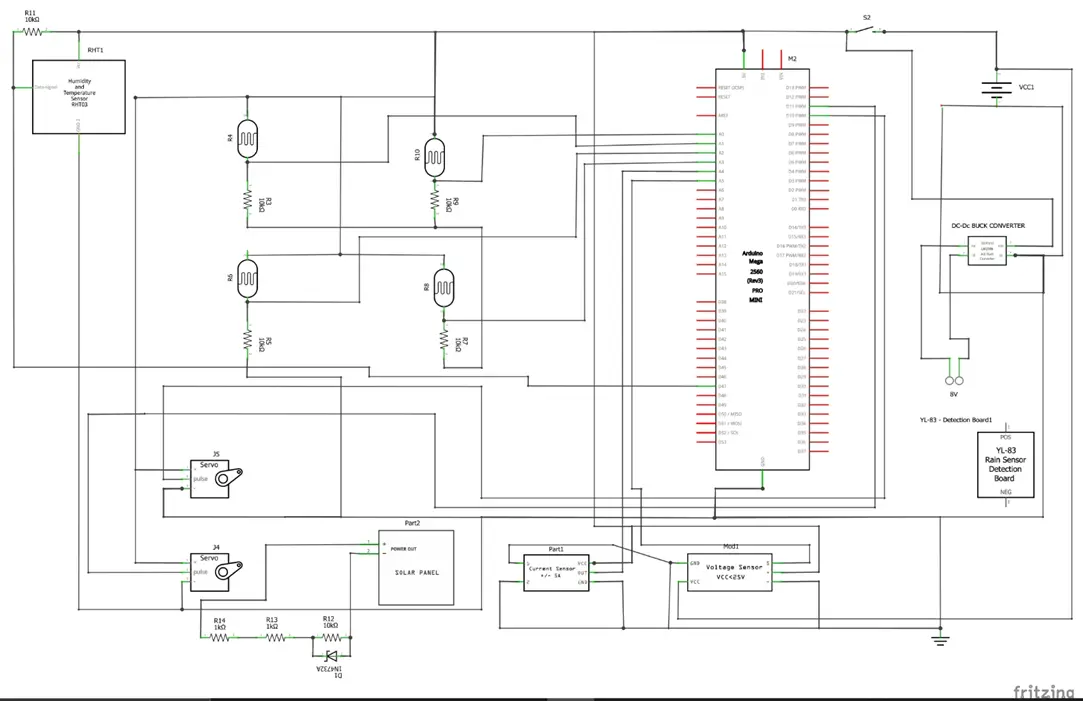
Explanation of the The Schematic Diagram of Solar Tracker With Weather Station
Attaching the Servo Motors
We needed two servo motors—one to control the horizontal movement and another to control the tilt. According to the schematic diagram above, here’s how to wire the servos to the Arduino Mega:
- Servo 1 (Horizontal): Connect the signal pin to pin 10 on the Arduino.
- Servo 2 (Vertical): Connect the signal pin to pin 11 on the Arduino.
- We powered the servos using the 5V from the DC-DC buck converter.
Connecting the DHT22 Sensor
The DHT22 sensor will be used to measure the temperature and humidity of the environment. Here’s how we wired it:
- VCC: Connect to 5V on the Arduino.
- GND: Connect to Ground.
- DATA: Connect to pin D47 on the Arduino.
Wiring the Rain Sensor
The rain sensor detects the presence of rainfall. This sensor will be particularly useful in conditions where solar energy collection is reduced due to rain. Here’s the wiring:
- VCC: Connect to 5V on the Arduino.
- GND: Connect to Ground.
- OUT: Connect to pin A0 (Analog Input).
Power Management
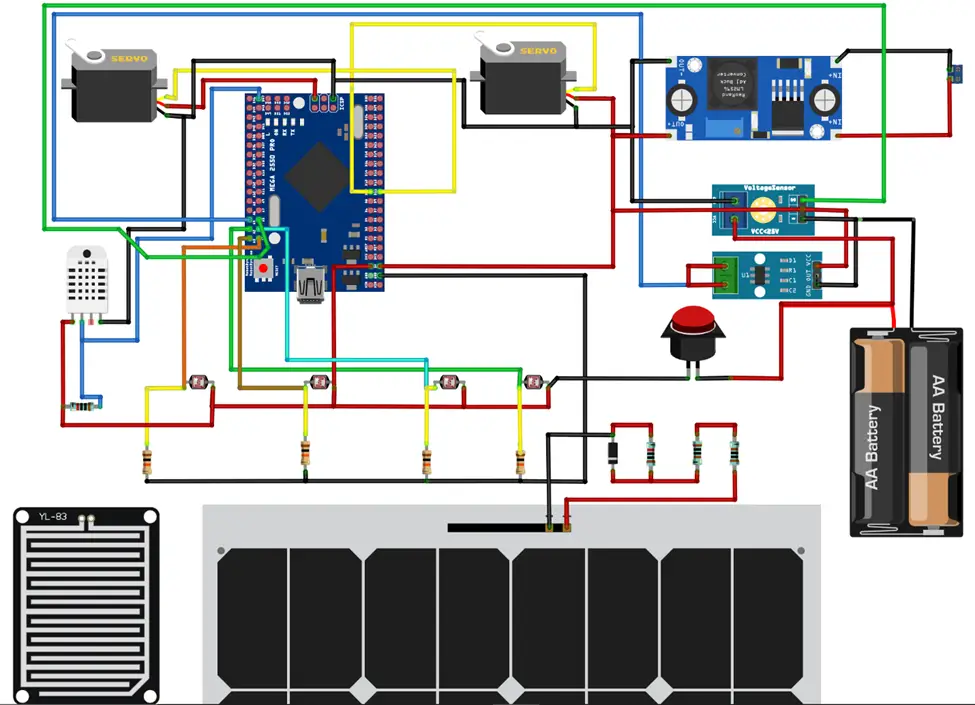
To ensure the solar tracker runs efficiently, even during power fluctuations, we use dtwo 3.7V LiPo batteries and a DC-DC buck converter.
- LiPo Batteries: Provide backup power during cloudy conditions.
- Buck Converter: Steps down the voltage from the batteries to power the Arduino and other components without overloading them.
Measuring Voltage and Current of The PV and Battery
We included two sensors, the voltage sensor module and the current sensor module to measure the voltage and current of the solar panel that is being dissipated onto the batteries. We used the whole project as an entire load for the current sensor module.
Programming the Arduino Mega 2560
Once everything is wired, it’s time to write the Arduino code. We used the following Arduino code:
#include <Servo.h>  // include Servo library
#include "DHT.h"    // include the DHT22 sensor lib
#include <SoftwareSerial.h>

SoftwareSerial arduino(30, 28);// hardware Rx<=>D26, hardware Tx<=>31, IO0 <=>D28, IO2<=>D30

// 180 horizontal MAX
Servo horizontal;  // horizontal servo
int servoh = 45;   // 90;     // stand horizontal servo

int servohLimitHigh = 120;
int servohLimitLow = 10;

// 65 degrees MAX
Servo vertical;   // vertical servo
int servov = 45;  //   90;     // stand vertical servo

int servovLimitHigh = 165;
int servovLimitLow = 25;

//DHT22 sensor
#define DHTPIN 46      // Digital pin connected to the DHT sensor
#define DHTTYPE DHT22  // DHT 22
DHT dht(DHTPIN, DHTTYPE);

// LDR pin connections
//  name  = analogpin;
int ldrlt = A12;  //LDR top left - BOTTOM LEFT    <--- BDG
int ldrrt = A8;  //LDR top rigt - BOTTOM RIGHT
int ldrld = A6;   //LDR down left - TOP LEFT
int ldrrd = A8;   //ldr down rigt - TOP RIGHT

//this is for the rain sensor, pv and battery
int rainSensorPin,readRainSensor, battSensorPin, pvSensorPin, lt, rt, ld, rd;
float h, t, readPVsensor,  readBattSensor;
int lumIntenLT, lumIntenRT, lumIntenLD, lumIntenRD, averageLumInten;

int ldrRes = 1000;
int ldrFixRes = 10000;
//for the PV voltage
// Floats for ADC voltage & Input voltage
float adc_voltage = 0.0;
float in_voltage = 0.0;
// Floats for resistor values in divider (in ohms)
float R1 = 2000.0;
float R2 = 10000.0;
// Float for Reference Voltage
float ref_voltage = 5.0;
// Integer for ADC value
int adc_value = 0;
//for Battery Level
// Floats for resistor values in divider (in ohms)
float R3 = 30000.0;
float R4 = 7500.0;
float adc_Battvoltage = 0.0;
float in_Battvoltage = 0.0;
int adc_Battvalue = 0;

const int ledPin = LED_BUILTIN;  // the number of the LED pin

// Variables will change:
int ledState = LOW;  // ledState used to set the LED
unsigned long previousMillis = 0;  // will store last time LED was updated

// constants won't change:
const long interval = 200;  // interval at which to blink (milliseconds)

float dht22Sensor() {
  // Reading temperature or humidity takes about 250 milliseconds!
  // Sensor readings may also be up to 2 seconds 'old' (its a very slow sensor)
   h = dht.readHumidity();
  // Read temperature as Celsius (the default)
  t = dht.readTemperature();
  // Read temperature as Fahrenheit (isFahrenheit = true)
  float f = dht.readTemperature(true);

  // Check if any reads failed and exit early (to try again).
  if (isnan(h) || isnan(t) || isnan(f)) {
    Serial.println(F("Failed to read from DHT sensor!"));
    return;
  }

  // Compute heat index in Fahrenheit (the default)
  float hif = dht.computeHeatIndex(f, h);
  // Compute heat index in Celsius (isFahreheit = false)
  float hic = dht.computeHeatIndex(t, h, false);

  Serial.print(F("Humidity: "));
  Serial.print(h);
  Serial.print(F("%  Temperature: "));
  Serial.print(t);
  Serial.print(F("°C "));
  Serial.print(f);
  Serial.print(F("°F  Heat index: "));
  Serial.print(hic);
  Serial.print(F("°C "));
  Serial.print(hif);
  Serial.println(F("°F"));
  return h, t;
}


int rainSenor() {
  rainSensorPin = A0;
  readRainSensor = analogRead(rainSensorPin);
  Serial.print("Rain sensor: ");
  Serial.println(readRainSensor);
  return readRainSensor;
}

float pvVoltageLevel() {
  pvSensorPin = A5;
  readPVsensor = analogRead(pvSensorPin);
  // Determine voltage at ADC input
  adc_voltage = (readPVsensor * ref_voltage) / 1024.0;

  // Calculate voltage at divider input
  in_voltage = adc_voltage / (R2 / (R1 + R2));
  Serial.print("PV Voltage Level: ");
  Serial.println(in_voltage);
  return in_voltage;
}

float battVoltageLevel() {
  battSensorPin = A1;
  readBattSensor = analogRead(battSensorPin);
  // Determine voltage at ADC input
  adc_Battvoltage = (readBattSensor * ref_voltage) / 1024.0;

  // Calculate voltage at divider input
  in_Battvoltage = adc_Battvoltage / (R4 / (R3 + R4));
  Serial.print("Battery Voltage Level: ");
  Serial.println(in_Battvoltage);
  return in_Battvoltage;
}

int trackSun() {
   lt = analogRead(ldrlt);  // top left
  rt = analogRead(ldrrt);  // top right
  ld = analogRead(ldrld);  // down left
  rd = analogRead(ldrrd);  // down rigt
  // int dtime = analogRead(4)/20; // read potentiometers
  // int tol = analogRead(5)/4;
  int dtime = 200;
  int tol = 50;

  int avt = (lt + rt) / 2;  // average value top
  int avd = (ld + rd) / 2;  // average value down
  int avl = (lt + ld) / 2;  // average value left
  int avr = (rt + rd) / 2;  // average value right

  int dvert = avt - avd;   // check the diffirence of up and down
  int dhoriz = avl - avr;  // check the diffirence og left and rigt
    averageLumInten = (avt + avd + avl + avr)/4;

  Serial.print(avt);
  Serial.print(" ");
  Serial.print(avd);
  Serial.print(" ");
  Serial.print(avl);
  Serial.print(" ");
  Serial.print(avr);
  Serial.print("   ");
  Serial.print(dtime);
  Serial.print("   ");
  Serial.print(tol);
  Serial.println(" ");
  Serial.print("Average Lum ");
  Serial.print(averageLumInten);
  Serial.println(" ");


  if (-1 * tol > dvert || dvert > tol)  // check if the diffirence is in the tolerance else change vertical angle
  {
    if (avt > avd) {
      servov = ++servov;
      if (servov > servovLimitHigh) {
        servov = servovLimitHigh;
      }
    } else if (avt < avd) {
      servov = --servov;
      if (servov < servovLimitLow) {
        servov = servovLimitLow;
      }
    }
    vertical.write(servov);
  }

  if (-1 * tol > dhoriz || dhoriz > tol)  // check if the diffirence is in the tolerance else change horizontal angle
  {
    if (avl > avr) {
      servoh = --servoh;
      if (servoh < servohLimitLow) {
        servoh = servohLimitLow;
      }
    } else if (avl < avr) {
      servoh = ++servoh;
      if (servoh > servohLimitHigh) {
        servoh = servohLimitHigh;
      }
    } else if (avl = avr) {
      // nothing
    }
    horizontal.write(servoh);
  }
  delay(dtime);
  return averageLumInten;
}

void setup() {
  Serial.begin(115200);
  arduino.begin(115200);
  dht.begin();
  pinMode(ledPin, OUTPUT);
  // servo connections
  // name.attacht(pin);
  horizontal.attach(7);
  vertical.attach(6);
  horizontal.write(40);
  vertical.write(78);
  delay(3000);
}

void loop() {
  unsigned long currentMillis = millis();

  if (currentMillis - previousMillis >= interval) {
    // save the last time you blinked the LED
    previousMillis = currentMillis;

    // if the LED is off turn it on and vice-versa:
    if (ledState == LOW) {
      ledState = HIGH;
      trackSun();
    } else {
      ledState = LOW;
      sendData();
    }
    digitalWrite(ledPin, ledState);
  }
}

void sendData(){
  dht22Sensor();
  rainSenor();
  pvVoltageLevel();
  battVoltageLevel();

  arduino.print(h);                   arduino.print("A");
  arduino.print(t);                   arduino.print("B");
  arduino.print(averageLumInten);     arduino.print("C");
  arduino.print(readRainSensor);      arduino.print("D");
  arduino.print(in_voltage);          arduino.print("E");
  arduino.print(in_Battvoltage);      arduino.print("F");
  arduino.print("\n");
}
Explanation of The Arduino Source Code
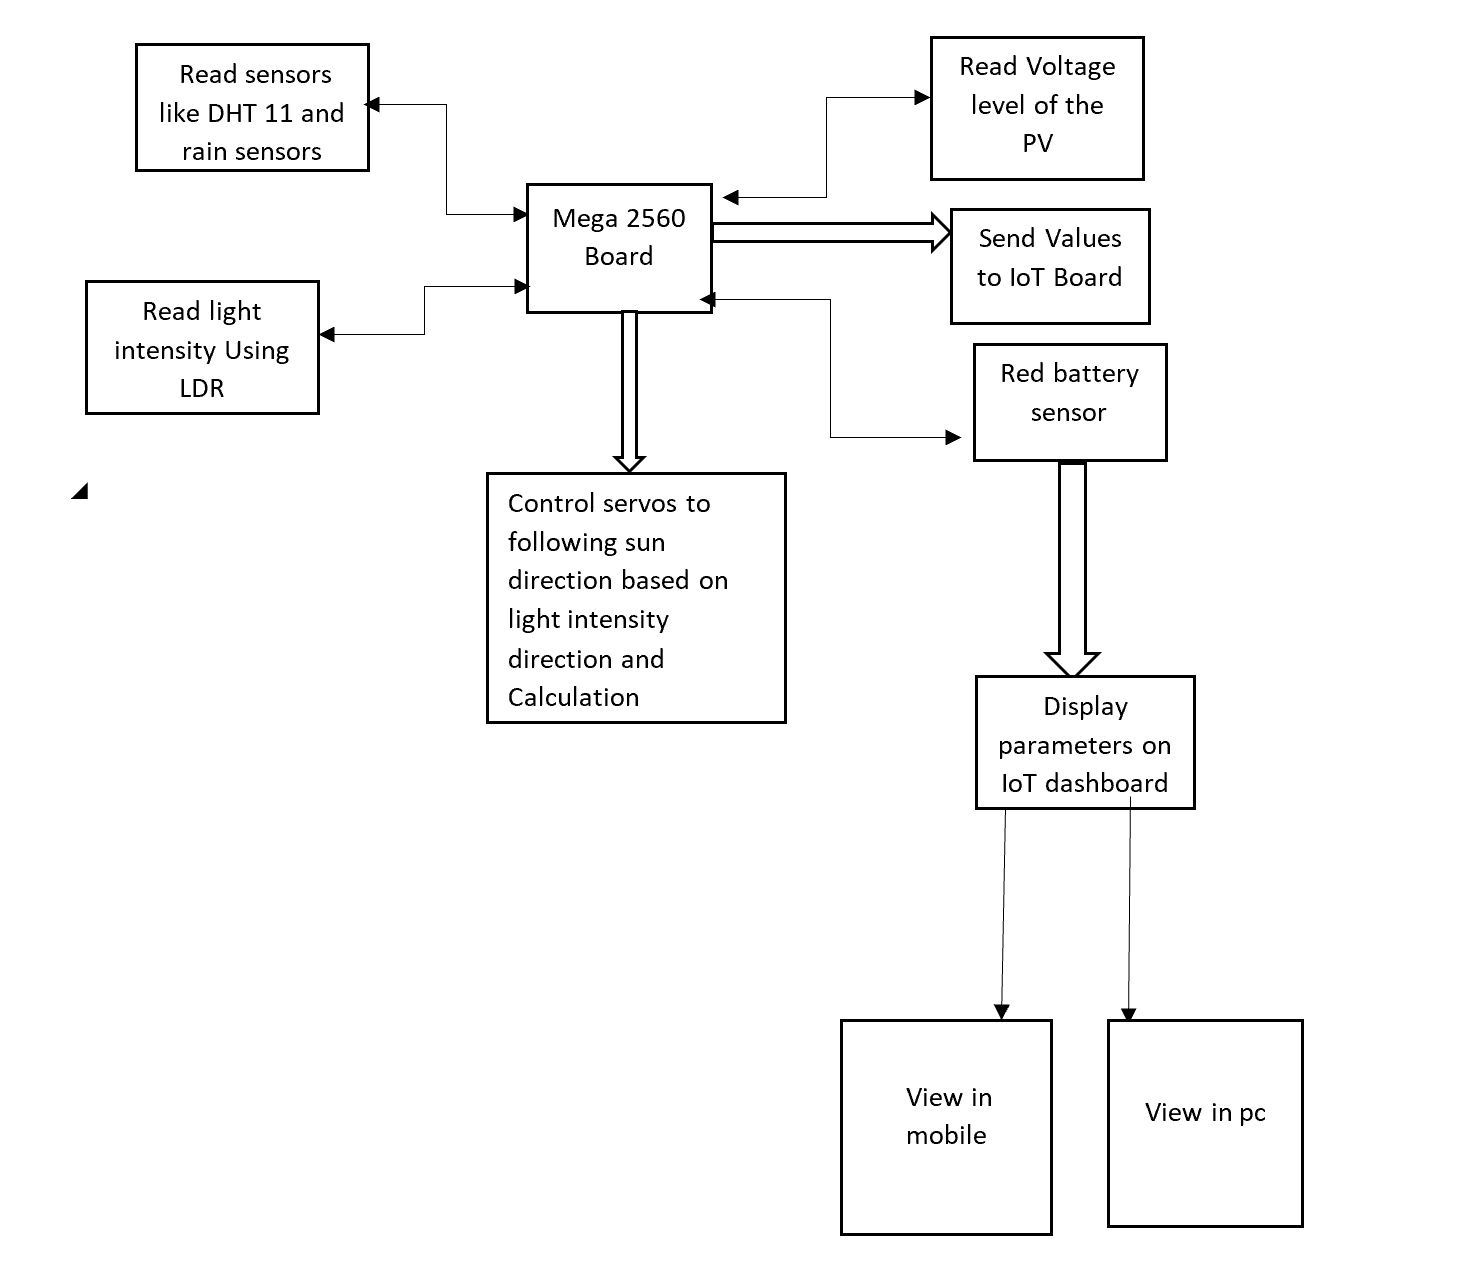
This Arduino code is designed to manage various environmental sensors (DHT22, LDR, rain sensor) and control servo motors to track the sun. It uses a DHT22 sensor for measuring temperature and humidity, a rain sensor to detect moisture, and an LDR array for light intensity to track the sun’s position. The servos, controlled by horizontal and vertical angle adjustments, enable the system to orient itself towards the brightest light source, such as the sun. The code also includes logic for measuring photovoltaic (PV) and battery voltage levels, storing these values for further use.
In the setup() function, the serial communication is initialized, the DHT sensor is started, and the servo motors are attached to their respective pins. The servos are then set to predefined positions. The main logic resides in the loop() function, where the current system time is used to alternate between two tasks: tracking the sun by adjusting the servo angles based on light intensity data from the LDR sensors, and sending sensor data (temperature, humidity, light intensity, rain level, PV voltage, and battery voltage) to an external system via the SoftwareSerial interface.
The sendData() function collects the sensor readings, such as temperature, humidity, and voltage levels. This data is sent via serial communication using specific labels to indicate the different sensor values (A for humidity, B for temperature, etc.). The sun-tracking function calculates the average light intensity on different quadrants, and the servos adjust their angles accordingly to ensure maximum exposure to light. This design can be used for solar panel tracking systems or environmental monitoring applications.
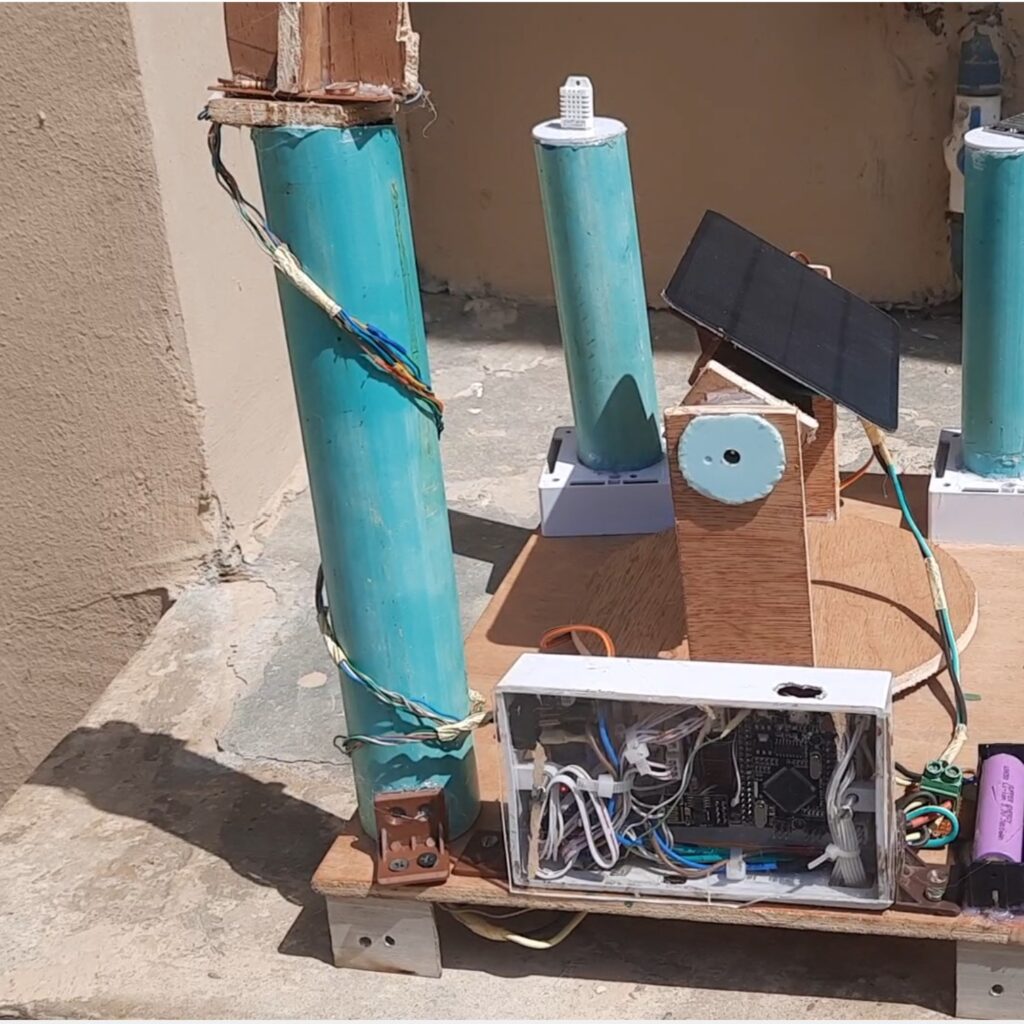
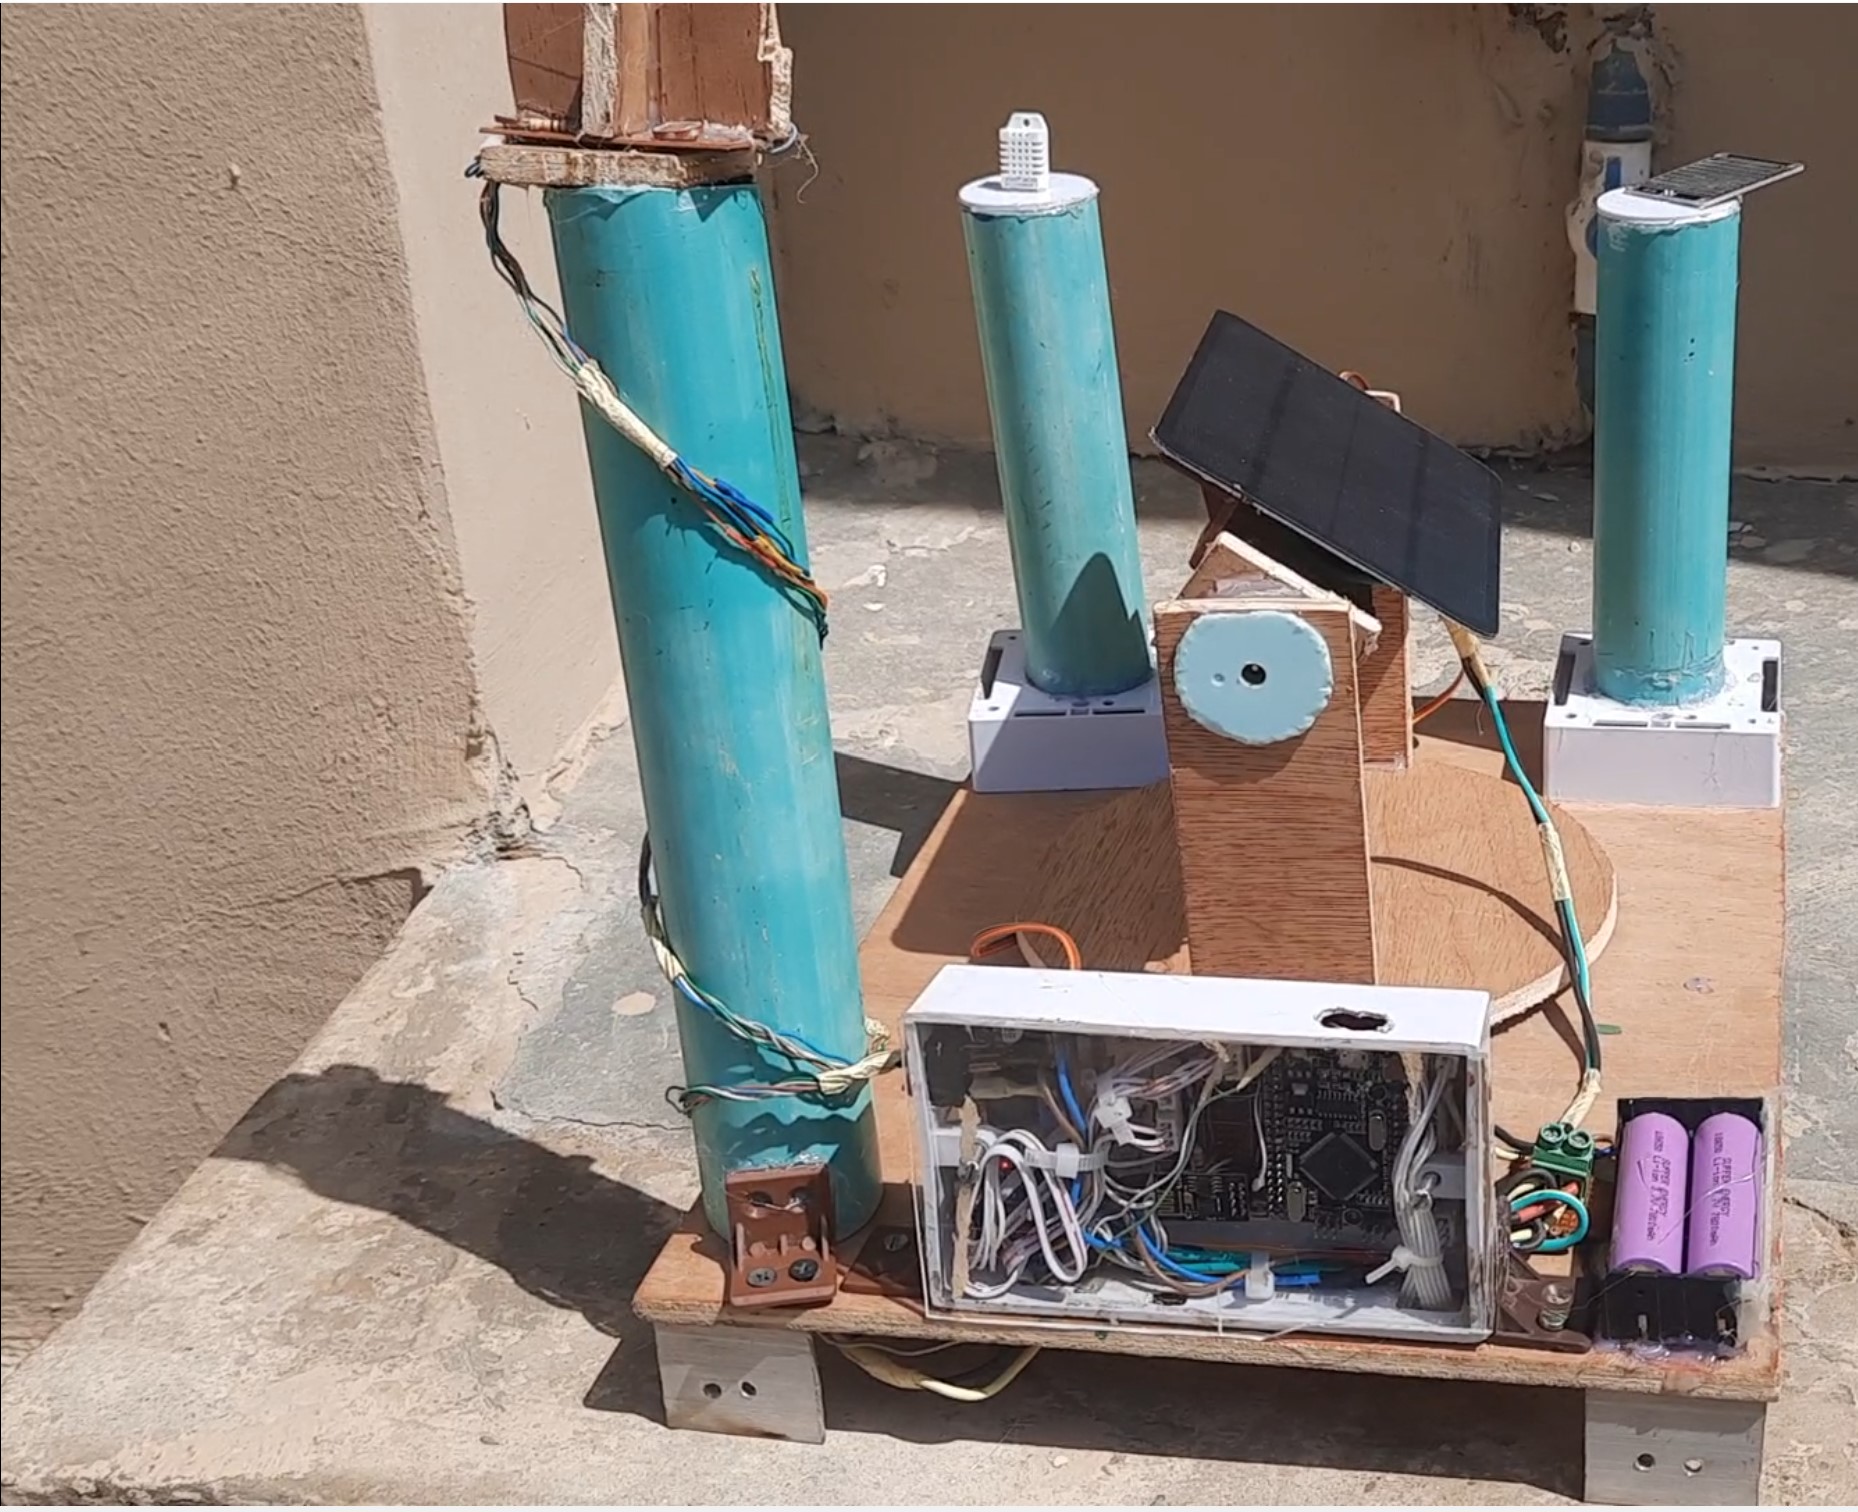
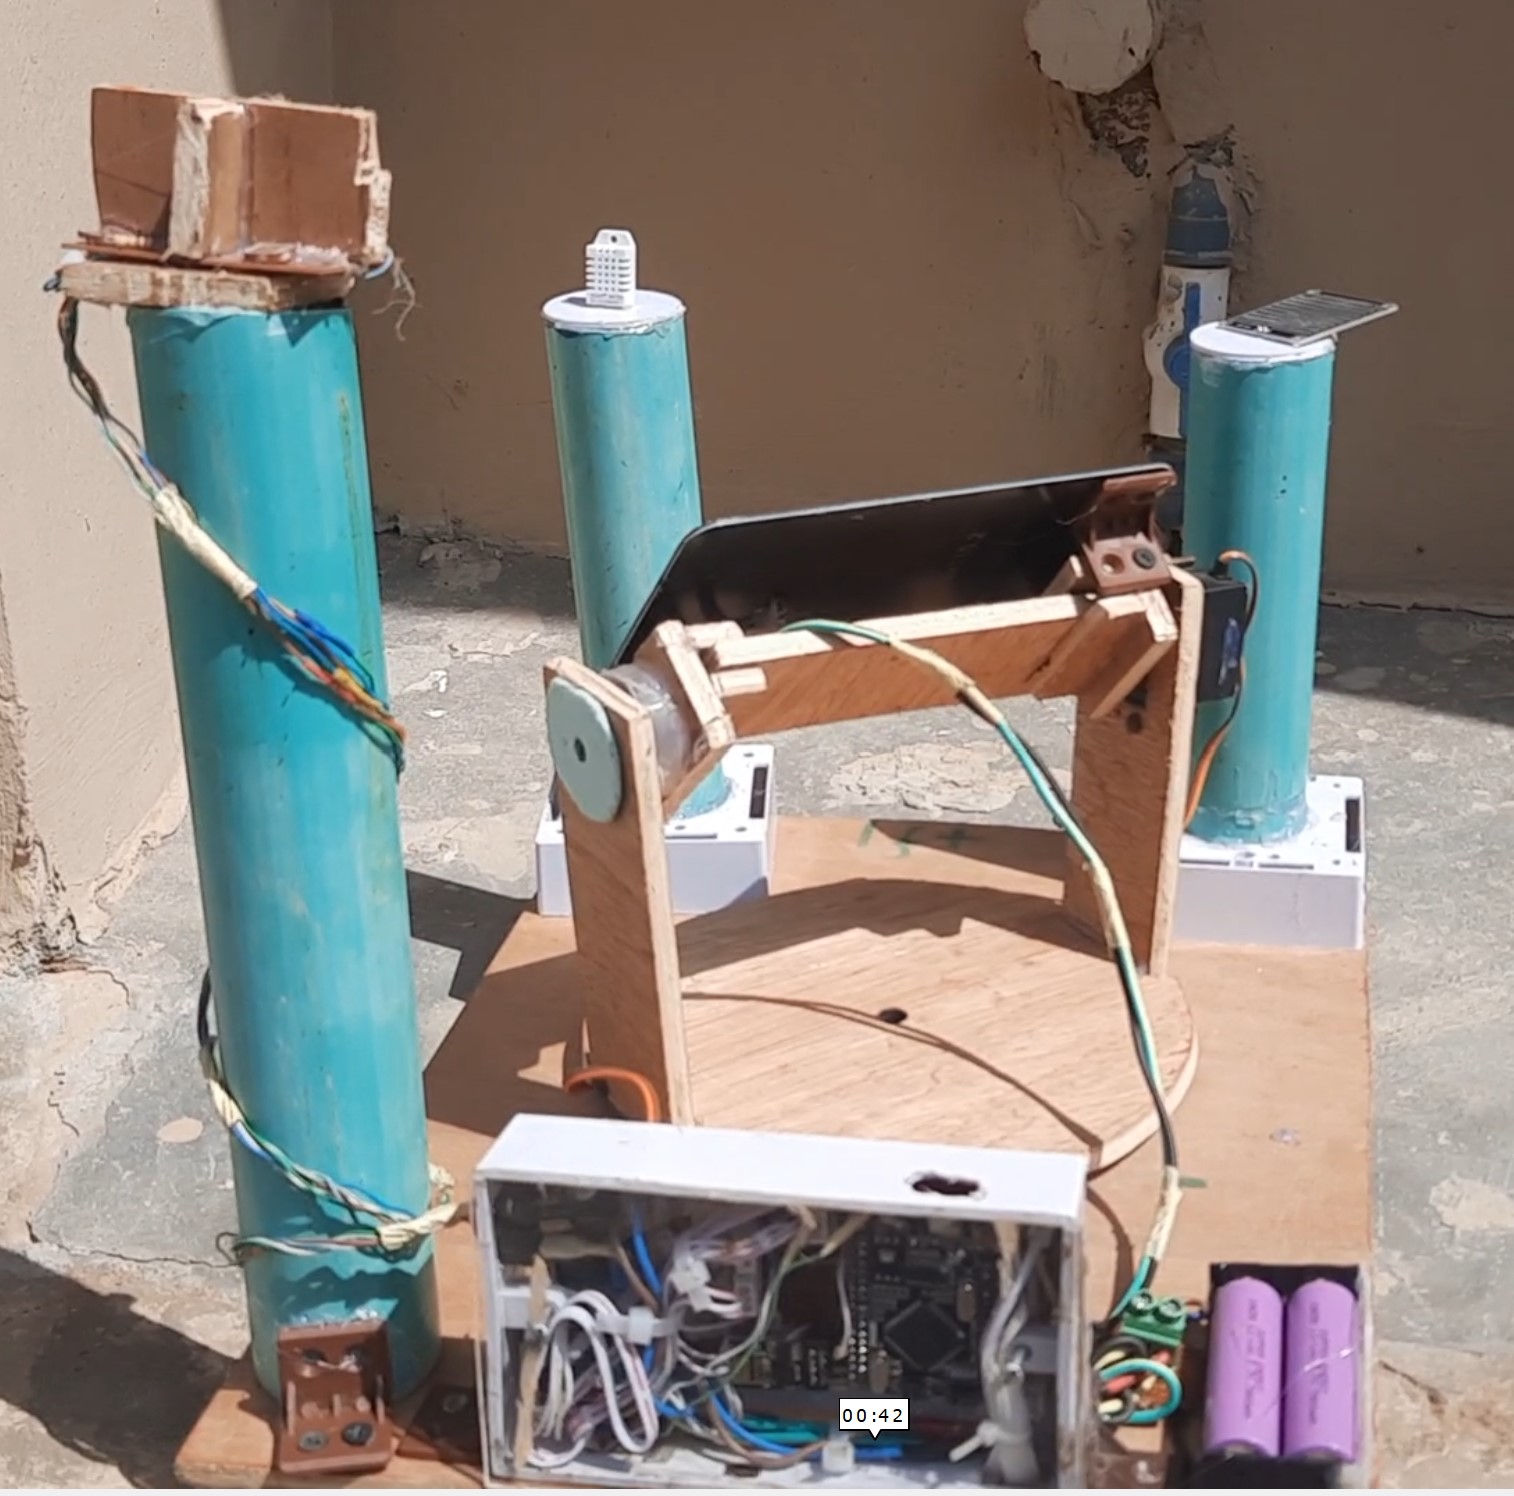
Testing and Monitoring the Solar Tracker
The system responds to the direction of the sun by moving the solar panel to face the sun when the system is powered on. The sensors are made to be powered by the rechargeable batteries.
Once our solar tracker is up and running, we’ll want to monitor the data in real-time. The IoT platform we chose allowed us to track temperature, humidity, and rainfall remotely.
Troubleshooting Common Issues
Servo Motor Jitter
Servo motors may experience jittering if not properly powered or if the code isn’t optimized. Ensure your power supply is stable and check your servo code for smooth movement.
Conclusion
Building a solar tracker with integrated weather station monitoring is a great way to enhance the efficiency of solar energy systems while keeping tabs on environmental conditions. With components like the Arduino Mega, DHT22 sensor, and ESP8266-01 module, you can create a smart system that not only tracks the sun but also provides real-time weather data to an IoT platform. This project is a step towards creating more sustainable, energy-efficient systems that adapt to their surroundings.
Call to Action
Have questions about building your own solar tracker with weather monitoring? Leave a comment below! We’d love to hear your thoughts and ideas on making this project even better.
FAQs
What is the purpose of a solar tracker?
A solar tracker increases the efficiency of solar panels by following the sun’s movement throughout the day, ensuring optimal sunlight exposure.
Why integrate a weather station into the solar tracker?
Weather stations provide real-time data on environmental conditions like temperature, humidity, and rainfall, which can impact solar energy efficiency.
Can I use a different IoT platform than ESP8266-01?
Yes, you can use platforms like Blynk, Adafruit IO, or ThingSpeak to monitor weather data and solar tracking remotely.
How do the servo motors adjust the solar panel’s position?
The servo motors adjust the panel’s tilt and horizontal position based on the sun’s direction, optimizing exposure.
Can this system work in areas with frequent cloudy weather?
Yes, the LiPo batteries provide backup power, and the system can still track and send data even when the sun isn’t fully visible.

