Introduction: Why Build Your Own PID Controller?
Ever wondered how your oven stays at just the right temperature? That magic lies in a PID controller and yes, you can build one yourself! Whether you’re a hobbyist or just love tinkering, creating a DIY PID controller for temperature control systems is not only doable, it’s fun and rewarding. Let’s dive into this step-by-step guide to mastering heat like a pro!
What Is a PID Controller?

PID = Proportional + Integral + Derivative
Think of it like a smart thermostat. It constantly adjusts the power to keep your temperature steady, without wild ups and downs.
Why Use It?
Because it’s precise. It reacts to current temperature, past trends, and future predictions like a heat wizard!
What You’ll Need (Basic Parts List)
Best AI Startup Ideas for 2025: Ride the Next Big Wave in Tech
Must-Have Components:
- Arduino (Uno or Nano)

AI-Powered Freelancing: How to Use AI to Boost Your Freelance Hustle in 2025
- Thermocouple (like a MAX6675 + K-type)

Title: AI Automation for Businesses: How to Work Smarter, Not Harder
- SSR (Solid State Relay)

- 12V or 24V heater

- LCD Display

- Potentiometer or buttons (for setting target temperature)

- Power supply

Optional but Handy:
- Enclosure box
- Cooling fan
- Buzzer or LED indicator
How Does It Work?
The PID algorithm constantly compares the setpoint (your target temp) to the process variable (actual temp). It then adjusts the heater’s power to reach and hold the right temp.
Step-by-Step Build Guide
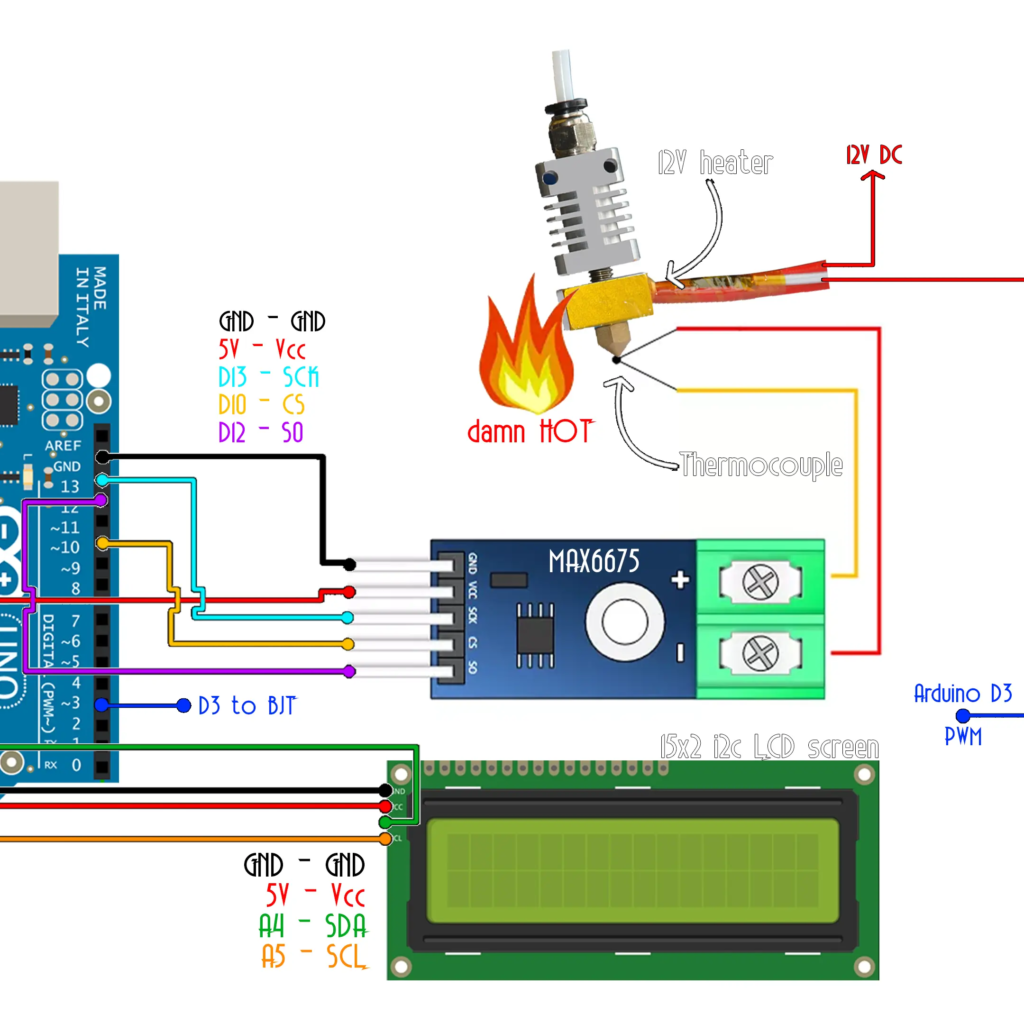
1. Wire Up the Hardware
Connect your thermocouple to the Arduino, hook up the SSR to the heater, and link the LCD for display.
2. Load the Code
Use the Arduino PID Library. There’s a ton of great code on GitHub. Tweak it for your heater and sensor.
3. Tweak the PID Values
Tuning the PID (Trial and Error, Baby!)
Start with basic values:
- P = 2
- I = 5
- D = 1
Now, tweak and test. If your temp overshoots, reduce P or D. If it takes too long, bump up I.
Safety First!
Use SSR Properly
Always respect voltage ratings and isolate AC from DC parts.
Temperature Limits
Add a max-temp safety cutoff to prevent overheating.
Testing the System
Let it run. Watch how fast it hits your target temp. Smooth climb? No wild swings? Then you’ve nailed it!
Real-Life Use Cases
- DIY reflow ovens
- Fermentation chambers
- Aquarium heaters
- Incubators
Bonus Tip: Add Wi-Fi!
Use an ESP8266 to monitor temps from your phone. That’s next-level DIY!
Conclusion: Control Like a Pro!
Building your own PID controller is like giving yourself superpowers over heat. It’s not rocket science but it feels close! Once you’ve built one, you’ll find a dozen uses for it. Go ahead tame the temperature beast!
FAQs
1. Can I use a Raspberry Pi instead of Arduino?
Yes! Raspberry Pi works too, especially for complex GUIs. But Arduino is simpler for real-time control.
2. What’s the best sensor for accuracy?
A K-type thermocouple with MAX6675 is reliable and easy to use with Arduino.
3. Why is my temperature overshooting?
Try lowering the P or D value. Overshoot often means your system is reacting too aggressively.
4. Can I control cooling systems with a PID?
Absolutely! Just reverse the logic like turning on a fan instead of a heater.
5. Is it okay to power everything from one supply?
Depends. Keep high-voltage parts separate from Arduino to avoid risk and noise.

