This blog post is about the design and construction of an obstacle avoidance robot that can detect obstacles in its path and find its way around it. This design is done with Arduino Uno and some robotic car chassis parts. Ensure you read until the end to get the full step-by-step instructions of how this was designed and built.
Obstacle Avoidance Robot: The Components and Materials Needed
| Components | Quantity |
|---|---|
| Arduino Uno | 1 |
| Ultrasonic sensor HC-SR04 | 1 |
| Motor Driver Shield | 1 |
| Servo Motor SG90 model | 1 |
| DC robotic Motor | 4 |
| Robotic Wheel | 4 |
| Chassis | 2 |
| LiPo Charging Module | 1 |
| LiPo Battery | 4 |
| LiPo Battery holder 4 battery rack | 1 |
| Wires | Assorted |
| Switch, button, gluestick and glue gun | 1 each |
Obstacle Avoidance Robot: The Schematic Diagram
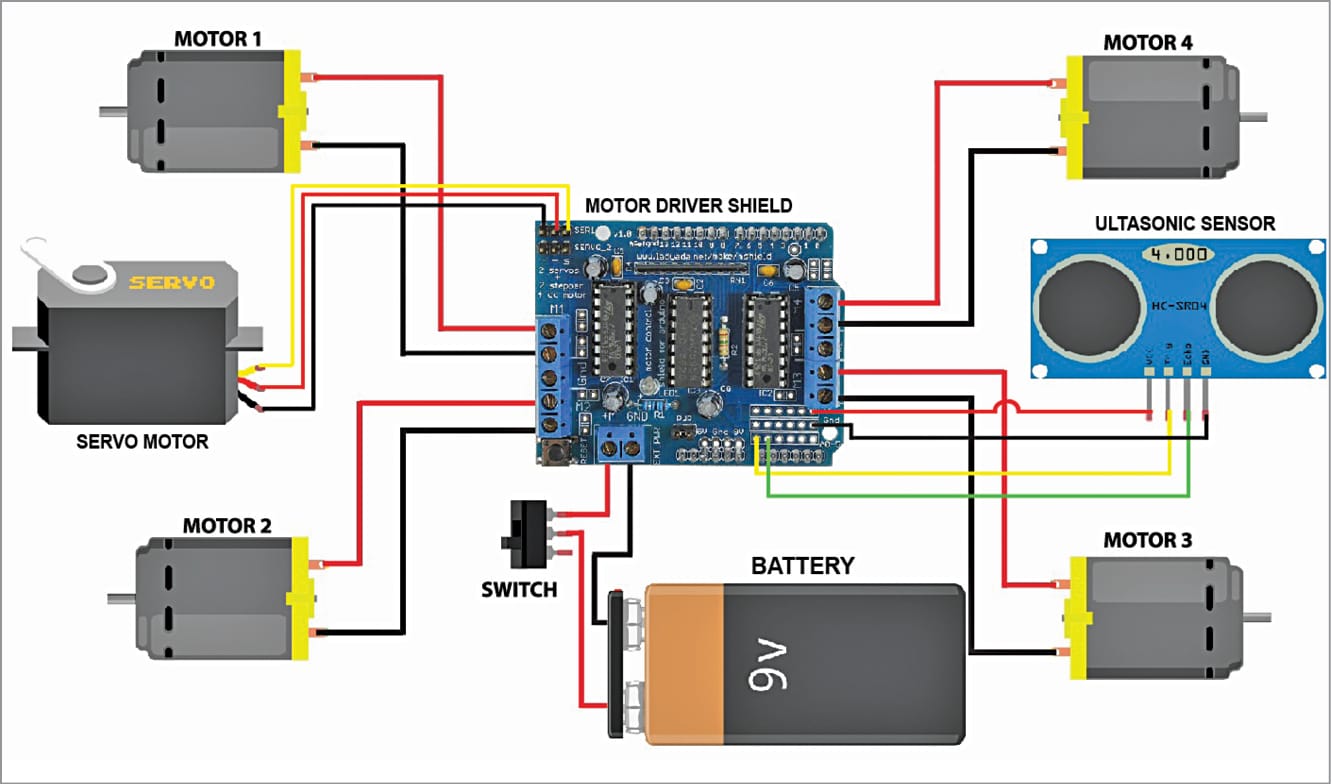
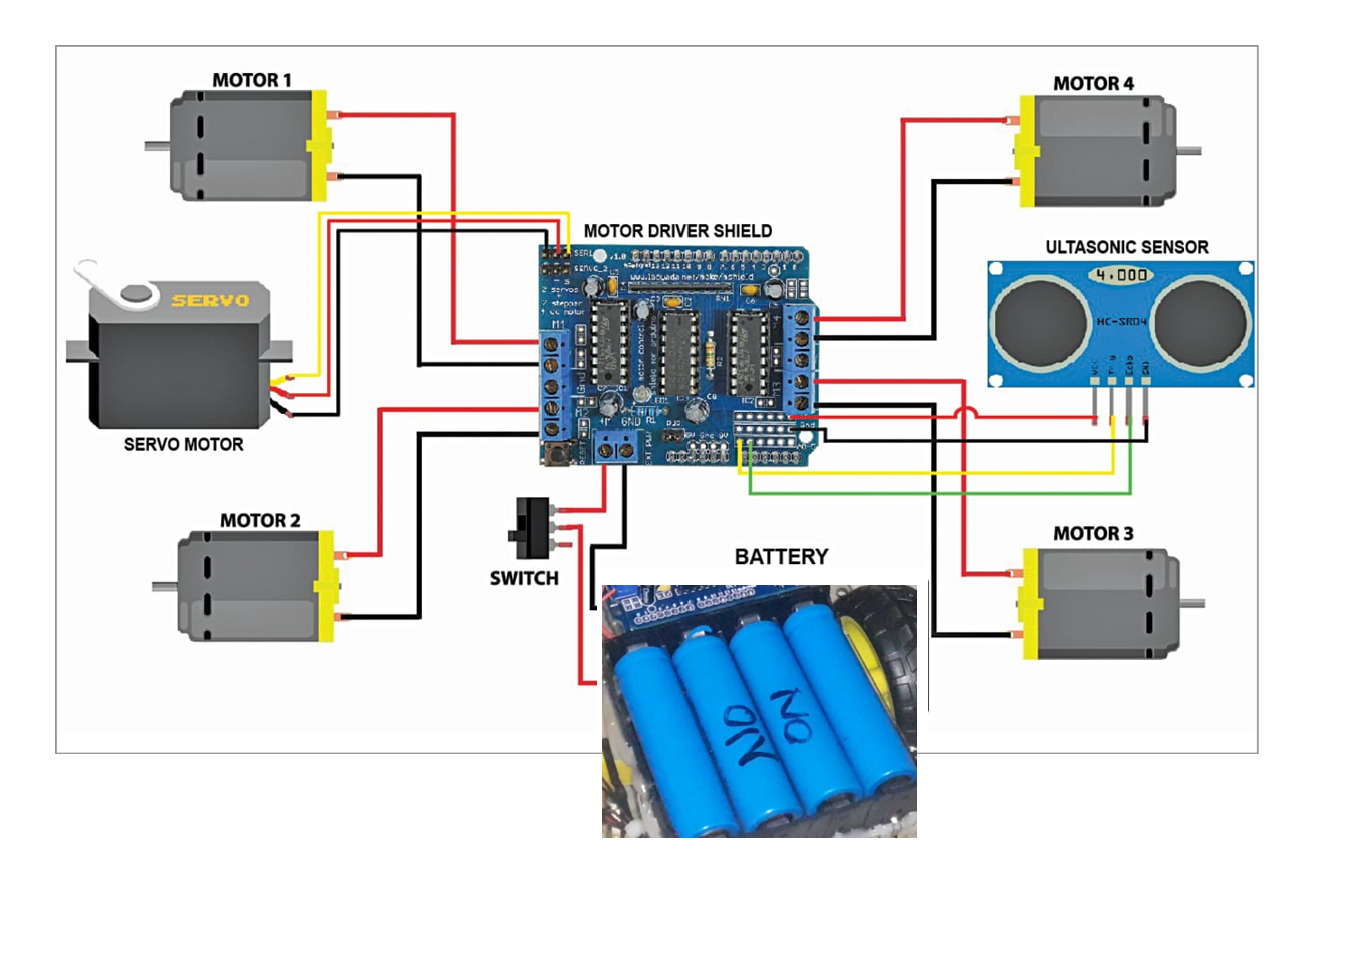
The above schematic diagram can be also found at the electronicsforyou website. The downside of this circuit diagram is that it doesn’t have a rechargeable battery and once the 9V battery power is depleted, you have to remove it and put another one. A modification of this circuit diagram is shown below.
Explanation Of Schematic Diagram
The schematic diagram uses the Arduino Uno ad the brain and development board for the project design. We used the Arduino motor driver shield. This supports DC motors, stepper motors, and also servo motor control. Since we will be controlling four (4) motors, the motor shield was the appropriate choice.
The motor shield just sits on the Arduino Uno board, making it very convenient. The ultrasonic sensor module helps us sense obstacles on the robot’s path. Whereas we used the switch to supply DC power into the system design. The servo motor is needed so that the robotic car can explore other view points that may not be obstructed. Hence, the ultrasonic sensor module is mounted on top of the servo motor gear.
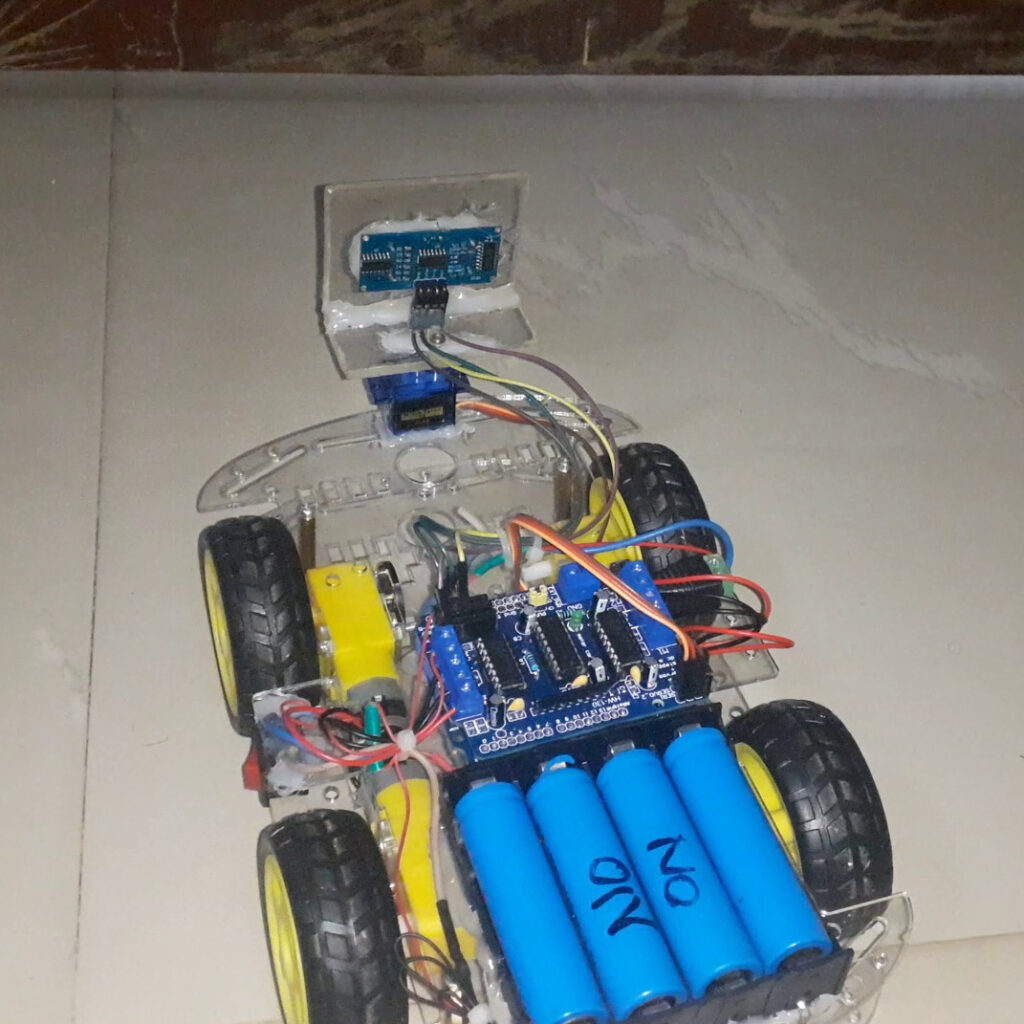
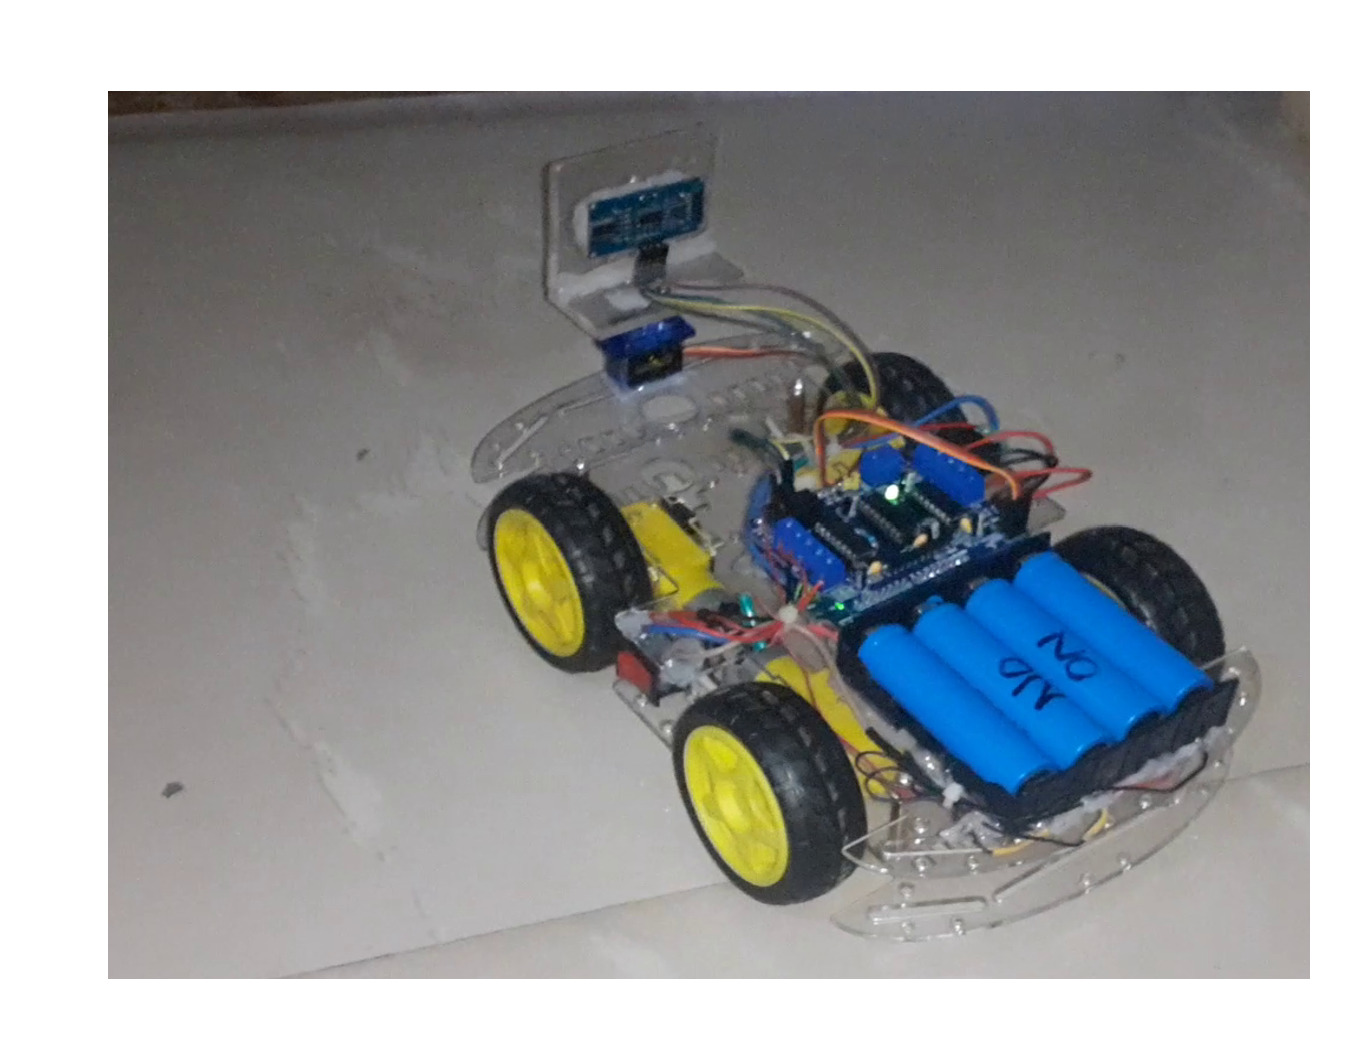
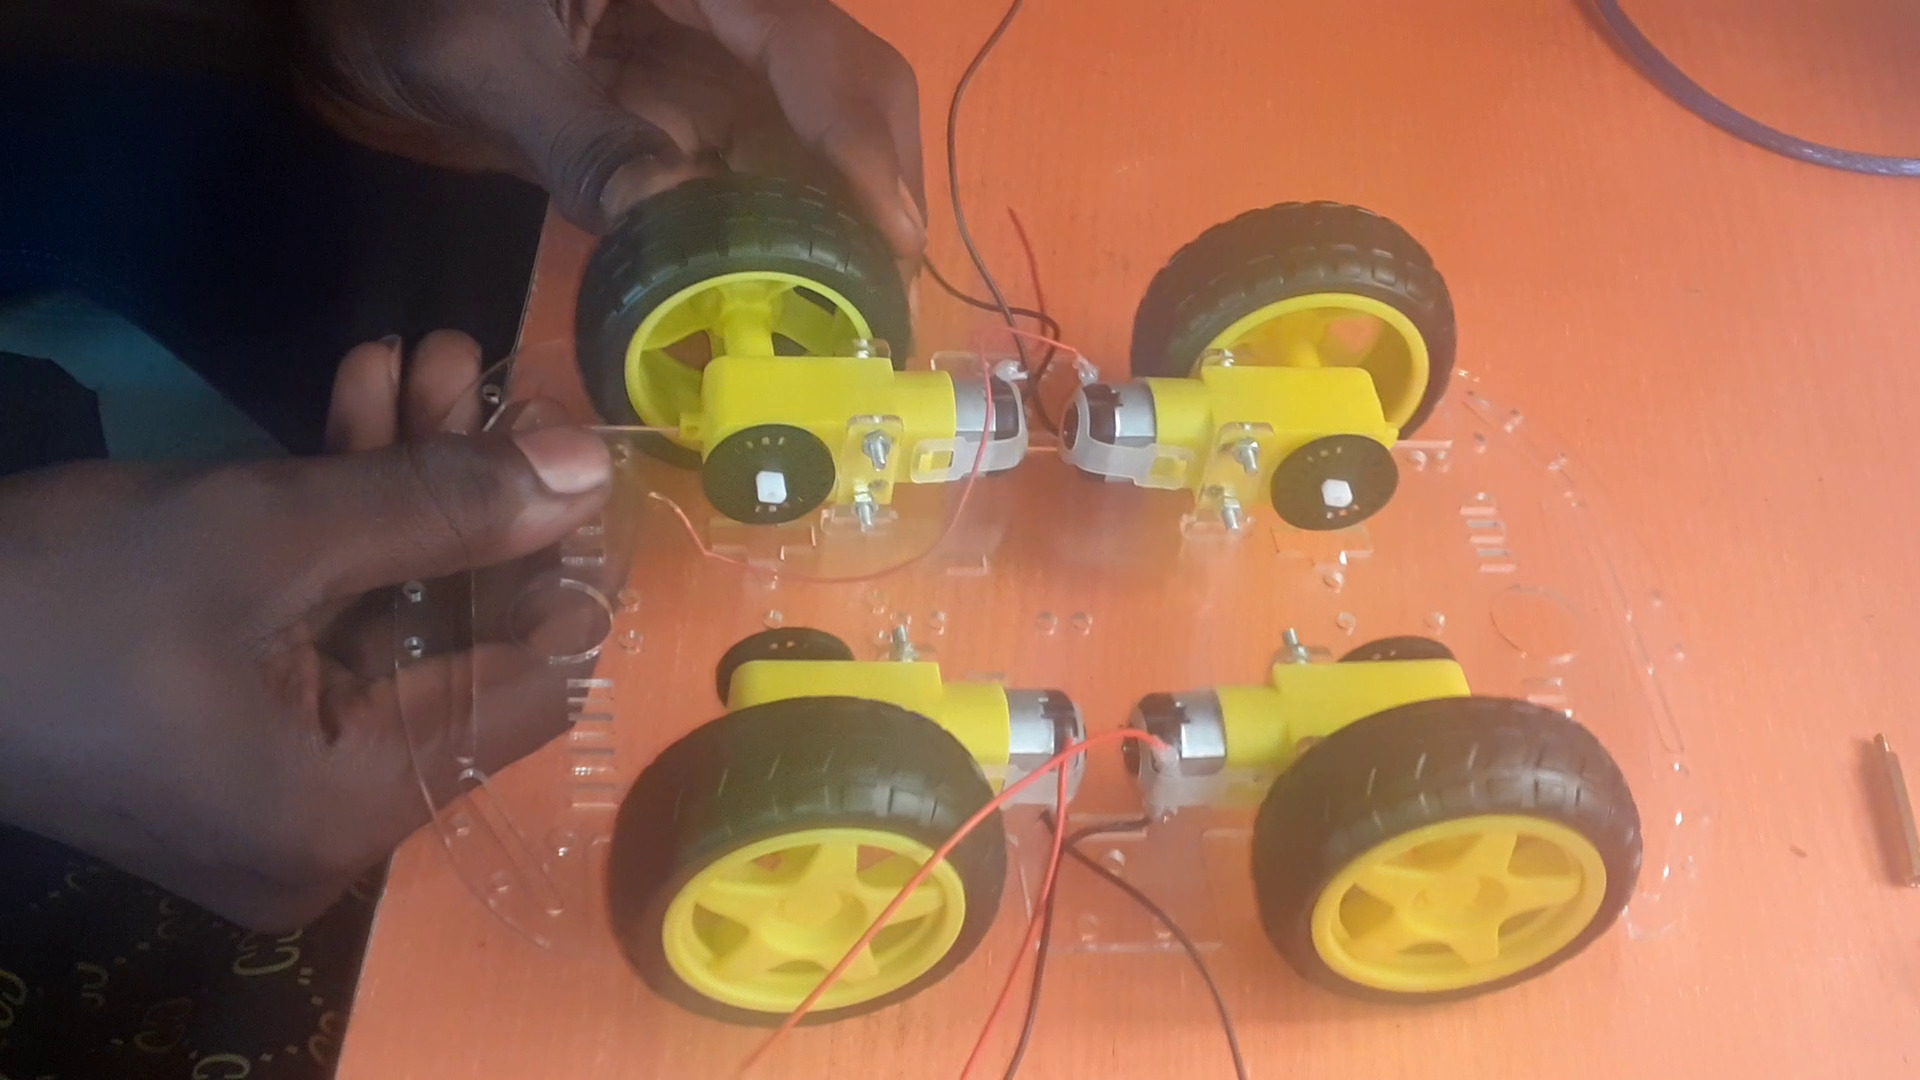
Assembling The Obstacle Avoidance Robot Together
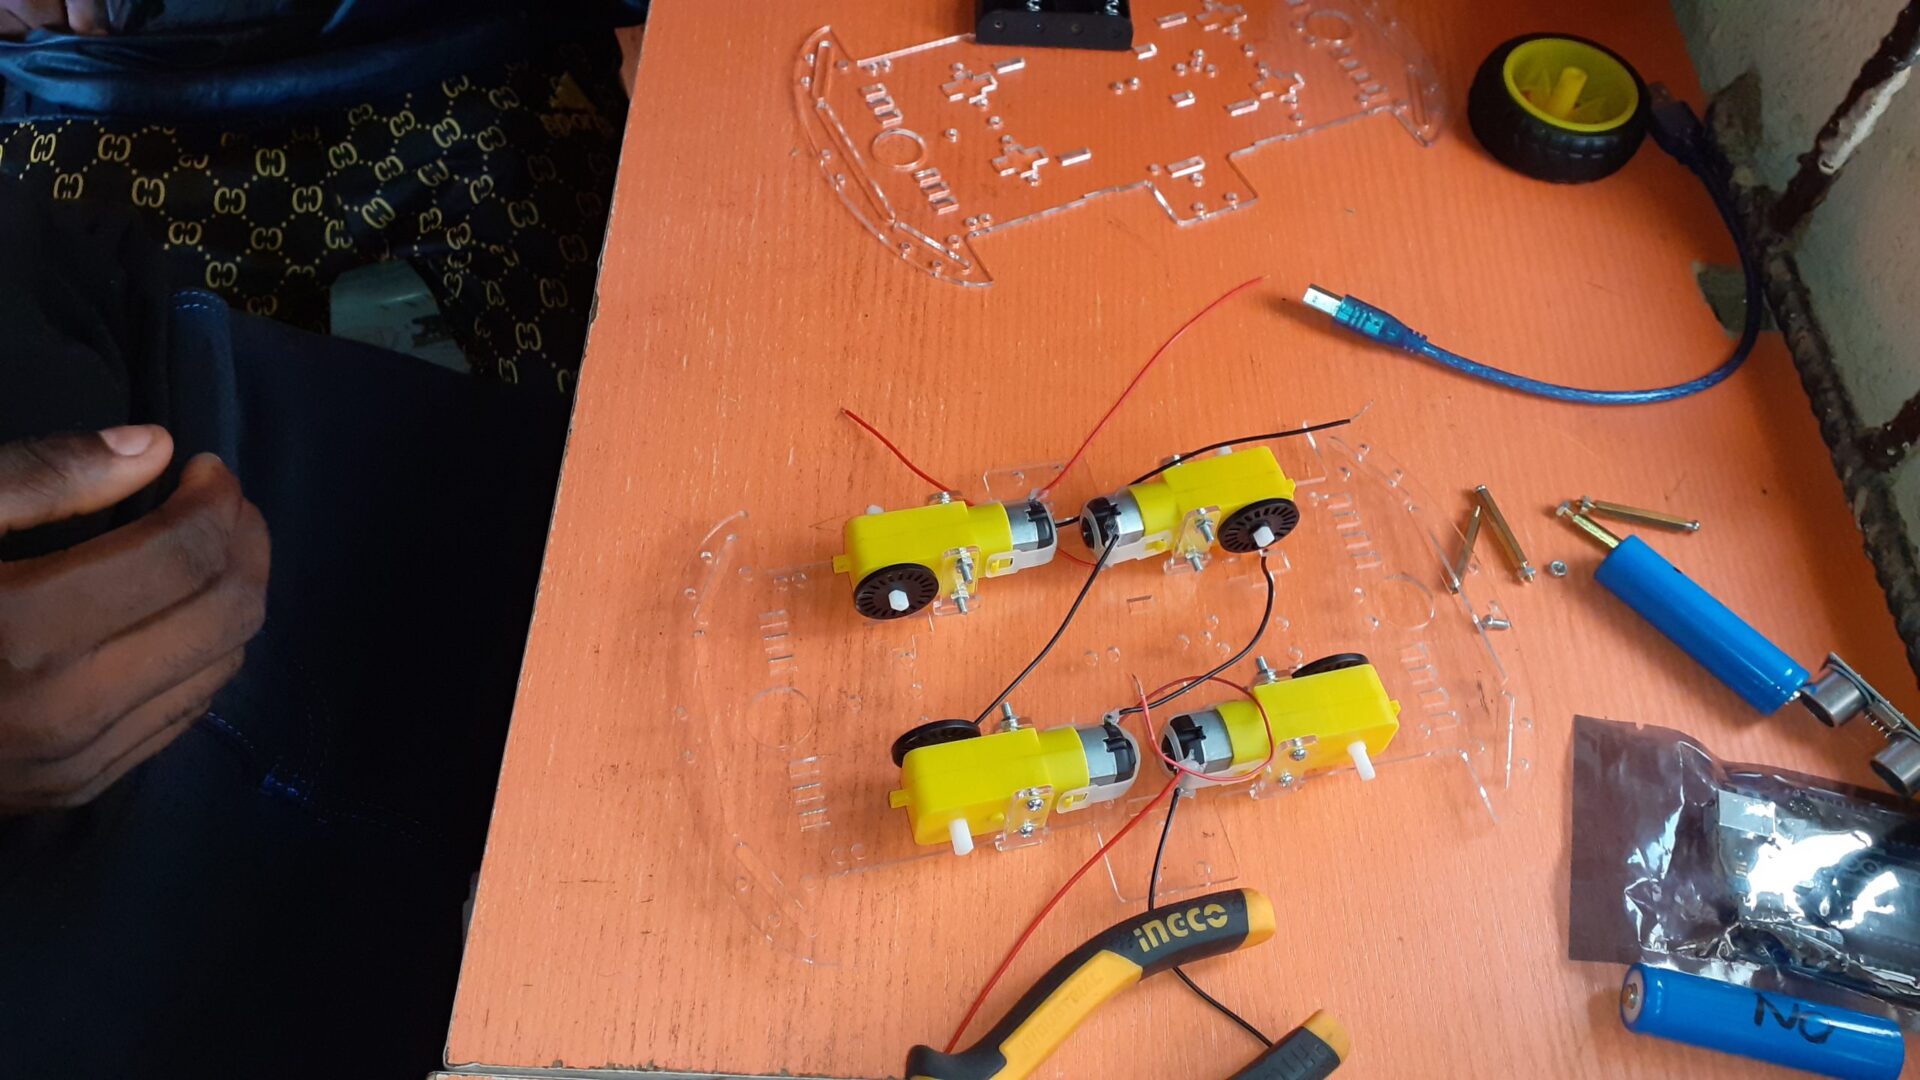
The robotic kit and its chassis were assembled as shown above. We removed all the robotic casing and assembled them using glue gun and gluestick solder. The robotic wheels were attached to the sides of the DC motor. Once this was done, it is time to connect the Arduino Uno and the motor shield together. The motor shield allowed us to make the same connections as we would using only the Arduino Uno, but it came with header pins so the connections were easier.
We used long nose plier to peel out the wires and soldered wires that need to be soldered. The LiPo batteries were aligned in a series connection with each battery outing a 4.2V at full charge and 3.7V at average. The resultant voltage was about 15V and the motor driver shield was able to use this voltage level.
Obstacle Avoidance Robot: The Arduino Source Code
#include <AFMotor.h>      //add Adafruit Motor Shield library
#include <Servo.h>        //add Servo Motor library

#define MAX_DISTANCE 60 // sets maximum useable sensor measuring distance to 60cm
#define MAX_SPEED 70 // sets speed of DC traction motors to 150/250 or about 70% of full speed - to get power drain down.
#define MAX_SPEED_OFFSET 20 // this sets offset to allow for differences between the two DC traction motors
#define COLL_DIST 30.00 // sets distance at which robot stops and reverses to 30cm
#define TURN_DIST COLL_DIST+20.00 // sets distance at which robot veers away from object

const int trigPin = 16; // Trigger Pin of Ultrasonic Sensor
const int echoPin = 17; // Echo Pin of Ultrasonic Sensor
long duration;
float distance;

AF_DCMotor leftMotor1(1, MOTOR12_1KHZ); // create motor #1 using M1 output on Motor Drive Shield, set to 1kHz PWM frequency
AF_DCMotor leftMotor2(2, MOTOR12_1KHZ); // create motor #2, using M2 output, set to 1kHz PWM frequency
AF_DCMotor rightMotor1(3, MOTOR34_1KHZ);// create motor #3, using M3 output, set to 1kHz PWM frequency
AF_DCMotor rightMotor2(4, MOTOR34_1KHZ);// create motor #4, using M4 output, set to 1kHz PWM frequency
Servo myservo;  // create servo object to control a servo

float leftDistance, rightDistance; //distances on either side
float curDist = 0.00;
String motorSet = "";
int speedSet = 0;

//-------------------------------------------- SETUP LOOP ----------------------------------------------------------------------------
void setup() {
  Serial.begin(9600);
  pinMode(trigPin, OUTPUT);
  pinMode(echoPin, INPUT);
  myservo.attach(10);  // attaches the servo on pin 10 (SERVO_1 on the Motor Drive Shield to the servo object
  myservo.write(90); // tells the servo to position at 90-degrees ie. facing forward.
  delay(2000); // delay for one seconds
 }
//------------------------------------------------------------------------------------------------------------------------------------

//---------------------------------------------MAIN LOOP ------------------------------------------------------------------------------
void loop() {
   myservo.write(90);  // move eyes forward
  delay(90);
  curDist = readPing();   // read distance
  if (curDist < COLL_DIST) {
    changePath();   // if forward is blocked change direction
    }
  moveForward();  // move forward
  delay(500);
 }
//-------------------------------------------------------------------------------------------------------------------------------------

void changePath() {
  moveStop();   // stop forward movement
  myservo.write(10);  // check distance to the right
    delay(500);
    rightDistance = readPing(); //set right distance
    delay(500);
    myservo.write(175);  // check distace to the left
    delay(700);
    leftDistance = readPing(); //set left distance
    delay(500);
    myservo.write(90); //return to center
    delay(100);
    compareDistance();
  }

  // find the longest distance
void compareDistance(){
//if left is less obstructed and more than 35cm
  if (leftDistance>rightDistance) {
    if(leftDistance > 35.00){
    turnLeft();
  }
  }

  //if right is less obstructed and above 35cm
  else if ((rightDistance>leftDistance) > 35.00) {
    turnRight();
  }

  //if they are equally obstructed
   else {
    turnAround();
  }
}


//-------------------------------------------------------------------------------------------------------------------------------------

int readPing() { // read the ultrasonic sensor distance
   digitalWrite(trigPin, LOW);
delayMicroseconds(2);
digitalWrite(trigPin, HIGH);
delayMicroseconds(10);
digitalWrite(trigPin, LOW);
duration = pulseIn(echoPin, HIGH);
distance = duration*0.034/2.0;
Serial.print("dist: ");
Serial.print(distance);
Serial.println(" cm");
//delay(300);
  return distance;
}

//-------------------------------------------------------------------------------------------------------------------------------------
void moveStop() {
  // stop the motors.
  leftMotor1.run(RELEASE);
  leftMotor2.run(RELEASE);
  rightMotor1.run(RELEASE);
  rightMotor2.run(RELEASE);
  }

//-------------------------------------------------------------------------------------------------------------------------------------
void moveForward() {
  Serial.println("MOVING FORWARD!");
    motorSet = "FORWARD";
    leftMotor1.run(FORWARD);      // turn it on going forward
    leftMotor2.run(FORWARD);      // turn it on going forward
    rightMotor1.run(FORWARD);     // turn it on going forward
    rightMotor2.run(FORWARD);     // turn it on going forward
  for (speedSet = 0; speedSet < MAX_SPEED; speedSet +=2)   {
    leftMotor1.setSpeed(speedSet);   // slowly bring the speed up to avoid loading down the batteries too quickly
    leftMotor2.setSpeed(speedSet);
    rightMotor1.setSpeed(speedSet);
    rightMotor2.setSpeed(speedSet);
    delay(5);
  }
}

//-------------------------------------------------------------------------------------------------------------------------------------
void moveBackward() {
  Serial.println("MOVING BACKWARD!");
    motorSet = "BACKWARD";
    leftMotor1.run(BACKWARD);     // turn it on going backward
    leftMotor2.run(BACKWARD);     // turn it on going backward
    rightMotor1.run(BACKWARD);    // turn it on going backward
    rightMotor2.run(BACKWARD);    // turn it on going backward
  for (speedSet = 0; speedSet < MAX_SPEED; speedSet +=2) // slowly bring the speed up to avoid loading down the batteries too quickly
  {
    leftMotor1.setSpeed(speedSet);
    leftMotor2.setSpeed(speedSet);
    rightMotor1.setSpeed(speedSet);
    rightMotor2.setSpeed(speedSet);
    delay(5);
  }
}
//-------------------------------------------------------------------------------------------------------------------------------------
void turnLeft() {
  Serial.println("MOVING LEFT!");
  motorSet = "LEFT";
  leftMotor1.run(FORWARD);      // turn motor 1 forward
  leftMotor2.run(FORWARD);      // turn motor 2 forward
  rightMotor1.run(BACKWARD);    // turn motor 3 backward
  rightMotor2.run(BACKWARD);    // turn motor 4 backward
  rightMotor1.setSpeed(speedSet+MAX_SPEED_OFFSET);
  rightMotor2.setSpeed(speedSet+MAX_SPEED_OFFSET);
  delay(500); // run motors this way for 1500
  motorSet = "FORWARD";
  leftMotor1.run(FORWARD);      // set both motors back to forward
  leftMotor2.run(FORWARD);
  rightMotor1.run(FORWARD);
  rightMotor2.run(FORWARD);
}
//-------------------------------------------------------------------------------------------------------------------------------------
void turnRight() {
  Serial.println("MOVING RIGHT!");
  motorSet = "RIGHT";
  leftMotor1.run(BACKWARD);      // turn motor 1 backward
  leftMotor2.run(BACKWARD);      // turn motor 2 backward
  leftMotor1.setSpeed(speedSet+MAX_SPEED_OFFSET);
  leftMotor2.setSpeed(speedSet+MAX_SPEED_OFFSET);
  rightMotor1.run(FORWARD);     // turn motor 3 forward
  rightMotor2.run(FORWARD);     // turn motor 4 forward
  delay(500); // run motors this way for 1500
  motorSet = "FORWARD";
  leftMotor1.run(FORWARD);      // turn it on going forward
  leftMotor2.run(FORWARD);      // turn it on going forward
  rightMotor1.run(FORWARD);     // turn it on going forward
  rightMotor2.run(FORWARD);     // turn it on going forward
}
//-------------------------------------------------------------------------------------------------------------------------------------
void turnAround() {
  Serial.println("MOVING AROUND!");
  motorSet = "RIGHT";
  leftMotor1.run(FORWARD);      // turn motor 1 forward
  leftMotor2.run(FORWARD);      // turn motor 2 forward
  rightMotor1.run(BACKWARD);    // turn motor 3 backward
  rightMotor2.run(BACKWARD);    // turn motor 4 backward
  rightMotor1.setSpeed(speedSet+MAX_SPEED_OFFSET);
  rightMotor2.setSpeed(speedSet+MAX_SPEED_OFFSET);
  delay(1700); // run motors this way for 1700
  motorSet = "FORWARD";
  leftMotor1.run(FORWARD);      // set both motors back to forward
  leftMotor2.run(FORWARD);
  rightMotor1.run(FORWARD);
  rightMotor2.run(FORWARD);
}
Explanation of Arduino Sketch
The Arduino sketch written for the obstacle avoidance robot project has a lot of comment lines to explain what each line of code means. However, the source code made use of two importation of libraries: the Adafruit library and the servo motor library.
Testing The Project Design
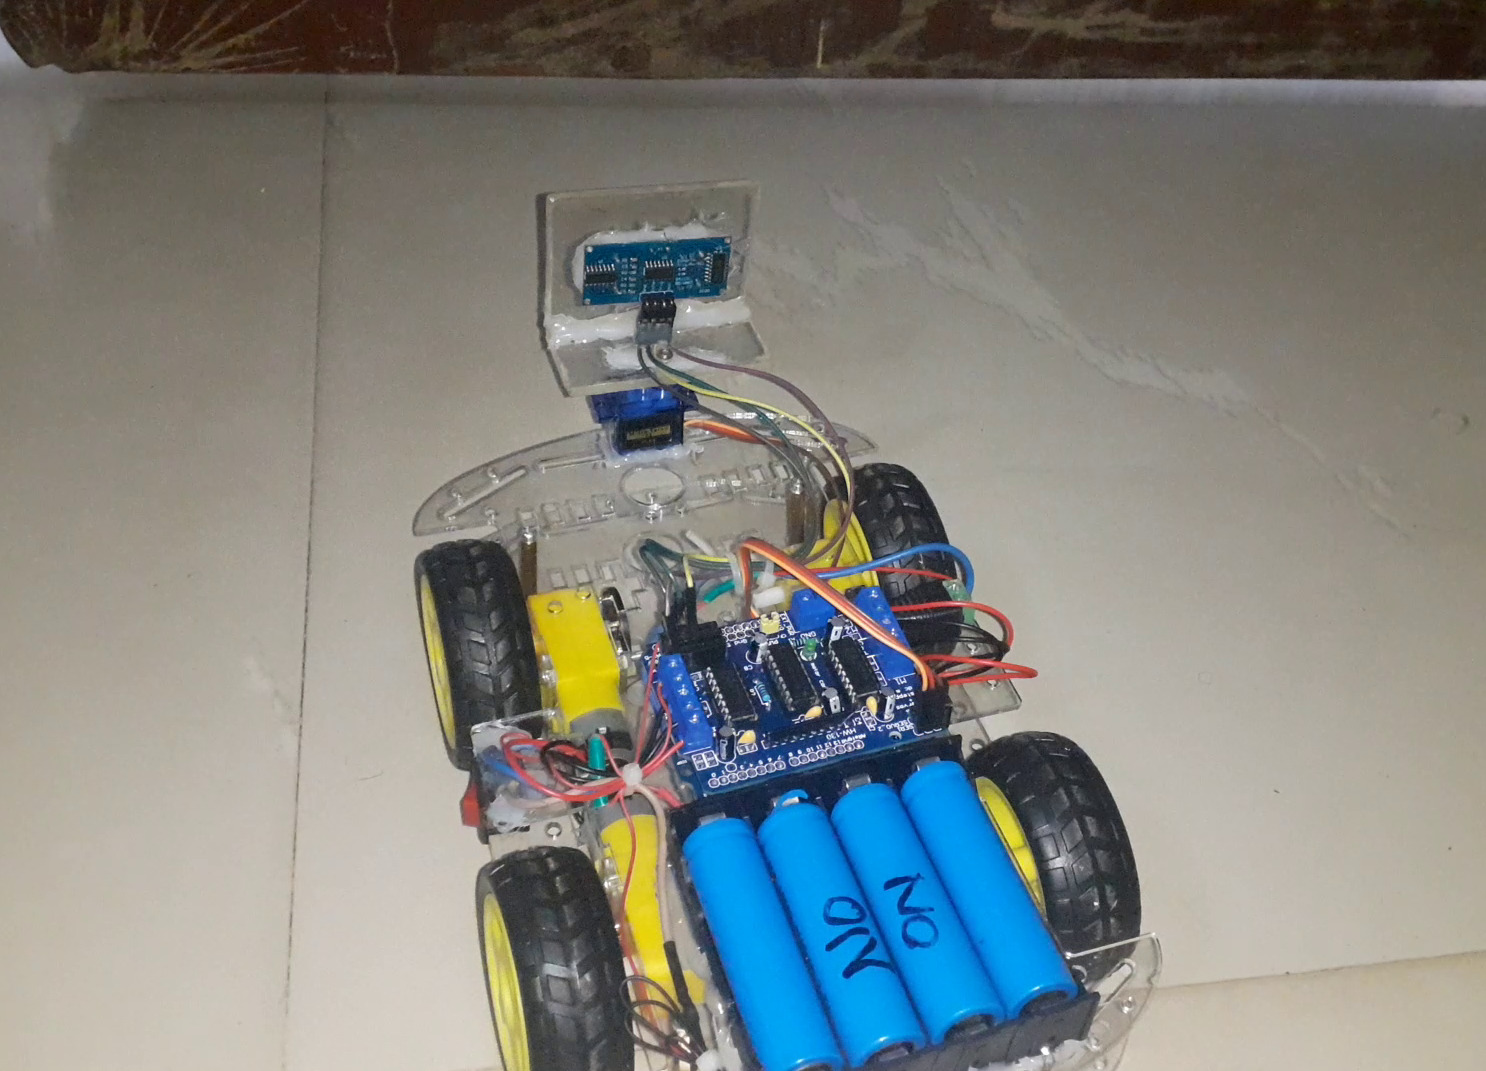
The project design worked as expected. It was able to detect obstacles and navigate around them by following or taking the path that doesn’t have such obstacle. When the obstacle avoidance robot approaches a wall, it was a “U” turn and retraces its footsteps. The robot is smart enough to move on its own without human guidance.
Conclusion
We have designed, programmed and constructed an obstacle avoidance robotic car that has high degree of accuracy. It can detect any obstacle along its path and turn away from it or go around it. The project design was impressive and we think it is worth taking a shot at.

